The Oven has baked its last loaf. This blog is no longer being updated.

My cooking videos appear at youtube.com/janeragavan

I write on food at star2.com

Daring Bakers: Decorated Sugar Cookies

Monday, September 27, 2010

Decorated sugar cookies
This challenge had me stumped. When I first read what we Daring Bakers had to do, I was delighted. Here's the brief:

The September 2010 Daring Bakers’ challenge was hosted by Mandy of What the Fruitcake?! Mandy challenged everyone to make Decorated Sugar Cookies based on recipes from Peggy Porschen and The Joy of Baking.

But as I read the instructions further, I began to wonder. The theme was "September" and the decoration for the sugar cookies would be related to whatever September meant to us (for the full recipe, click here).

September means the start of school for some people, and the fall or spring season depending on which hemisphere you live in. Of course, if you live within the equatorial belt, it's just dry and wet, neither of which should be the feature of any cookie. Say the word "September" and the first thing that comes to my mind is Earth, Wind and Fire's song of that name! Base my cookies on September? Err... take a look at the lyrics and see if you could come up with something appropriate.

But I only needed to look at some of the finished cookies posted on the Daring Baker's forum to get a push (you can view them here). This really is my first attempt at decorating sugar cookies with royal icing so I told myself to keep it simple. I had got a set of alphabet cutters on my last visit to the baking supply shop, and I like words, so that seemed a good way to go.

Time for T(ea)
I just didn't reckon on how difficult it would be to get the dough out of the cutters! They aren't very big and even though I floured the cutters well, I still needed to push the alphabets out with a chopstick. And washing the cutters afterwards was a pain as well because the dough got into all the tiny holes! I didn't do a very good job at icing either.

But despite what seems like complaining, I actually got into this activity and rather enjoyed it. It's leisurely and you get to be as creative as you want. I can see how a person could get hooked. No doubt Mandy, who came up with the challenge, knew this would happen.

The date of this post, Sept 27, coincides with the Husband leaving for Oxford University to start his PhD. Since I won't be there with him, I've left him a message (right). The pastels don't make the cookies very manly, but he gets the drift... (Don't you, dear?)

Mighty mung bean

Friday, September 24, 2010

Vegetable mung bean griddle cakes
Mung beans are fantastic. Why am I only just realising this?

Mung beans come in all manner of dishes ­­­­– they appear in Chinese dishes like ang ku, and in Indian idli, both favourites of mine – and yet I have only just come to think about their role in a particular food item.
Perhaps because they're so small and unassuming. With their green skins on, they stand out among the other legumes on the shelf, but split and skinless, I wouldn't be able to say what they were if not for the label on the packaging. But they're certainly not to be underestimated.

It was after I made Tepung Gomak, which has a filling of mashed mung beans and grated coconut, that I realised how much I actually like mung beans. Having some beans left over from that recipe, I added them, mashed, to a pancake batter together with some vegetables and fried them on a griddle. I enjoyed the texture very much and there's a certain roundness to the taste that you don't get with just flour, milk and eggs.

This griddle cake is based loosely on the Korean Bindaetteok, a pancake comprising mung bean and kimchi (here's a link to a recipe). I substituted the kimchi with cooked cabbage and pickled carrots­­ – the type that comes in a Bánh Mì, the Vietnamese sandwich ­­– because Hungry Caterpillar (whose birthday happens to fall today. Happy Birthday Ivy!) had given me some, but of course any vegetable is fine. 

MUNG BEAN GRIDDLE CAKES WITH VEGETABLES
Makes 6-10 cakes (7cm in diameter), depending on thickness

½ cup split mung beans, soaked in cold water overnight
½-¾ cup water
1 egg
Salt and freshly ground black pepper, to taste
A pinch of chilli powder or cayenne pepper
2-3 tablespoons all-purpose flour
Cooking oil
1 clove garlic, minced
1 cup finely shredded cabbage
1 cup pickled carrots or finely shredded fresh carrots
Soy sauce, to taste

Equipment
Egg rings, optional
  • Rinse the mung beans and place in a saucepan; cover with fresh water. Bring to the boil, then simmer until beans are soft; drain. Process the beans with the egg and seasonings until smooth. Remove to a large bowl and whisk in flour. Stir in enough water to form a thick batter. Cover and set aside for 30 minutes.
  • Heat a little cooking oil and sauté the garlic. Add cabbage and fresh carrots, if using, and sauté until tender. Season with soy sauce. Remove from pan and leave to cool. Stir cooked vegetables and/or pickled carrots into the batter. 
  • Heat a griddle pan and coat the base with a little cooking oil. If using egg rings, grease the inside rim and place into the pan. Spoon the batter into the rings or make small rounds. Cook until golden brown on both sides. If cakes are browning too quickly, turn the heat down.
  • Serve hot or cold, plain, with chutney or a dipping sauce.
PRINTABLE RECIPE

Bread bulletin: Hot and corny

Wednesday, September 15, 2010

Jalapeño and corn loaf
This bread is hot! I don't mean stolen, angry, popular or having a high temperature, although it is fresh and a success. No, I'm talking about the burn-the-skin-off-your-tongue kind of heat that comes from chillies!


My chakras must have been aligned and all that good energy worked its way out of my fingers into the dough when I was kneading it because this bread turned out very well. Only thing is, there are a few too many chillies in it.

Even for my highly-tolerant palate, the heat is a bit much. Ten (yes, 10!) shrivelled jalapeño peppers don't look like much after they're roasted, skinned and chopped, but they can still hurt you. And even if you can take the heat, it can overwhelm the bread and take over. I gave some to Veggie Chick, and she breathed fire too.

We decided the heat could be tempered with a soup. And I spread Marmite and cream cheese over a slice and that was perfect. It is just too powerful to eat on its own. If a coyote with the voice of Johnny Cash starts offering me spiritual guidance, I'll start worrying.

Green heat and multi-coloured beads
The corn in the bread's name is in the form of kernels. I used dried multi-coloured corn kernels ­­– in orange, yellow and purple ­­– and cooked them in a slow cooker for a few hours to soften. I thought they would add a brilliant palette to the bread but as you can see, they didn't exactly keep their colour. Using frozen or fresh corn should be just fine and much easier.

I used Daniel Steven's baking advice from The River Cottage Bread Handbookand got a lovely crusty top. The crumb was pleasantly soft, although I would have liked it to be slightly more chewy. Experienced bakers will of course have their own techniques to achieve the kind of loaf they like.

I am submitting this to YeastSpotting.

JALAPEÑO AND CORN LOAF
Makes 1 loaf

2-4 jalapeño peppers (depending on heat), washed and dried
¼ cup dried corn kernels*, soaked overnight
1¼ cups organic bread flour
¾ cup organic whole-wheat flour
1 tablespoon milk powder
½ teaspoon salt
1 tablespoon honey
3 tablespoons butter
½ teaspoon instant yeast
1 cup warm boiled water, approximate
Fine cornmeal
  • Turn on the oven grill to high. Cut the peppers in half and remove the seeds. Place them in a baking tray, cut side down and place under the grill. When the skin has blistered and turned black, remove them and place in a bowl; cover the bowl to allow the peppers to sweat. When cool enough to handle, remove skin. Chop up the peppers.
  • Place corn kernels in a medium saucepan and cover with water. Bring to the boil, then simmer until kernels are soft. Alternatively, cook in a slow cooker. Set aside to cool.
    * Use frozen or fresh kernels if desired. You will need about half a cup.
  • In a large mixing bowl, combine both flours, milk powder and salt. Add honey and butter and rub into the dry ingredients. Stir in yeast.
  • Pour in almost all the water and bring ingredients together. Add more water if necessary until a soft but moist ball of dough is formed. Leave in the bowl, covered with a tea towel, for about 10 minutes.
  • Knead dough on a work surface, using a plastic dough scraper to help shift the dough so that you do not add too much extra flour. If the dough gets too sticky, form into a rough ball and allow to rest for 5-10 minutes, then knead again until dough is springy, about 10 minutes, and passes the windowpane test
  • Now it's time to incorporate the chopped peppers and corn kernels. Stretch the dough out on the work surface; scatter the ingredients over the dough then fold, roll and knead briefly to incorporate them. Form dough into a ball and place in a greased bowl; cover with a tea towel and leave to double in size.
  • 45 minutes before baking, turn on the oven to 250°C. Place a heavy baking pan in the bottom of the oven. Deflate the dough and form into a stubby cylinder. Place on a baking tray dusted with cornmeal. Cover with a tea towel and allow to rise.
  • Have some freshly boiled water ready. Make three deep diagonal slashes on the top of the dough; brush or squirt with water and sprinkle with cornmeal. Place dough in the oven, pour the hot water into the baking pan in the bottom of the oven to create steam. Shut the door and leave for 10 minutes before turning down the oven to 190°C. Bake for a further 30-35 minutes.
  • Remove from oven and cool on a wire rack.
PRINTABLE RECIPE
The greenish parts on the crust (in the foreground) are the jalapeños

Dishy Arabian nights

Sunday, September 12, 2010

Scheherazade's dinner
Selamat Hari Raya Aidil Fitri! Happy Eid to my Muslim friends! I know these good wishes come a couple of days late but would you want to read a blog post when you're celebrating? I didn't think so.


But in contrast with my tardiness with my greetings, I'm early with this posting. It's supposed to come out tomorrow since it's an extension of my review of the recipe book Everything Rice & Nice (2010, Marshall-Cavendish) by Chef Zam (for the link to the published newspaper page, will be up tomorrow click here). For the review, I tested his recipes for Egg Rice Terengganu-style (it has beef meat and liver, and the eggs are cooked in a particular way) and Lor Mai Kai (glutinous rice with chicken and mushrooms).

For the extra recipe, I decided to feature Chef Zam's Spiced Arabian Rice. Why? Because it's a nice recipe to have. Okay, the truth is I already had a picture and it would save me the trouble of cooking the dish! I know, lazy bum...

Well, when I saw the picture of the Arabian rice in the book, I thought it looked like the barberry rice which I cooked for Don't Call Me Chef in October 2009 ("1,001 bites"; I prepared sumac chicken to go with the rice). My recipe is quite different, and perhaps you would like to compare.

SPICED ARABIAN RICE
From Everything Rice & Nice by Chef Zam
Serves 4-6

8 chicken drumsticks, skinned and cleaned
5 shallots, peeled and pounded
3 cloves garlic, peeled and coarsely pounded
2.5cm knob ginger, peeled and coarsely pounded
½ teaspoon fennel seeds
½ teaspoon cumin seeds
3 cardamom pods
3 star anise
2 cinnamon sticks, 5cm lengths each
½ tablespoon black peppercorns
1 chicken stock cube
2 tablespoons kurma powder
1.25 litres water
Salt and sugar to taste
2 tablespoons ghee (clarified butter)
½ onion, peeled and sliced
125ml tomato purée/sauce
600g basmati rice, soaked for 20 minutes and drained
1 sprig mint
1 tablespoon barberries
  • In a pot, combine chicken, shallots, garlic, ginger, fennel, cumin, cardamom pods, star anise, cinnamon, black peppercorns, chicken stock cube, kurma powder, water, salt and sugar. Bring to the boil, then simmer until chicken is tender. Remove chicken from the broth.
  • Strain spices and pounded ingredients from the broth and blend until fine with 250ml of the broth. Set aside.
  • Heat ghee in a wok and add sliced onion. Sauté onion until soft. Add blended ingredients and sauté for a few minutes.
  • Add 750ml of broth, tomato purée/sauce, salt and sugar to taste. Bring to the boil and set aside.
  • Put basmati rice into a rice pot/cooker and top with a layer of chicken. Continue alternating layers of rice and chicken until all the ingredients are used up.
  • Pour broth mixture into the pot and cook rice, covered, until done.
  • Garnish with mint leaves and barberries before serving. Add crisp-fried shallots if desired.
PRINTABLE RECIPE

Mince and rat's tail noodles

Wednesday, September 8, 2010

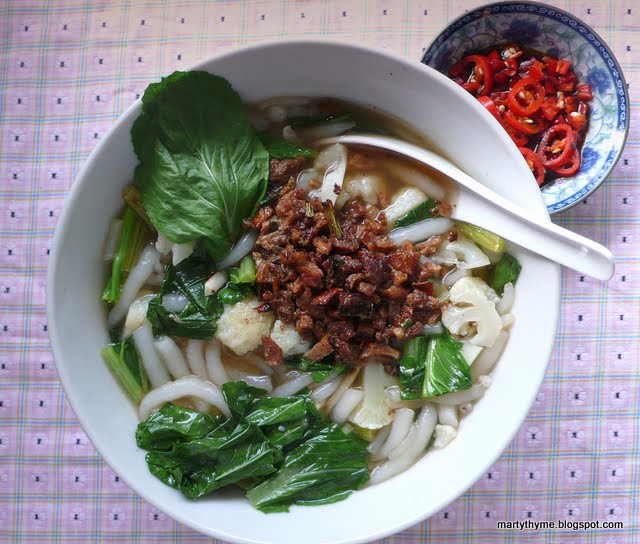
Minced beef with loh shi fun
Oh no no, don't misread the title of this post. That's mince AND rat's tails noodles. The noodles are called that in Chinese – loh shi fun – because of their shape: short and fat and resembling a rodent's end zone.


This is the first time I am cooking with the rice noodle, and it also happens to be the first time I am eating it!

I've seen it prepared by hawkers, but have never been persuaded to eat it, preferring instead to have the more conventional kueh teow or yellow mee. It isn't a prejudice; I just never thought about it.

At my neighbourhood grocers the other day, it was there along with the other noodles and I thought, why not? I was in the mood for a soup and I could use it and see what happens.

And now, I think I'm in love with this noodle.

It's so easy to eat! I have no problem using chopsticks but because these noodles are short, I can just use a Chinese soup spoon while I sit in front of the TV ­­– no spillover, splashes or mess, and I get a few noodles, the condiments and the all-important broth all in one scoop.

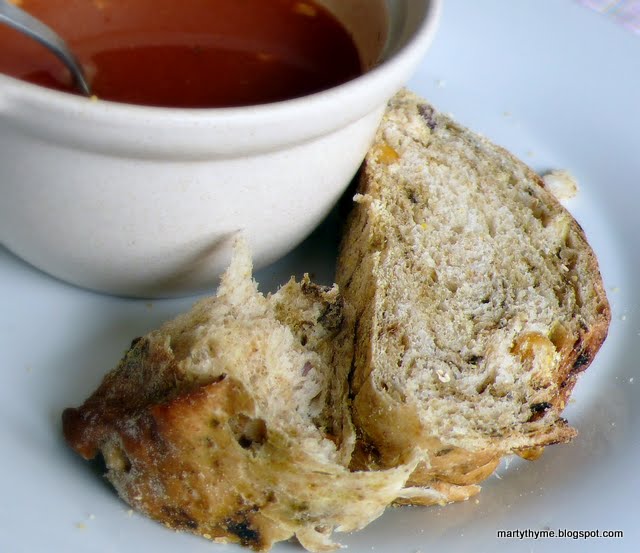
The broth I made for the following recipe was nothing out of the ordinary – a spoonful of stock concentrate added to water to get chicken-flavoured soup. I made it special for myself with hot minced beef.

Because I used only a small amount of meat, and it was left over from a dish I had to prepare for a cookbook review, I minced it up myself by hand. When I was little, I remember how my maternal great uncle used to mince great hunks of meat on special days when he fed a large crowd. He was a headmaster but was the most fantastic cook. He lived next door to us, in one compound, so when we knew he was cooking his amazing curry mee or braised pork slices with yam, we would eagerly wait for him to holler from across the hedge, "Makan!" and we would all scoot over.

It was fascinating to watch Great Uncle Ben mince meat. He would put a slab of pork or beef on one of those thick wooden chopping blocks cut from a tree trunk, slice them using a cleaver, and tenderise them first using  the dull edge of the knife. Next, he would pound away as he flattened the meat into one lean layer. Then he would fold one side of the meat layer onto itself, slide the knife blade beneath it, deftly give it a quarter turn and then on with more chopping, repeating the process until he got the mince as fine as he needed.

LOH SHI FUN SOUP WITH SPICY MINCED MEAT Serves 2

100g loh shi fun
2 teaspoon sesame oil
600ml water
1 tablespoon chicken stock concentrate
1 large clove garlic, thinly sliced
100g vegetables (mustard green, cauliflower, beans etc), cut into small pieces
Cooking oil
Sliced red chillies and soy sauce 

Minced meat
100g meat (beef, pork or chicken), cubed
1 small shallot, chopped
1 tablespoon thick soy sauce
Large pinch of chilli flakes
Freshly ground black pepper
1 teaspoon sesame oil
Soy sauce to taste
  • Mix loh shi fun noodles with thick soy sauce and sesame oil; set aside.
  • Prepare the mince. Place the cubes of meat on a cutting board; using a cleaver or heavy chef's knife, mince the meat coarsely (do this manually so you don't get finely ground meat). Spread the mince out on the board and sprinkle with the chopped shallot, thick soy sauce, chilli flakes and black pepper to taste. Drizzle with sesame oil and soy sauce. Fold the meat onto itself and continue chopping, incorporating the seasonings. Place meat in a bowl and set aside for 10 minutes.
  • In a saucepan, heat 2 tablespoons cooking oil over medium high heat and then add meat. Cook until the meat is brown and crisp, 3-5 minutes. Remove meat and set aside.
  • Add more oil to the pan if necessary and fry the garlic until lightly browned. Add water and stock concentrate (or use real stock if desired) and bring to the boil. Add vegetables and cook until softened, then add noodles. Season to taste. Pour into bowls; garnish with the minced meat and serve immediately with sliced red chillies and soy sauce.
PRINTABLE RECIPE

Malay kuih from the old days

Sunday, September 5, 2010

Boarding school tea cakes
This kuih may not be the prettiest thing you've seen but I love it for the taste and because it reminds me so much of my childhood, especially the seven years I spent in fully residential school (boarding school).


It's called Tepung Gomak. The filling is made of mung beans (the greenish tinge is the result of the green skin of the bean), grated coconut and sugar. It is encased in a dough made simply from glutinous rice flour and water. The patty is cooked by poaching and then rolled in mung bean flour.

When I saw this recipe in Norzailina Nordin's cookbook Bite Size: A Collection of Traditional Malay Treats (2009, Marshall-Cavendish, RM39.90), I got quite excited. It's not a Malay tea cake that I have seen since my girlhood in Perlis (the northernmost state in Peninsular Malaysia). Actually, there are quite a number of kuih in the book that I only remember having when I was young and which I can no longer find nowadays.

One of my classmates used to sell Sagon, a simple mixture of toasted grated coconut, rice flour and sugar. After the weekends she spent at home in her kampung, she would bring back Sagon ­­– think of it as Asian trail mix ­­– in little cone packets made from newspaper that she sold for 20 sen each. While we easily get rice flour nowadays, at the time, her mother would pound husked rice in a lesung tangan, one of those huge wooden mortars that sits on the ground and comes with an equally huge pestle ­­– pounding was usually a two-person job and they would do it in rhythm; one pestle would go in and as it was lifted out, the other one would go in, and so on. Very efficient. (For pictures, go to this website.)

I featured Pulut Serunding for this month's Don't Call Me Chef (see tab above; the link to the published document will be up soon is now up ­­– click here) since the theme was a celebration of Hari Raya Aidil Fitri. I like anything with glutinous rice and coconut and this kuih combines the two so I had a good time making and eating it. There was a little of the pulut and serunding left over and the next day, I didn't bother with the banana leaf cones.

What are your favourite kuih from the old days? Can you still find them easily nowadays?

TEPUNG GOMAK(Green Bean Flour-Coated Patties)
Adapted from Bite Size
Makes 10

2 shredded and knotted screwpine (pandan) leaves
200g green (mung) bean flour

Filling
100g mung beans
60g soft dark brown sugar
30g caster sugar
80g grated coconut

Dough
240g glutinous rice flour
1/4 teaspoon salt
200-250ml water
  • Prepare filling. Boil green beans until tender and broken up. Strain off water. Return beans to pan.
  • Add the other filling ingredients and stir over medium heat until quite dry but still moist. Remove from heat and leave to cool.
  • Prepare dough. Combine glutinous flour and salt. Add water, a little at a time, and mix into a soft, pliable dough.
  • Divide dough into 10 portions. Flatten one portion with your hands and spoon filling into the middle. Enclose to make a 4cm ball. Flatten into a 1cm-thick patty.
  • In a large pan, bring some water and the screwpine leaves to the boil. Drop patties in batches into the boiling water. When they start to float, remove with a slotted spoon and drain well.
  • Roll patties in green bean flour before serving.
SAGON
Sweet Coconut Floss
Serves 6

195g grated skinned coconut
250g rice flour
110-120g caster (superfine) sugar
  • In a large pan, stir grated coconut over very low heat until very pale cream in colour.
  • Add rice flour and continue to stir for 15-20 minutes more. When the mixture is very dry, fragrant and crisp, remove from heat. tip into a bowl and set aside to cool before mixing in the sugar to taste.
    PRINTABLE RECIPES