Pages

Monday, January 31, 2011

How-to: Strudel dough

APPLE STRUDEL. 
I haven't even begun to scratch the surface of Larousse Gastronomique which I've had for almost six months now. There is so much to read and so many interesting items to mull over.


New Larousse GastronomiqueI mention the book because I am writing about my meeting with Joël Robuchon for my newspaper and he happens to be the Gastronomic Committee president of the new Larousse. I should have carried it with me to Singapore last October and got M. Robuchon to sign it, but this book is so thick and heavy, it needs its own wheelie bag! The master chef is opening three restaurants at Resorts World Sentosa and was there to check up on the progress. The press were told the eateries would be open sometime in February, but nothing has been confirmed yet. (My story is slotted for sometime next month as well and a link to the pdf of the printed version will be up – in the sidebar – when it comes out.)

I still can't believe I met Joël Robuchon. You read about him and admire him on paper, and then you actually come face-to-face – that's the kind of highlight you look forward to in your job. While I kept my professional journalist composure throughout the interview, when it was over, I was like some wide-eyed pop idol fan the way I trotted up and asked to have a photograph taken with him. He was very obliging and even put a hand over my shoulder.

Robuchon and the Fan's Right Ear
So, back to Larousse Gastronomique. After browsing through it for a while now, I thought preparing a dish from one of the recipes in the book should be the next step ­­– something with ingredients I always have in the house. And that would, of course, be some sort of bread or cake. The apple strudel is a little bit of both.

Strudel must be made with bread flour, says Larousse, because the dough needs to be stretched into a thin sheet and only a strong flour will allow that. I wondered about the vinegar in the dough. There are recipes that don't contain vinegar and other that do but I can't find an explanation for why the ingredient is included. Usually there would also be bicarbonate of soda and the two would react to give lift as in certain cakes and breads. If anyone can help me on this, I would be most grateful. Perhaps I should email Monsieur Robuchon and ask him since we've become ;-D great chums...

Larousse Gastronomique, while encyclopedic in nature, doesn't often give detailed recipe instructions. It must be assumed that readers will already be familiar with cooking concepts and methods. Anyway, more information would make the book even thicker and heavier! I've laid out the strudel recipe in customary format for ease of reading, but have adapted the recipe from Larousse and elaborated on the method after reading up on strudel-making.

Site check: About.com has pictures on how to stretch the dough, and Diana's Kitchen has instructions without pictures, but with a good description of the process. Baking911 has recipes for several fillings and suggests holding a "strudel bee": get some friends over to help with stretching the dough! I've tried to record each step in pictures myself.

APPLE STRUDEL
Adapted from Larousse Gastronomique
Serves 8-10

Dough
250g strong plain (bread) flour
150ml tepid water
Pinch of salt
1 teaspoon vinegar
1 egg yolk
1 tablespoon oil

(A)
200g dried fruit (raisins, chopped dates and crystallised ginger)
1 tablespoon rum (optional)
1kg cooking apples
3 tablespoons caster sugar
75 melted butter, plus extra for brushing
A handful of breadcrumbs
100g chopped walnuts
2 tablespoons milk
Icing sugar for dusting

(B) – combined
2 teaspoon cinnamon
8 tablespoons soft brown sugar

  • Place flour in the bowl of an electric mixer; add the rest of the dough ingredients. Mix with a wooden spoon until the dough comes together. Using the mixer's dough hook, knead until the dough is smooth and elastic (Pix 1) but still tacky (Pix 2), about 8 minutes. Scoop up into a small bowl, cover with cling film and leave for 1 hour at room temperature, then place in the fridge overnight. When ready to make strudel, remove dough from fridge and allow to come to room temperature, about 1 hour.
  • Combine the dried fruit with the rum, if using; set aside for 30 minutes. Peel and finely dice the apples; sprinkle with caster sugar. Mix dried fruit and apples together.
  • Spread a large floured tea towel or sheet on a large table you can walk around; place the dough on it. Flour a rolling pin and roll out the dough into a rough rectangle (Pix 3). Flour the back of your hands, make fists and place them under the sheet of dough. Stretch the dough carefully using your knuckles (Pix 4), pulling your hands gently apart. Move around the table to work from all sides. Brush with extra melted butter, then keep on stretching it until it is very thin, taking care not to tear it; you should be able to see through the dough. Trim the edges to the shape of a large even rectangle (Pix 5). Use the trimmings to make a another, smaller strudel.
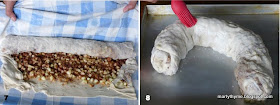
  • Lightly brown the breadcrumbs and walnuts in 75g melted butter; spread this mixture evenly over the dough. Sprinkle with the fruit (try not to include too much liquid), then dust with the cinnamon-sugar mixture (Pix 6). Fold the two outer sides in, then, using the tea towel/sheet, roll up the dough carefully to enclose all the ingredients (Pix 7). Slide the strudel on to a buttered baking sheet. Brush with the milk (Pix 8). It's all right if the strudel does not lie straight; it can be curled to fit the tray.
  • Cook in a preheated oven at 200°C for 40-45 minutes. When golden, take it out of the oven, dust with icing sugar and serve lukewarm.
PRINTABLE RECIPE

Monday, January 24, 2011

Bread bulletin: It's ALIVE!

LEPARD'S LEAVEN.
It takes five days to make Dan Lepard's leaven from his book The Handmade Loaf, but I took eight because I neglected to refresh it on three of those days.


Anyway, in the first few days, there was nothing happening in the jar I used. The mixture looked like the paste I use to plug up holes in my walls after drilling them in the wrong place. Even when Mr Lepard said there would start to be activity, I didn't see a single bubble. Had I killed my leaven even before I had started any breadmaking? On the night of the eighth day, I left the jar on the kitchen counter and told myself I would start over the next morning.

And then, something happened. I walked into the kitchen to find a white liquid on the kitchen counter around the jar. It was the leaven. I thought the jar was cracked, but no, it was still intact. And then I realised that the leaven had somehow got out of the tightly lidded Kilner jar like some sort of contortionist. When I opened the lid, I whooped for joy. The reason is in the picture at the top of the post. Yes, this baby was alive and kicking!

The recipe for Mr Lepard's leaven follows. My notes are in red.

DAN LEPARD'S LEAVEN

Day 1
50g water at 20ºC (I used filtered tap water. The temperature doesn't read on my thermometer; I know it's below 30ºC but this is Malaysia, so I'm sure it's slightly higher than 20ºC)
2 rounded tsp rye flour
2 rounded tsp strong white flour
2 rounded tsp currants or raisins (I used golden raisins)
2 rounded tsp live low-fat yoghurt (my yoghurt was full-fat)
  • Mix all together in a 500ml Kilner jar. Cover and leave at room temperature (approx. 20ºC; in Malaysia, room temperature is around 26ºC/79ºF) for 24 hours.
Day 2
50g water at 20ºC
2 rounded tsp rye flour
2 rounded tsp strong white flour
  • There will be no perceptible change, but the surface will look shiny as the solids separate from the water and sink down in the jar (check). Stir the above into the leaven, starting with the water, followed by the dry ingredients (I didn't read this part carefully and simply added everything at once). Cover and leave again at room temperature for 24 hours.
Day 3
100g water at 20ºC
4 rounded tsp rye flour
4 rounded tsp strong white flour
  • Do the same as Day 2. (This time I added the water first, as asked for in the recipe.)
Day 4
100g water at 20ºC
125g strong white flour
  • Remove and discard ¾ of the mixture (I didn't measure exactly; simply eye-balled it. Also I didn't discard the mixture and instead added it to some bread dough I was already making. I can't say if it helped that loaf, but it certainly didn't hinder). Add the water and stir well. Pour the mixture through a tea strainer to remove raisins. Pour mixture back into jar, add flour and stir well. Cover and leave at room temperature for 24 hours.
Day 5
100g water at 20ºC
125g strong white flour
  • The surface of the mixture should be bubbling. Remove and discard ¾ of the mixture. Add the water to the remaining mixture and stir well. Pour back into jar. Add flour so that you have a thick paste. Cover and leave again at room temperature for 24 hours. (I left it overnight and the spillover as mentioned at the top of this post is what happened the next morning.)
Each day, as you continue to remove leaven for baking, replace it with an equivalent amount of flour and water.

Note: This is a white leaven. To make a rye leaven, Dan Lepard says to substitute rye flour at each step. Or take some of the white starter and refresh that using solely rye flour and water for a few days. Rye flour needs more liquid to reach the same consistency as a batter made with white flour.
    Using the leaven for the first time
    On the ninth day, I put the jar in the fridge and a few days later I made a loaf using the leaven for the first time (pictured above). The sourdough flavour was still underdeveloped, but it was certainly there. This was inspiring and I aimed to use the leaven once a week, and if I didn't, I promised myself not to forget to feed it. I have killed enough starters by neglecting them. I am happy to report that it has been three weeks, and I have kept to my word. The leaven (no, I am not going to name it!) is smelling fresh and happily awakens after every feed.

    The Handmade Loaf has loads of bread recipes that use the leaven, but I find a lot of them quite daunting. And because the recipes make rather large loaves, I am hoping to get it right the first time to avoid wastage. My first loaf is a relatively simple Sunflower Bread. It didn't come out looking exactly like the picture in Mr Lepard's book, but it doesn't taste bad and there's that lovely crunch of the toasted seeds.

    This is going to YeastSpotting.

    Super seedy
    SUNFLOWER BREAD
    From The Handmade Loaf by Dan Lepard

    200g strong white flour
    50g millet flour (I used spelt)
    200g sunflower seeds, lightly toasted
    ¾ teaspoon fine sea salt
    50g runny honey
    100g white leaven (recipe above)
    ¾ teaspoon fresh yeast, crumbled (I used just a little more than ¼ teaspoon dried yeast)
    100g water at 20°C
    Beaten egg or milk, for glazing the loaf prior to baking
    • In a large bowl, combine strong white and millet flours with the toasted sunflower seeds and salt. In another bowl or jug, whisk the leaven with the honey, yeast and water. Pour the liquid with the dry ingredients and stir well until you have an evenly combined, soft and sticky dough. Scrape any dough from your fingers, then cover the bowl and leave for 10 minutes.
    • Rub 1 teaspoon of corn or olive oil on the work surface and knead the dough on the oiled surface for 10 seconds*, ending with the dough in a smooth, round ball. Clean and dry the bowl, then rub lightly with a teaspoon of oil. Return the dough to the bowl and leave for a further 10 minutes. Remove the dough from the bowl and knead once more on the oiled surface, returning the shape to a smooth, round ball. Place it back in the bowl, cover and leave for 1 hour in a warm (21-25°C) place.
    • Lightly flour the work surface and shape the dough into a ball. Rub a tea towel with a handful of flour and place the dough inside, seam side up. Wrap the dough up in the cloth, then place this inside a 2-litre deep, round bowl. The will help force the dough to rise upwards rather than spread outwards and give height to the dough. Leave it to rise for 1½ hours, or until almost doubled in height.
    • Preheat the oven to 210°C. Upturn the loaf on to a floured-dusted tray, then brush the loaf with the beaten egg/milk. Cut a deep cross in the centre of the loaf. Bake in the centre of the oven for 30 minutes, then lower the heat to 190°C and bake for a further 15-20 minutes, until the loaf is a good brown colour, feels light in weight, and sounds hollow if tapped on the base. Cool on a wire rack.
    * Only 10 seconds? Could it be a misprint and should it be 10 minutes instead? Anyway, I kneaded until smooth.

    Monday, January 17, 2011

    O is for onions

    NO MORE TEARS WITH GOGGLES.  
    There was a huge batch of onions – courtesy of my mother ­– to peel and cut up and I wasn't looking forward to it. If ever there was a time to have a robot servant, this would be it.


    I consulted wikiHow's guide to chopping onions without tears. Freezing takes too long; cutting them under water – running water, I assume – is wasteful; chewing gum while cutting? Seems silly, and I can't stand chewing gum. I tried the burning candle near the chopping board, but still teared and my nose ran. These onions were really pungent.

    Finally, I dug out my swimming goggles. I still had to breathe through my mouth but this was the recommendation from wikiHow that worked for me. The goggles have only ever been in the pool twice ­­– I hardly swim ­­– so it's good I've found another use for them. Their storage place is now in the kitchen drawer.

    At the market last week, my mother saw some very good red onions and got a whole sack which she divvied up for her children. I wondered at first what I would do with so much, and worried that they would spoil before I got the chance to use all of them. But this weekend, I set about the task of peeling them. Once I did that I would have to use them.

    Onion & pumpkin galette
    With about half of the sliced bulbs, I made onion jam, which keeps well in the fridge and is a nice relish. I've used it in a vegetable frittata (recipe is at the same link as the onion jam) and this time, I made a free-form galette. This tart is often made with puff pastry, but since I had filo pastry, I went with that instead. It's really not much of a recipe so I haven't recorded it here. You'll have the instructions on the box of filo pastry for how to brush the sheets with melted butter or oil and layer a few together before filling and baking. I put in a layer of onion jam and some pumpkin slices that I had baked a few days ago, sprinkled the top with grated strong cheddar and scrunched up the edges of the pastry around the filling into a free-form shape, then baked the two little galettes I made at 180°C for about 10 minutes.

    For help with another recipe, I turned to Starting With Ingredients by Aliza Green (I did a newspaper review of the book a while back) since Green has a chapter on cooking with onions, and the Senegalese Chicken Yassa looked uncomplicated. And lucky me, I also happened to have in stock all the ingredients in the recipe.

    I used red onions instead of white onions as asked for in the recipe, but that didn't hurt the dish. If you like the sourness of lemon, you will be scraping up the remaining bits of sauce in the cooking pan after you dish out the chicken. Fans of onions as well will surely enjoy it. Here's some background information on the yassa and Senegalese food in general.

    In her research, Green found out some very interesting information about onions. These are Very Important Vegetables, it seems. Here are some random facts:
    • In ancient Egypt, leaders took an oath of office with their right hand on an onion; onions were then a form of currency; and Egyptian mummies were set out for the afterlife with onions carefully wrapped in bandages to look like a little mummy;
    • Before competition of the Greek Olympic Games, athletes would consume pounds of onions, drink onion juice, and rub onions on their bodies;  
    • During the American Civil War, General Ulysses S. Grant told the War Department he would not move his army without onions, and the next day three trainloads of onions were on their way to the front;
    • Julia Child said, "It's hard to imagine a civilization without onions", and Brillat Savarin declared that "The onion is the truffle of the poor."
    I'm going to have to treat the onion with more respect.

    Out of Africa
    SENEGALESE CHICKEN YASSA
    From Starting With Ingredients by Aliza Green
    Serves 4

    3 cups (about 2 large onions) sliced white onions (I used red)
    1 tablespoon finely chopped garlic
    2 teaspoons finely chopped hot green chillies
    1 teaspoon ground ginger (I grated fresh ginger root)
    3 bay leaves (I used dried)
    1 tablespoon chopped fresh thyme, or 1 teaspoon dried thyme (dried)
    1 teaspoon coarsely ground black pepper
    Kosher salt to taste
    1 cup fresh lemon juice
    1 cup water
    ½ cup canola or vegetable oil, divided
    1 (1-1.3kg) fryer chicken, cut into 8 pieces (I used drumsticks)
    • In a shallow, nonreactive (not aluminium) baking dish, combine the onions, garlic, chillies, ginger, bay leaves, thyme, pepper and salt. Add the lemon juice, water, ¼ cup oil, and chicken. Marinate in the refrigerator at least 4 hours, or up to overnight. (I used a resealable plastic bag and threw in the lemon carcass as well.
    • Remove the chicken from the marinade and pat dry with paper towels. Strain the marinade liquid, reserving both liquid and solids. (I discarded the lemon carcass here. The onions have turned pink from the reaction to the lemon juice.)
    • Heat ¼ cup oil in a large, heavy skillet (cast-iron preferred) and brown the chicken on all sides. Transfer the cooked chicken to a plate.
    • Pour off most of the oil from the skillet. Add the reserved solids to the pan and cook for about 5 minutes over moderate heat, or until the onions are soft and lightly coloured. Return the chicken (and any juices) to the skillet. Add the marinade, bring to the boil, then reduce the heat to low and simmer about 25 minutes, or until the chicken is tender. Serve with hot boiled rice.
    PRINTABLE RECIPE

    Monday, January 10, 2011

    I-heart-my-mama cake

    HEARTACHE CHOCOLATE CAKE. 
    It's my mother's birthday today. She's 70 but you wouldn't know it. The woman doesn't just potter around the house, she does the heavy lifting. You try and tell her to slow down.


    I reviewed Harry Eastwood's Red Velvet & Chocolate Heartache for an article out in print today (link to pdf is up shortly), featuring butter-free cakes that get their fluff and moisture from finely grated vegetables, and their "Excellent Crumb", as the author calls it, from ground almonds. The butter, she says, solidifies when cold and the cake hardens. Vegetables, on the other hand, keeps the cake moist and tender.

    After my initial success with the sunken apricot almond cake and camomile-courgette cupcake recipes for the review, I decided to make another cake from the book for my mother. The Light Chocolate Cake on the cover looks good as does the Pistachio Chocolate Cake inside, but they use the same vegetables in the cakes I tried ­­– butternut squash (I used pumpkin though) and courgette.

    An unusual recipe, and one that's talked about quite a bit online, is the Heartache Chocolate Cake. It is sweetened with honey instead of sugar and the vegetable used is aubergine (or eggplant or brinjal, depending on where you live). Mixing up the cake reminds me of making a fudge brownie batter, where everything is combined in one go. Only difference here is instead of melted butter, puréed aubergine is used. While you can taste the vegetable on its own, you wouldn't know it was in the chocolatey cake that comes out of the oven. And although it may look heavy, it's actually very light and mousse-like. The nutritional information at the back of the book lists the calorie content per slice at 216 and with only 10g of saturated fat. I would eat it from the fridge but some people prefer having it warm, and it certainly doesn't need a creamy top or filling.

    One observation: we had the cake at the family lunch yesterday, and I found out that this is an adult cake. The children (all below 12) all wanted a slice – it is chocolate, after all – but they very nicely told their aunty that there was too much chocolate in it (!) and it wasn't sweet enough. I didn't mention the aubergine, of course.

    By the way, the cake is a girl according to Eastwood's description:
    "This cake is sad. It's dark and drizzling down the window panes. She puffs her chest in hope when she goes into the oven; she then breaks, like a chest heaving a sob. This is why Aubergine (the Eeyore of the vegetable world) is the right kind of friend to hold your hand."
    I'm not making it up – that is the way Harry Eastwood writes. Another example is in the recipe below; I have reproduced it in her own words.

    Well, this cake may cheer up those who are feeling down, but I'm sure happy (adult) people will enjoy it too. Maybe for those times, we'll call it Heart-soaring Chocolate Cake.

    Sadness, be gone! 
    HEARTACHE CHOCOLATE CAKE
    From Red Velvet & Chocolate Heartache by Harry Eastwood
    Serves 14

    2 small whole aubergines (weighing roughly 400g)
    300g best dark chocolate you can find (minimum 70% cocoa solids essential), broken into squares
    50g good-quality cocoa powder, plus extra for dusting
    60g ground almonds
    3 medium free-range eggs
    200g clear honey
    2 tsp baking powder
    ¼ teaspoon salt (or some tears, if you have any in the kitchen)
    1 tablespoon brandy (for moral support)

    You will need
    a 23cm-diameter x 7cm-deep loose-bottomed tin
    a skewer
    a microwave (see Trust Me Tips, below)
    a blender
    • Preheat the oven to 180°C. Line the tin with baking parchment and lightly brush the base and sides with a little oil.
    • Cook the aubergines by puncturing the skins erratically here and there with a skewer, then placing them in a bowl covered with cling film. Microwave on high for 8 minutes until the vegetables are cooked and limp. Discard any water at the bottom. Leave the aubergines to stand in the bowl until they are cool enough to handle.
    • Next, skin (I find that the tip of a knife does the job) and purée the aubergines in a blender. Once the warm aubergine is puréed and smooth, add the chocolate, which will mingle and melt slowly. Set aside, covered once again in cling film, until all the chocolate has melted.
    • In a large bowl, whisk up all the other ingredients for a minute until well introduced to each other and slightly tipsy (bubbly). Fold the melted chocolate and aubergine mixture into the bowl with all the other ingredients. Don't be afraid of being a little brutal with the spatula ­­– they will get on and fuse.
    • Pour the mixture into the prepared tin and place it in the bottom of the oven for 30 minutes, by which time your kitchen will sing with the smell of hot chocolate.
    • Remove he mixture from the oven and let it cool in its tin for 15 minutes before turning on to a wire rack and peeling off the parchment. Quickly turn the right way up again and sit it on a plate to avoid any scars from the rack.
    • Sieve a little cocoa powder over the top of the cake before cutting yourself a slice and letting the medicine work its magic.
    Trust Me Tips
    • If you don't have a microwave, peel and cube the aubergines and cook them with a tiny splash of water on top of the hob until they are soft and squidgy, taking great care neither to burn them nor to drown them with too much water. Discard the water before blitzing.
    • Make sure that the aubergine has definitely melted the chocolate – this is not an instance where chunks of chocolate are wanted, I'm afraid. If the aubergine is too cool, simply blitz in the microwave for another 2 minutes before adding the chocolate chunks.
    • Be very careful to unmould the cake when it is cool rather than warm – it is terribly delicate (just as you are) and could smash easily. A little time to cool down helps make it more robust.
    • On particularly sad days, this cake will crack on the surface when it's cooking. Don't be upset by this – it's just the heart of the cake breaking too and trying to make you feel less alone.
    PRINTABLE RECIPE

      Monday, January 3, 2011

      How-to: Handmade ravioli

      GUIDE TO HOMEMADE RAVIOLI. 
      It takes me half a day to make pasta, and the other half to clean up, but this must be one of the most pleasurable things to do, not least because the end result is a delicious and fine-textured product that dried store-bought pasta just doesn't stand up to.

      Don't get me wrong ­­– I have store-bought pasta in all shapes in my pantry and it is often a life-saver. It cooks quickly, and even tossed with chilli flakes flash-fried in a little olive oil can be a satisfying meal when I'm pressed for time and don't have much else in the fridge.

      The theme for January's Don't Call Me Chef column (it is out in print today; link to the pdf up shortly is is up) is "kitchen gadgets". I used a hand-cranked pasta machine (nothing fancy) and a ravioli mould (a little fancy ­­– it comes with its own little rolling pin. Isn't that just adorable?!) to make Cauliflower & Anchovy Ravioli with Sage Butter Sauce. As promised in that article, I am providing a guide here on how to make this type of pasta from scratch without the use of the gadgets. A pasta machine helps knead the dough and rolls it out into very thin sheets, but this can also be achieved with a rolling pin and patience. Durum/semolina flour produces dough that is more elastic than all-purpose flour, and that will make the task easier.

      A ravioli mould makes perfectly shaped pasta (the one pictured right makes 3.5cm by 3.5cm pasta) but handmade ravioli like the ones in the picture at the top of the post* look rustic and good enough to eat. Instead of cutting into squares, you can also use a round fluted cookie cutter. It's what you put in it and on it that matters, and the choices are endless.

      I first learned how to make pasta ­­– from the dough recipe to rolling and shaping by hand and with a machine ­– from the Dorling Kindersley 101 Essential Tips series on Pasta. It's no Italian mamma, but the tips are pretty good. Buon Appetito!


      FRESH EGG PASTA DOUGH
      Makes 500g

      300g durum/semolina flour
      Salt
      3 medium free-range eggs
      1 tbsp oil
      • Combine flour with a pinch of salt and mound on a work surface. Make a well in the centre and add eggs and oil. Using a fork, draw in the flour gradually, working it into the liquids (Pix 1).
      • When the mixture looks like crumbly wet sand (Pix 2), use the fingertips of one hand to pull the mixture together to form a dough (Pix 3); if sticky, add flour a little at a time. Gather the mixture into a rough ball (Pix 4).
      • Lightly flour the work surface and knead dough until elastic and smooth, 7-10 minutes (Pix 5).
      • Form dough into a ball and cover with a bowl (Pix 6). Allow to rest for 1 hour at room temperature before rolling out.
      ROLLING
      Italian pasta cooks use a traditional rolling pin that has no handles and is 80cm long. The extra length is useful since the dough covers a large area when rolled out. You can get them at specialist bake shops. My homemade rolling pin is sawn off from a thick wooden curtain rod.

      • Before beginning to roll, knead dough briefly on a floured surface. Form the dough into a ball (Pix 7).
      • Sprinkle surface with flour. Place ball of dough on work surface and flatten it slightly with rolling pin (Pix 8). Begin rolling out dough, turning and moving it all the time to prevent sticking.
      • Continue rolling, pressing dough away from you, not pushing down, and always rolling in just one direction. Sprinkle work surface and rolling pin generously with flour as you work (Pix 9).
      • Keeping even pressure on rolling pin, carry on rolling until dough is almost transparent. If rolling pin is not long enough, divide dough into three and roll each piece separately. Keep other pieces wrapped in plastic.
      • When the pasta dough has been rolled out as thinly as possible (for ravioli, the pasta should be no more than 1.5mm thick), leave to dry on a floured surface until it acquires a leathery look, 5-10 minutes, before cutting or filling as desired.
      SHAPING RAVIOLI
      • Cut the pasta into 2 equal rectangles. Place small mounds (about 1 tsp) of filling on dough, spaced 4cm apart (Pix 10). Brush around filling with beaten egg or water (Pix 11). 
      • Lay second rectangle on. Press gently around each mound of filling to seal the layers and ensure there are no air pockets around the fillings (Pix 12).
      • With fluted pastry cutter or large chef's knife, cut between the mounds to separate rectangle into equal sized squares (Pix 13). Place on floured tea towel to dry for 1-2 hours (Pix 14). Cook fresh pasta immediately or store in the refrigerator and cook within one day.
      • To cook, add ravioli in batches to a pot of boiling salted water. When they float, they are done (Pix 15). Divide the pasta among four plates and pour the sauce over the ravioli (main pix, top*).
      PRINTABLE RECIPE

      * The picture at the top is Leek & Mushroom Ravioli with Anchovy Sauce. Here's the recipe.

          Saturday, January 1, 2011

          Gear for the new year

          KITCHENWARE.
          This looks like an ordinary white bowl, doesn't it? It is. There's nothing special about it. Popcorn doesn't suddenly appear in it when you rub the side; soup doesn't season itself; nothing multiplies in it.


          Clockwise from left: silicone tongs, 
          zester/grater, dough whisk, 
          offset spatula, silicone spatula,
          and silicone brush
          This glazed ceramic bowl is 20cm across and 6cm deep, and I use it for everything: to marinate a whole cut-up chicken; a single serving of noodle soup – even though it's too big for that; as a mixing bowl for sauces and dressings; and for general serving. It's the vessel I reach for most often in my kitchen.

          I've had it for almost six years, and have now noticed that it is discoloured in spots and no longer glossy. But it still has a lot of life left in it so it's staying for now.

          I cannot say the same for a few other utensils in my kitchen.

          Looking through my cupboards, drawers and hanging rail at all my gadgets for an article I was writing (it's for Don't Call Me Chef, this first one for 2011, and it will out in print on Jan 3), I noticed a few things that shouldn't be there. Now, I am not a hoarder – it just takes me a while to get rid of something. So out went the mechanically challenged ice cream scoop, the flimsy whisk and the stained Asian cloth coffee/tea strainer. I found an ugly little plastic basin, a rubber spatula without the handle (so basically, just the scraping part; useless) and some random lid (no idea what for). I put a Mason jar with a rusty lid with the rest of the discards, then decided to throw away only the top and keep the bottle.
             Large stainless steel deep skillet

          I do get new tools now and then, and there will probably be a few more additions this year. I admit, I am sometimes simply drawn to how pretty they look (for the Don't Call Me Chef article, my new – and pretty – ravioli mould and my old hand-cranked pasta machine are featured). But I make a lot of practical purchases too and I use these gadgets all the time. Like the white bowl at the top, my essential tools can be seen in these pictures.

          Good rolling pins are essential, and I made two really good ones myself by sawing a thick wooden curtain rod into 75cm and 25cm lengths. I use the longer one for rolling out large pieces of dough and pastry (like the pasta dough The Thymes will feature this Monday – it's part of a pictorial guide on making pasta/ravioli without gadgets) and the shorter one for smaller items like chapatti and tortilla.

          Oh, I forgot to put in a picture of my very useful work surface, but practically every picture appearing on Monday shows it. It is a marble top and it was the top of a side-table that belonged to an aunt of mine. I'm glad she didn't want that piece of furniture anymore. I use it for all my kneading and rolling out pastry, and it's so easy to clean. That plastic pastry scrapper below works hand in hand with it, and both of them omit the need to add too much extra flour to doughs and pastries.

          People who know me know I am hopeless at deep-frying, and they may scold me for not using the candy/deep-fry thermometer that I obviously own. I only use it in candy-making. Perhaps one day I will try putting it in a pot of oil too.

          Top three: Rolling pins. Bottom row, from left: Candy/deep-fry thermometer; digital scale;
          and plastic pastry scraper
          The tool I need most right now is a good can opener. I have bought cheap ones and expensive ones and mid-priced ones and they all work for a while, then go kaput on me. I wish I knew what I was doing wrong.

          HAPPY NEW YEAR!