Pages

Tuesday, December 27, 2011

Daring Bakers: Let nature do the work – Sourdough

CROSTINI USING SOURDOUGH BREAD AS THE TOAST BASE 
Our Daring Bakers Host for December 2011 was Jessica of My Recipe Project and she showed us how fun it is to create Sour Dough bread in our own kitchens! She provided us with Sour Dough recipes from Bread Matters by Andrew Whitley as well as delicious recipes to use our Sour Dough bread in from Tonia George’s Things on Toast and Canteen’s Great British Food!
Although I already have a long-tended leaven, I decided to make a new starter according to Jessica's instructions. Watching the development of that simple mixture of flour and water over the four days was fascinating. Air-borne yeast rocks!
My bread, however, didn't rock as much as I would have liked. I made the French Country Bread three times. Here's what happened:
THE FIRST: Open crumb and lovely taste, but quite flat 
Bread #1
Recipe followed, except in using stone-ground wholewheat flour. Used normal wholewheat flour, and spelt flour in the final refreshing.
Pros
1. Open crumb
2. Crusty
3. Good level sour flavour
4. Good for crostini base (top picture; from left: tomato and grilled pepper on sour cream; cream cheese with lemon pepper and olive oil; chilli and smoked goat's cheese; chicken liver; and plain toast)
Cons
FLAT! The wet dough did not keep its shape and spread out, but... (see 4 above)
THE SECOND: A firmer dough that kept its shape, but had a tight crumb
Bread #2
Added quite a bit of extra bread flour before the final rising.
Pros
1. Rose beautifully in the proofing basket and kept its shape when it came out.
2. Good crust.
3. Tender crumb, but... (see 1 below)
4. Flavourful, but... (see 2 below)
Cons
1. Closed crumb, like a sandwich loaf.
2. A milder taste than Bread #1.

Bread #3
THE THIRD: Horrors!
Added less flour than Bread #2. I didn't have time to bake, so I placed the dough in the fridge overnight. The next day (following Peter Reinhart's instructions), I removed it from the fridge four hours before baking, shaped it after two hours and put it into the proofing basket. When it had risen, I transferred it to the baking tray, washed the top with egg white and sprinkled flax seeds over it. It looked like it would hold its shape at first, but then spread out like Bread #1.
Just looking at the picture, you know there's no need for a pros and cons list.
Third time's the charm, I thought, but the result ended up causing harm... to my ego! I knew as soon as I took the disc out of the oven that I would have to throw it out. It was so heavy! I thought my wrist would come off when I tried cutting into it, and inside, it was just a dense block of rubber. Not even fit for the birds! The one bright spot was a crust that was beautifully golden and smelled awfully good.

Final comment
I'm glad I made the leaven, because it tastes different from the one I already have, so I have two to choose from. This one, I'm keeping on the kitchen counter instead of in the fridge. I've already used it for other bread recipes and it has worked well.

These are some of my more successful Daring Baker's challenges:
Meringue-filled Coffee Cake (March 2011)

Sunday, December 25, 2011

Season's greetings

HOW IS YOUR HOUSE DECORATED? 
MERRY CHRISTMAS AND HAPPY HOLIDAYS!

Wednesday, December 21, 2011

Condensed milk canned, but here's cake

LIGHT AND AIRY CONDENSED MILK CAKE 
I didn't know what to expect when I started mixing the ingredients for the condensed milk cake. I imagined it would be too sweet and the crumb would be dense, and perhaps fudgy.
What a surprise I got when the cake that emerged from the oven was tender and light, with a chewy crust, airy and honeycomb-like on the inside, and a level of sweetness that didn't hurt my teeth.
If I hadn't made it myself, I would have thought, just like all those people who had a slice, that this was a steamed cake.
It actually has a very traditional look and texture to it. Cakes made in the old days in Malaysia –  before there were electric ovens –  were often steamed and/or cooked in a pot over a wood fire so the outside would be crusty and the sponge would have a lot of holes in it.
I certainly was quite happy with this.
And now, a revelation (a confession?) about this cake: It doesn't actually contain condensed milk.
There was a time when sweetened condensed milk was found everywhere. It was the preferred additive in a cup of coffee, teh tarik (pulled tea) or chocolate drink Milo. When I was a child, we would even spread it on a slice of bread and top that with a sprinkling of Milo for a sweet chocolatey snack.
But a few years ago, condensed milk was taken off the shelves in Malaysia. Gazetted as a controlled item in 1972 (the government fixed the price to ensure sufficient supply in the market), it later became too expensive to produce because of the rise in the price of milk solids. It was later phased out since it was no longer profitable for manufacturers to produce it. Well, read that as it is more profitable for export – which means you can still find it in certain shops, but be prepared to pay an astronomical price for a tin.
So what we get everywhere in Malaysia now is condensed creamer, which is palm oil-based, and to a lesser extent, condensed filled milk. I have used filled milk for this cake. I don't know how different it is from creamer (although it is also produced with palm oil), but the word "milk" in it makes me feel that I am not using something completely unnatural.
* * *

Condensed Milk Cake 
Makes 1 loaf or 17cm round cake

50g all-purpose flour
½ tsp baking powder
Pinch of salt
50g unsalted butter, at room temperature
1 medium egg
½ tsp vanilla extract
200g sweetened condensed (filled) milk (not sweetened creamer)
½ tsp baking soda
1 tbsp white vinegar

Preheat oven to 180°C. Grease and line a small loaf pan or 17cm round pan. (I will try a baba tin next time.)
Sift the flour, baking powder, baking soda and salt together in a mixing bowl.
Beat the butter until creamy. Add the egg and beat together until combined (it may look curdled). Beat in the vanilla extract and condensed milk (the batter will smooth out now).
Gradually beat in the flour mixture until combined.
Place the baking soda in a small bowl. Add the vinegar and quickly swirl together. It will foam. Stir into the batter.
Transfer batter to the prepared pan. Bake until a skewer inserted in the centre comes out clean, and the cake is golden, 30-35 minutes. Cool the cake in the pan for 10 minutes, then remove from pan and place on wire rack to cool.

PRINTABLE RECIPE

A few other 'sponge' cakes:
Over-The-Top Coconut Cake

Monday, December 19, 2011

Nine, ten, a big fat hen

DRESS UP A ROTISSERIE CHICKEN
I almost didn't want to use the roast bird I got from Cold Storage for the recipes using store-bought rotisserie chicken. It was really good on its own. Despite having been under the deli counter's heat lamp for half a day (I only went there after lunch), it was still juicy and I kept poking my nose into my shopping bag because the aroma coming from it was absolutely enticing.
But I went ahead and made four recipes for the newspaper column.
Four ways with rotisserie chicken
Even with those four dishes, there was still part of a chicken breast and a thigh left, and I decided to make two more dishes so I could post the recipes here: chicken cheese balls, and a chicken and melon salad. With dishes like these, there aren't real measurements and even the ingredients are random, but I'm happy with the results.
This Blue Cheese Dip has kick with the addition of cayenne pepper
Chicken Cheese Balls with Blue Cheese Dip
Serves 2

2 cups shredded rotisserie chicken meat
1 cup grated Parmesan cheese
2-3 dashes of freshly ground black pepper
1 cup plain flour
1 egg, beaten
1 cup breadcrumbs
Oil for deep-frying

Mix the chicken, cheese and black pepper. Form into golf-ball-sized balls. (The mixture should come together easily, but if it is crumbly, add a little beaten egg.)
Place flour, egg and breadcrumbs into three separate bowls. Dredge the chicken cheese balls in the flour, then in the egg, and finally coat with the breadcrumbs.
Heat oil and deep-fry the balls until golden. (Remember, the meat is already cooked, so this will only take a minute or two.) Drain on paper towels. Serve warm with the Blue Cheese Dip.

Blue Cheese Dip
100g blue cheese
120ml sour cream
2 tbsp mayonnaise
Juice from ½ lemon
A pinch of cayenne pepper
Salt and pepper to taste

Mash the blue cheese in a bowl then beat in the soured cream, mayonnaise, lemon juice and seasonings. Cover and chill until needed.

A little green and red add a Christmasy look to this salad. I might make this for the family lunch on Dec 25.
Pasta with Roast Chicken and Melon
Serves 2

Salad
Rocket leaves
2 cups meat from rotisserie chicken, in bite-size chunks
2 cups rock melon balls (can also be cubed)
2 cups cooked elbow macaroni
1 tbsp toasted sesame seeds
A handful of pistachios
A handful of dried cranberries
Salad oil (good olive oil; I used argan oil)

Lay the rocket leaves on a platter. Toss everything else together with the dressing and pile on top of the leaves. Drizzle salad oil around the plate and serve.

Sour Cream Dressing
½ cup sour cream
Freshly ground black pepper
1½ tsp sugar
½ tsp salt
1 tsp white wine vinegar

Whisk everything together.
* * *

A few related recipes:
Chicken Salad with Chilli Coriander Dressing
Three Malaysian salads (Ulam)
Marinated Roasted Peppers

Thursday, December 15, 2011

Surf and turf

CHICKEN ROULADE STUFFED WITH ANCHOVY FILLET 
A post early on in this blog (when it was still called Marty Thyme) recalled a time many years before when I tried to make a chicken roulade for a guy I was trying to impress. I didn't know how to cook then and relied on a recipe, which I chose solely for the picture of the dish, thinking that if I followed the recipe it would turn out exactly the way it looked in the book and said guy would be suitably impressed.
That roulade had bits of tinned pineapple in it. I had a lot of trouble rolling it up and trying to secure the ends with toothpicks. With the filling spilling out, I launch the roll into the hot pan to fry it. It looked quite sad and I thought I would try to cover up the flaws (read: the bits with the third-degree burns).
So I used the syrup from the tinned pineapple to make a sauce. Now, the sauce wasn't part of the recipe, so I should get credit for being innovative with a dish when I couldn't even cook. I'll put the syrup in a pan, I told myself, add tomato purée and it will probably turn out okay since the sweet and the sour should go together. But the sauce seemed to lack something, only I couldn't figure out what.
Well, I did realise what it was in the end: Salt.
Now, many years later, if a dish wasn't salty enough, I would know immediately to add salt. I'm nowhere near an expert, but if something doesn't taste right, I could tell what seasoning adjustments to make. This has come with experience.
But for some people, many things seem strange when they're learning to cook. And sometimes, more proficient cooks don't realise that. I remember, when I provided a recipe for pancakes in one of my old cooking columns, a reader wrote in and asked if the milk I used in the recipe was sweetened condensed milk. That was probably the only type of milk she was familiar with and didn't know anything else.
(Despite knowing that, it would be impossible to cater to everyone since newspaper readers are so diverse.)
Today, I can make a chicken roulade without consulting a recipe – and, as with many people, it's all down to having done it enough times. I love anchovies and have included them in my dish this time. It's my version of surf and turf. I even did a neat job of tying up the meat in a roll.
I don't know why I tried to impress that guy so long ago since he turned out to be rubbish, but I'm glad to say my taste in men has improved along with my skill in cooking...

Anchovy and Mushroom-stuffed Chicken Roulade
Serves 2

2 skinless chicken breasts fillets, about 200g each
1 large red bell pepper (capsicum)
2 large romaine lettuce leaves
1 medium onion, finely diced
4-5 button mushrooms, finely diced
4 anchovy fillets
Cooking oil

Kitchen string to tie the roulade

Butterfly the chicken breasts, and pound them with a fist to flatten and even out slightly.
Halve the bell pepper and remove the stem and pith. Rub oil over the skin, place the pepper, cut side down, on a baking tray and place under the grill until skin is blistered and black. Remove from the oven and place in a bowl; cover the bowl with cling film and leave pepper to cool. When cool, peel off the skin.
Heat a little oil and fry the onion until translucent. Add the mushrooms and season with salt and plenty of freshly ground black pepper. Stir until softened. Set aside to cool.
Soften the lettuce leaves by blanching in hot water for just a few seconds. Place into kitchen towels and dab dry.
To assemble the roulade: Place chicken breast fillets on a chopping board. Sprinkle with a little salt and pepper. Place a lettuce leaf on each fillet and top with half a bell pepper. Spread with the mushroom filling and top with 2 anchovy fillets. Roll up and tie the roulade.
Preheat the oven to 180°C. Heat oil in a skillet and sear the outside of the roulades until light brown. Place roulades in an ovenproof pan, cover pan with foil and place in the oven for 25-30 minutes. Remove the foil and cook a further 10 minutes until golden.
Make a sauce: Pour pan drippings into a saucepan over medium heat. Simmer until slightly thickened. To serve, slice the roulades on the diagonal and spoon on the sauce.


Some past chicken recipes:

Coming up:
The next post will feature recipes using store-bought rotisserie chicken.

Sunday, December 11, 2011

Bark as good as its bite

WHAT'S BETTER THAN PLAIN CHOCOLATE? BARK! 
So, maybe I went a little overboard with the topping on this chocolate bark, but hey, no one can accuse me of skimping on the ingredients.
Quality chocolate is good to eat on its own, but chocolate bark has that little extra something in the chocolate. Or in my case, a lot of extra something.
Chocolate bark is simply chocolate that is melted, and studded with dried fruit and nuts before it hardens again. Sometimes the nuts and fruit are stirred into the melted chocolate before it is spread out, and at other times, the fruit and nuts are layered on top, like I've done here.
I can't think of any confection as delicious but as simple to make as chocolate bark. Some knife work is involved if the nuts and/or fruit are a little large but nothing absolutely precise – not even the ingredient amounts really. Good quality chocolate is essential and dark and white chocolate can be used and even swirled together. Tempering the chocolate beforehand will give it that desired shine and snap, but to do that properly requires an accurate thermometer and patience. I used Lindt's, which is fine by me, so I'll leave the tempering for other kinds of confection.
Festive colours: Chocolate, pumpkin seeds, dried cranberries and crystallised ginger
I made bark this time with Christmas in mind, and used green pumpkin seeds, red dried cranberries and golden crystallised ginger. Very festive, I think. The weight of the chocolate and the nuts and fruit (combined) were about equal. Then I spied the bag of toasted sesame seeds and added a dash of those too. I also mixed in some salt. Mustn't forget the salt.
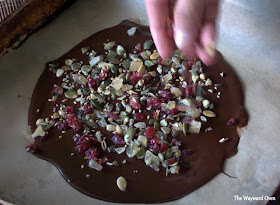
Sprinkle on the topping – and be generous about it
The chocolate is melted and poured onto a tray lined with baking/parchment paper. The fruit and seeds are sprinkled on and pressed into the chocolate so they adhere. The chocolate will flatten out slightly too.
The chocolate is set. Leave it as one jumbo piece or break it into shards? Hmm... 
It was too warm to leave the tray on the kitchen counter, so I put it in the fridge and left it there for a couple of hours for the chocolate to set.
Once set, the bark is broken into shards. Before storing in an air-tight container lined with greaseproof paper, I copped a couple of those pieces and was utterly delighted.

Chocolate Bark with Pumpkin Seeds, Cranberries and Ginger
Makes about  cups (amounts can easily be doubled... or tripled!)

100g good quality dark chocolate, finely chopped
30g pumpkin seeds, lightly toasted and roughly chopped
30g dried cranberries, roughly chopped
30g crystallised ginger, roughly chopped
1 tbsp toasted sesame seeds
A pinch of salt

Place the chocolate in a bowl over simmering water. Stirring occasionally, let the chocolate melt until smooth. Alternatively, place chocolate in a microwave-safe jug and heat on High for 30-45 seconds, stirring halfway through, until completely melted.
Meanwhile, combine the remaining ingredients in a bowl. Line a tray with baking/parchment paper.
When chocolate has melted, pour it onto the paper. Spread out to 0.5cm using an offset spatula. Sprinkle the fruit and seeds over the top until chocolate is completely covered. Press down gently so the topping sticks to the chocolate, which will spread out slightly.
Place tray in the refrigerator and leave chocolate to harden. Once set, peel off paper and break the bark into shards. Line an air-tight container with baking paper (reuse the paper from before) and store the bark in the fridge.


You may also like these recipes with chocolate:
Heartache Chocolate Cake
Peanut Butter Fudge Swirl Brownies
Banana Chocolate Brownies with Quick Chocolate Glaze

Thursday, December 8, 2011

Catch of the day

CHICKPEA TIFFIN LUNCH: SPICY FRIED SARDINES, EGGPLANT AND DHALL
Tinned sardines in tomato sauce are a staple that can be found in many Malaysian homes. They are made into curry, or used as a filling in sandwiches or roti canai.
I am not a fan of tinned sardines in tomato sauce but I do love fresh sardines. They're inexpensive, full of healthy omega-3 fatty acids, but more important, this is sustainable fish.
And they taste nothing like the tinned fish in tomato sauce.
The fish guy at my local grocers pointed out the fresh sardines to me in his array of seafood recently (he also drew my attention to some lovely clams  more on that in a later post), and their bright eyes and silvery bodies made me look twice.
Fresh sardines. Ooh, behave...
I've seen a lot of recipes for baked sardines, but I've never cooked them that way. I like frying them because that crisps up their skin and I enjoy the taste and texture. My mother simply dredges them in a mixture of curry powder and salt, but I thought I would make just slightly more effort and coat them with a batter after butterflying them.
Ah, that's one more thing I like about sardines – they're easy to butterfly. The head is removed, the underside is slit from gills to tail and the backbone is easy to pull out.
I made the batter with chickpea flour, another good source of healthy minerals. Its yellow tinge adds an attractive finish and its nutty flavour is delicious. This flour is easy to get in Malaysia, but there are online sites with instructions on how to make it: Pulverise dried chickpeas in a food processor or blender until smooth, sift to remove larger particles and then repeat the pulverising. Finally, roast the flour in a hot oven for 15-20 minutes until lightly browned. I would be cautious about this. Dried chickpeas are hard and unless the food processor is industrial grade, I would be afraid of ruining the machine.
To continue the chickpea theme in the meal, I made some eggplant chips: Cut long eggplant on the diagonal into 0.5cm slices; coat in seasoned chickpea flour, then in beaten egg and once more in chickpea flour; pan fry until golden and crisp on both sides.
Plus, Mumtaj from the office gave me some of her mum's dhall curry and I added some boiled chickpeas to it.
And there was a tiffin lunch, with chickpeas in three dishes.
The chickpea batter is good for sliced vegetables and fritters too 
PRINTABLE RECIPE


You may also like these seafood recipes:
Fried Fish in Tamarind Sauce
Sweet and Spicy Anchovies with Peanuts
Baked Stuffed Crabs

Monday, December 5, 2011

Pre-Christmas manoeuvres

I am in my first year at university in the picture, and that pathetic piece of foliage I am grinning next to is my Christmas tree. I got that tree under, shall we say, dubious circumstances. (I figure the statute of limitations on youthful indiscretions has expired but to protect the identity of my room-mate, her face is blurred in the photo.)
I couldn't go home that Christmas because of an inter-varsity sports meet (in Malaysia, universities don't get long breaks around Christmas, so activities go on). I was the only freshman on the team and some of my team-mates wanted to do something special for the rookie. We all stayed at one of the residential colleges on campus, and they decided to get a Christmas tree for my room.
There used to be a huge tract of woodlands (a real jungle!) near the playing fields on campus. It has since been cut down to grow ugly buildings.
Which makes what we did inconsequential by comparison.
One of the girls roped in her final-year dentistry student boyfriend who had a car and in the middle of one Silent Night, the five of us drove down to that jungle for our clandestine Operation Deck the Halls.
Armed with a parang (machete), we managed to lop off a considerable branch from the nearest Casuarina tree only to find that it was to big to fit in the car.
So I hung out the window in the back holding on to one end while another girl had her arms around the other end in the front as the man who was going to graduate as a doctor in a few months drove quickly back to the dorms on the other side of campus.
The tree was lopsided and miserable but we found enough tchotchkes to decorate it with. We celebrated with coconut tarts from a bakery which I believe closed several years ago.
* * *
The tarts, I found out later, were made Hong Kong-style and can often be found in dim sum buffets. I tried a recipe but had to modify it because it resulted in too much coconut filling, so I have halved the amount here.
Coconut tarts, Hong Kong-style
Hong Kong-Style Coconut Tarts
Makes 10 quarter-cup tarts

Pastry
125g plain flour
25g sugar
A pinch of salt
75g butter, chopped and chilled
1 egg yolk
1 tbsp iced water

Filling
75g dessicated coconut
25g butter
60ml condensed milk
1 egg yolk

Glaze and garnish
1 egg yolk
1 tbsp melted butter
Glacé cherries, optional

Make the pastry: Mix the flour, sugar and salt together. Rub in the butter until fine and crumbly. Add the yolk and enough water, and mix with a flat-bladed knife until mixture comes together in a smooth soft dough. Form into a disk, wrap in cling film and chill for 30 minutes.
Make the filling: Mix the coconut and butter together until well-blended. Stir in the condensed milk and yolk.
Grease 10 quarter-cup tart cases (or a fluted or plain bun tin). Preheat the oven to 175°C. Divide the pastry into 12 equal portions; press into the base and side of the cases. Spoon the filling into the cases; smooth the mounded tops but do not press down. Bake for 25 minutes and the tops are golden.
For the glaze: Combine the yolk and melted butter and brush on the tops of the tart as soon as they come out of the oven. Place a cherry in the centre, if using.
* * *
Now, not being nearly as competent as Hong Kong dim sum chefs, my tarts were a little lacking in looks (just like my Christmas tree). I did like the coconut filling though and used it in another tart.
Unlike the pastry for the HK-style tarts, the cases for Lemon Coconut Tartlets – flavoured with lemon zest – are blind baked before the filling – flavoured with lemon juice – is put on. There's a little bit of jam in the base of the cases, which adds a pretty surprise to the tartlets.
These tartlets are flavoured with lemon and have a filling of jam
Lemon Coconut Tartlets
Makes 12 quarter-cup tartlets

Pastry
185g plain flour
3 tbsp icing sugar
125g butter, chopped
Grated rind of 2 lemons
1 egg yolk

Filling
Filling from Hong Kong-style Coconut Tarts
1 tsp baking powder
1 egg white
3 tbsp lemon juice
6 tsp blueberry or raspberry jam

Make the pastry: Sift the flour and icing sugar in a bowl. Rub in the butter until fine and crumbly. Sir in the lemon rind.
Add the egg yolk and 3 tbsp cold water. Mix with a flat-bladed knife to form a rough dough; add more water, drop by drop, if necessary. Turn out onto a lightly floured surface; gather into a ball. Wrap in cling film and chill for 20 minutes.
Preheat the oven at 180°C. Roll the pastry out between 2 sheets of baking paper until 3mm thick. Cut into 12 rounds with a 7cm cutter and line greased patty tins or a muffin pan. Prick the pastry lightly and bake until slightly coloured, about 8 minutes.
Make the filling: Stir baking powder into coconut filling. Combine egg white and lemon juice and add to coconut. Mix well.
Put ½ tsp jam in the base of the pastry, spoon the filling on top and bake for 25 minutes, or until firm and golden.

Friday, December 2, 2011

This cookie is a cracker

CORN CHIP CRUMBS IN A COOKIE
Here are two nice things about making cookies: 1) They can be as small or as big as you want; and 2) you can flavour them with whatever you want. Well, Nice Thing #2 isn't completely true, because who would want pickled beets in their cookie? (Then again, who can say for a fact that it is terrible?)
But there’s also the Not So Nice Thing about cookie recipes: most of them make a batch of at least two dozen cookies. Sure, most cookies keep well and cookie dough can be frozen, but with only two people at home, I don’t want to keep having the same kind of cookies over and over again.
With the two Nice Things and the one Not So Nice Thing in mind, I set about making just a few cookies, only to find that I didn't have everything I needed in stock. But it taught me Nice Thing #3 about cookies: to some extent, they do allow for improvisation.
So I mixed together some chopped pecans and the crumbs from a bag of cheese-flavoured corn chips with flour, butter and sugar. Some vegetable shortening replaced the egg I lacked. The dough melded well and wasn’t crumbly. It produced 10 large cookies, each one perfect for a single serving with coffee, and they were chewy – just the way I like them.
All in all, a Very Nice Thing.

Chewy, cheesy and egg-free
Corn Chip Cookies
Makes 10 large cookies

55g butter, softened
20g vegetable shortening
50g caster sugar, plus extra for shaping
½ tsp pure vanilla extract
110g cake/pastry flour
25g finely chopped pecans
25g finely crushed cheese corn chips

Preheat oven to 180°C. Line a baking sheet with parchment.
Beat the butter, shortening and 50g sugar until creamy and well-blended. Add the vanilla and beat again until blended. Stir in the flour, pecans and and corn chips until just combined.
Divide into 10 pieces and shape into balls, arrange 5cm apart on the sheet. Put some sugar into a shallow bowl. Wet the bottom of a drinking glass with water. Dip the glass in the sugar and press down on the dough ball until about 0.5cm thick. Repeat dipping and pressing with the remaining balls.
Bake until cookies look dry on top and the edges are light golden, 10-12 minutes, rotating the sheet for even baking. Place on wire rack to cool completely before storing in an air-tight tin.

PRINTABLE RECIPE


You may also like these cookie recipes:
Poppy Seed Crescents
Chocolate and Fresh Mint Wafers
Date Pillows