Pages

Wednesday, June 27, 2012

Daring Bakers: Battenberg Cake

GINGERNUT-PINEAPPLE BATTENBERG CAKE 
No matter how hard I try, I have not been able to divide batter equally just by eye-balling it.
With this Battenberg Cake, it looked like I had finally got it right, but it's obvious from the picture that the pink portion is slightly bigger than the yellow.
Maybe if I close one eye... ;-|
The Daring Bakers made this classic English cake for June. There was apparently a hitch with hosting the challenge, but...
*trumpet blast*
Mandy of What The Fruitcake?! came to our rescue last minute to present us with the Battenberg Cake challenge! She highlighted Mary Berry’s techniques and recipes to allow us to create this unique little cake with ease.
Thanks Mandy!
With Britain celebrating Queen Elizabeth II's royal diamond jubilee this year, this cake was apropos for the occasion. It's apparently an old German-style cake which used marzipan and has bright colours, and chefs of the Royal Family learnt the technique during the reign of Queen Victoria. They invented the cake to celebrate the marriage of the queen's granddaughter Princess Victoria of Hesse and by Rhine and Prince Louis of Battenberg.
Mandy provided an excellent tutorial of the recipes and instructions on how to make different flavoured Battenberg Cakes.
First, bake the cake and assemble...
I thought ginger and pineapple would be a good match. So that both coloured portions of the cake would have the same texture, the ginger half – flavoured with powdered ginger – also has crushed gingernut biscuits in it, while the flavour and texture of the pineapple half comes from minced candied pineapple.
The colours of the two portions looked almost the same, so I had to add some food gel. Pineapple would be yellow, of course, but pink was the closest I could get to the colour of ginger.
...then cover with marzipan and decorate
I had a little trouble with the marzipan and didn't do a neat job of wrapping the cake, but hey, when the loaf was right side up, the top scored and decorated with candied pineapple slices, who could tell but me and the kitchen sink?
Was this a cake fit for a queen? Don’t know about the British monarch, but Mama, queen of the house of Ragavan, decreed that she would be taking several slices of it home with her.

Gingernut-Pineapple Battenberg Cake
Serves 8-12

100g butter, softened
100g sugar
2 medium eggs
50g ground almond
100g plain flour
2 tsp baking powder
Pinch of salt
1 tbsp milk
25g gingernuts (2 biscuits), finely crushed
1 tsp powdered ginger
25g candied pineapple (1 large ring), finely chopped
Red and yellow food gels

To assemble
80ml apricot jam, microwaved for a few seconds to soften
200g marzipan
1 candied pineapple ring, cut into short lengths

Grease an 18cm square baking tin. Cut baking parchment twice the length of the base of the tin. Make a crease in the centre and fold up to fit into the base of the tin. Preheat oven to 170°C. 
Beat the butter and sugar until light and creamy. Add the eggs, one at a time, beating well after each addition. Mix in the ground almonds.
Sift the flour, baking powder and salt together three times. Fold flour mixture into the wet ingredients. The batter should be a dropping consistency. If too firm, add a little milk.
Divide the mixture into two equal portions. Add gingernuts and powdered ginger to one portion. Colour this portion with red food gel. Add glace pineapple and yellow food gel to the other portion.
Place the two portions in separate sections of the tin and bake cake for 20-25 minutes, until springy and a toothpick in the centre comes out clean.
Cool cake on a wire rack for 10 minutes, then remove from tin and cool completely.

Assembly
Cut each portion in two equally. two different coloured logs together with apricot jam, and then sandwich the two pairs together with more jam in a checkered pattern. Set aside.
Dust a large flat surface with icing sugar then roll the marzipan in an oblong shape that is wide enough to cover the length of the cake and long enough to completely wrap the cake. Brush the top of the cake with apricot jam. Place the cake on the marzipan, jam side down. Brush the remaining three sides with jam. Press the marzipan around the cake, making sure the join is either neatly in the one corner, or will be underneath the cake once turned over.
Carefully flip the cake over so that the seam is under the cake and score the top of the cake with a knife in a criss-cross pattern. Neaten the ends of the cake and remove excess marzipan by trimming off a small bit of cake on both ends to reveal the pattern. Decorate the top with pieces of candied pineapple.

Sunday, June 24, 2012

Rise of the pancake

SOURDOUGH PANCAKES WITH CHOCOLATE CHIPS 
Every definition of the word “pancake” points to flatness:
a. (cookery) a thin flat cake
b. (aeronautics) an aircraft landing made by levelling out a few feet from the ground and then dropping onto it (also called a pancake landing)
c. (grooming) a stick or flat cake of compressed make-up
d. (verb) to flatten; e.g. The car had been pancaked by the bus.
e. (photography) pancake lens – colloquial term for a flat, thin lens (short barrel)
f. (idiom) flat as a pancake – extremely level
Flat. Right. We get it.
And then there's the word “flat” itself, which is defined one way as lacking in interest or flavour.
Pancakes can be flat in terms of taste and very often are simply the vehicle for the accompanying fruit and cream and fillings, but not when it comes to sourdough pancakes. With that additional layer of flavour that comes from the leaven, there's nothing dull or insipid about sourdough pancakes.
Make the batter
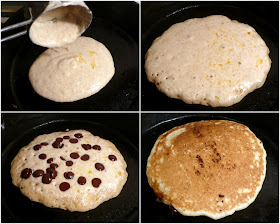
Although some recipes simply include the discarded leaven in the batter, which is for the tangy taste, these pancakes use refreshed sourdough starter, which provides rise as well. After refreshing and leaving aside overnight (although a couple of hours is fine), it was bubbly as in the photo grid above, top left, and fragrant – it smelled like vanilla actually. Or maybe it was just that sweet alcohol aroma.
After the refreshed sourdough starter is combined with more flour and water to make the pancake starter (top right), I refrigerated the mixture for another overnight rest. It won't produce so many surface bubbles but it will have doubled in size (bottom left) the next day. When deflated, it will be a very soft dough, but once the other batter ingredients are added, it will be a thick liquid (bottom right) and bubbles will start to form as the acid in the sourdough starter reacts with the baking soda.
These pancakes, obviously, are not something that can be whipped up when the craving hits. The way I make it, between refreshing the starter and finally eating a pancake, it takes roughly two days. It works around my schedule so I'm fine with it. If it were as easy as making non-sourdough pancakes, I would be eating them every day and despite how good they taste, that's not a good thing.
Cook the pancakes
The recipe I referred to is from cmomcook with very slight changes. The original recipe uses one egg, and although I halved the recipe, I still used a whole medium egg.
Of course, the first pancake got burnt. I was watching the bubbling batter with excitement and was focused on taking pictures, that more than a few minutes had passed before I turned the pancake over to cook the other side. The finished pancake in the photo grid above, bottom right, is the third one I cooked and by that time I was more attentive. It has a few streaks of melted chocolate on it from the one made before.
Burnt or not, I had that first pancake straight off the griddle with a dusting of icing sugar and a few squirts of blue agave nectar. 
Flat? Only in shape.
Mop the plate clean
Sourdough Pancakes
Based on a recipe at cmomcookMakes about eight 10cm pancakes

Pancake Starter
½ cup refreshed sourdough starter
¾ cup water
¾ cup plain flour
½ cup whole wheat flour

Pancake Batter
1 medium egg
cup whole milk
½ tsp baking soda/bicarbonate of soda
½ tsp salt
1 tbsp sugar
1 tbsp butter, melted + extra for frying
Rested pancake starter

First prepare the pancake starter: Combine all the ingredients well in a large bowl. Place the bowl inside a large food-grade plastic bag and refrigerate overnight. If making pancakes on the same day, leave on the kitchen counter for at least 4 hours.
Remove pancake starter from the refrigerator an hour before preparing the pancake batter. The starter would have risen quite a bit. Whisk together all the batter ingredients, except the starter, until well combined. Add the wet ingredients to the pancake starter and fold everything together until well mixed.
Heat a griddle or heavy frying pan. Melt some butter in the pan and pour in cup of batter. Wait a few seconds for the batter to settle, then sprinkle on toppings (chocolate chips, berries, etc) if using. When the edges begin to dry and lots of bubbles appear on the surface, flip the pancake. Cook for another 1-2 minutes.
More ways to use sourdough leaven
Sourdough Bagels
Sourdough Banana Bread with Walnuts
Dan Lepard's Sunflower Bread (includes a recipe for leaven)

Wednesday, June 20, 2012

Sourdough Bagels

SOURDOUGH BAGELS WITH VARIOUS TOPPINGS
Belches never sounded so good.
Well actually, the gas escaping from the dough as I kneaded it wasn't a noisy discharge of stomach gases, but more like mellow burps.
I've wanted to bake along with Sourdough Surprises since the group started with donuts back in March. It would have been a good opportunity to use sourdough starter in items other than breads.
Well, I couldn't let the latest "surprise" to make bagels go.
Now, I can't say that I buy bagels very often. They're not a bread you find much in Malaysia, and certainly not authentic either. And while I've made them before, I wouldn't go out boasting that they were anywhere near as good as the real stuff.
These sourdough bagels that I made using a recipe from Wild Yeast are still not fantastic, but I do like the taste and texture a lot. The wheat gluten helped strengthen the dough.
I tried the recipe twice, both times, halving the recipe because it's easier for me to work with smaller amounts. The specified timings, however, didn't work for me, probably because it's too warm and humid here in Malaysia.
At Wild Yeast, the dough is formed into bagels and left to proof at warm room temperature until they are puffy and then refrigerated for four to eight hours. Unfortunately, my bagels overproofed and when it came time to poach them, they deflated. So I had to reshape them, and left them to rise again at room temperature until puffy before poaching them. Fortunately, the over-handling did not affect the texture and chewiness much.
I took no chances the second time. After kneading, the dough immediately went into the fridge overnight and I only shaped the bagels the next day before proofing, poaching and baking. Worked so much better. They were certainly more pneumatic!

Puffy and round with a tight crumb
100% Sourdough Bagels
Based on the recipe from WildYeast
Makes 4 bagels

170g bread flour
5g vital wheat gluten
14g milk powder
8g non-diastatic malt powder
5g salt
60g tepid water
150g 100%-hydration sourdough starter

Poaching liquid
½ tbsp malt syrup
½ tbsp baking soda for boiling
½ tsp salt

Toppings
Seeds
Melted butter and cinnamon sugar

Stir the flour, vital wheat gluten, milk powder, malt powder and salt together.
Combine the water and starter; stir into the dry ingredients until all the ingredients come together into a rough dough. Turn the dough onto an unfloured work surface and knead into a smooth ball, about 10 minutes. The surface should feel satiny and tight.
Place the dough in a lightly oiled bowl, slip it into a plastic bag and refrigerate overnight. If baking on the same day, place dough into a lightly oiled bowl, cover and leave at room temperature until puffy. In my kitchen, it takes 2 hours.
Divide the dough into 4 pieces of about 100g each. Form each piece into a light ball, cover, and let rest for 10 minutes.
Meanwhile, line a cookie sheet with parchment paper and dust it generously with semolina.
To shape each bagel, roll the dough into a cylinder about 20-25cm long without tapering the ends. Wrap the cylinder around your hand, with the ends overlapping by about 5cm in your palm. Roll your palm on the (still unfloured) counter to smash the ends together. (Note: if the dough is a little dry, give it a quick spritz of water with a fine spray bottle before shaping. This helps it roll more easily, and the ends stick to each other.)
Place the bagels on the prepared cookie sheets, and slip into a large food-grade plastic bag. Proof at warm room temperature, until the bagels look and feel a bit puffy.
According to Peter Reinhart, to test if bagels are ready to be poached, place one bagel in a large bowl of water. If it floats immediately, the bagels are ready. If the bagel sinks, remove from the water, dry it off and return to the tray. Allow to proof for longer.
Meanwhile, preheat the oven to 250°C and put a large pot of water on to boil. Add malt syrup and salt. Place a dish towel on a tray next to the stove, and place the seeds for the toppings in shallow plates nearby.
When the water has reached a rolling boil, add the baking soda. Drop the bagels, three or four at a time, into the vigorously boiling water for 30 seconds. Flip them over and leave them for another 30 seconds.
Remove the bagels from the water with a slotted spoon and place them on the dish towel. Dab the tops lightly. If topping them with seeds, upturn the bagels onto the seeds in the plate and press down lightly so the seeds stick. (If using cinnamon sugar, do this only after the bagels are cooked.)
Place the bagels back onto the semolina-dusted, parchment-lined cookie sheet, and place in the oven.Turn the oven down to 200°C once the bagels are in. Bake until golden brown, about 24-26 minutes. About halfway through baking, open the oven door briefly to vent any steam.
Cool on a wire rack.
If topping with cinnamon sugar, brush melted butter on the hot bagels and dip the tops into a mixture of brown sugar and cinnamon.

Monday, June 18, 2012

Here chickpea, chickpea

THICK CHICKPEA AND NOODLE SOUP WITH SPICED TOASTS
Steamed chickpeas are a popular street food in Malaysia. The vendor who sells them along with nuts and crisps, called a kacang putih man, sometimes still package the chickpeas in paper cones, but more often you'll find them in plastic baggies nowadays. Chickpeas are also roasted and that's where the "kacang putih" comes from – literally, "white nuts".
Chickpeas are also cooked into a curry, but apart from those items, I couldn't think of any other way the actual peas are used in Malaysian cooking. Chickpea flour, however, is common in many traditional cakes and used as a batter for fritters.
I boil up a pot of chickpeas all the time and eat them the way other people eat popcorn. Here, I've used them in a soup based on the Moroccan harira. This one starts off like most other soups – with a trinity of vegetables. I've used onion and celery, and because I was thinking of the Moroccan tagine when I made this, I used potato. Towards the end of cooking, when part of the soup is pureed, the thickness comes from the potato. True harira, from what I've read and seen in online cooking videos, is thickened with a cornflour slurry.
Again, thinking back to the lentil soups and tagines that I had in Morocco, I remember them having the taste of meat. So although this soup can be made completely vegetarian, I added a beef stock cube and that reminded me very much of the flavour of Morocco.
Use any type of bread to mop up the soup, but I would recommend making Dan Lepard's chickpea cob loaf, which is not difficult to put together. It is, after all, made with chickpea flour and is the perfect companion to this soup. The spice paste that is brushed on the grilled slices screams Morocco once again.

Chickpea Noodle Soup
Serves 2

1 cup dried chickpeas, soaked for 4-6 hours (or 1 400g can of chickpeas, drained)
2 tsp olive oil
1 medium onion, chopped
3 new potatoes, diced
1 celery stick, chopped
2 cloves garlic, chopped
½ tsp cumin seeds, toasted and ground
Large pinch ground cinnamon
750ml water, plus extra
1 beef stock cube or  tsp beef bouillon powder
1 tbsp finely chopped coriander stems
Salt to taste
20 strands dried angel hair pasta, broken into 5cm pieces
Torn coriander leaves for garnish

Drain the soaked chickpeas and place in a pot. Cover with water and bring to the boil. Turn down the heat and stir in a large pinch of salt. Cover the pot and leave the chickpeas to cook until tender, about 15 minutes. Drain and set aside.
Heat the oil in a large saucepan. Cook the onion over medium heat until soft. Add the potatoes and celery and cook until they start to caramelise. Add the garlic and stir in the spices; cook for 1 minute. Add the cooked chickpeas, water, beef stock cube or bouillon powder and chopped coriander stems. Reduce the heat and simmer for 20 minutes.
Remove about 1 cup of soup and using a hand blender, puree the soup in the saucepan. Return the unblended portion to the pot and add the pasta, plus a little extra water to loosen the mixture. Stir over medium heat until pasta is cooked. Season with salt if required.
Dish out and garnish with coriander leaves.

Spiced Toasts
4 slices from a Chickpea Cob Loaf or other country bread
1 tbsp butter
1 tbsp olive oil
1 clove garlic, minced
⅛ tsp cumin seeds, toasted and ground
⅛ tsp ground cinnamon
⅛ tsp cayenne pepper
¼ tsp sea salt

Toast or grill the bread slices.
Melt the butter and oil in a saucepan over medium heat. Add the garlic, spices and salt and cook for 1 minute. Brush onto one side of the toasts.

Wednesday, June 13, 2012

On Her Majesty's Secret (Tea) Service

SLABS OF QUEEN'S GINGERBREAD...
It's no secret that a lot of dishes have been made and named for Britain's queens. And with Queen Elizabeth II celebrating her diamond jubilee just recently, many of these dishes were reintoduced to the public.

Dan Lepard had this recipe for Queen's Gingerbread in The Guardian (his other recipe in the article was for Queen's Cakes). I made it the same day the article appeared because it was so tempting and fortunately, I had most of the ingredients. I would recommend this recipe to anyone who likes gingerbread. It is spicy and chewy, and I feel like I'm having something substantial even if it's just a slice – a thick slice is more than enough for a good snack. It will be, as Dan Lepard told a commenter, "really very little like the fluffy cake-like gingerbread of today".

My gingerbread looks like a brick and I think it has a kind of Sixties vibe to it. It looks just like one of those cakes in my mother's old cookbooks.

It didn't really resemble the picture in The Guardian and I said so in the comments. But Dan Lepard very nicely replied saying that my cake looks traditional, so I'm happy with the result, after all (and the reply!)

Here's what Esther Copley writes about Queen's Gingerbead in The Housekeeper's Guide: Or, A Plain & Practical System of Domestic Cookery (1838), available on Google Books :

In this honey is employed instead of treacle and almonds chopped fine are added in any proportion you please. Spice sugar candied peel at pleasure. Two pounds each of honey and sugar and half a pound each of almonds candied orange and lemon peel to three pounds of flour will make it very rich one ounce of cinnamon and one ounce mixed of nutmeg cloves mace and cardamoms. Melt the honey and sugar in a very little water not more than a wine glass if less all the better with this mix the other ingredients to a stiff paste. Roll out thin. It is generally cut in squares. When baked wash it over with clarified sugar.
Slabs of gingerbread are nice, but then I decided to cut thinner slices from the brick and bake them again.They turned out a like gingernuts, but softer, and I think they can keep at room temperature longer this way.
...or sliced thin and baked again into chewy rusks
I didn't have all the ingredients, but substitutes work well. I used crystallised pineapple for glace ginger, golden syrup for treacle and green and red glace cherries for dried apricot. I think I'll sprinkle more almonds on top next time.