Pages

Friday, August 31, 2012

Merdeka Day whoopies

WHOOPIE PIES THAT PUT ROSES IN YOUR CHEEKS 
Malaysia celebrates 55 years of independence today. I haven't lived as long but I have seen enough changes in the country in the time that I have. Some of them have been terrific; others, well, those were "developments" of modern times that we could have done without.
But this isn't the place to talk about them.
I will touch on the past though, because on a day like this, it's nice to reminisce about the good times. And a lot of those times, of course, involve food.
My mother used to make Swiss rolls a lot when I was little. A sponge with strawberry jam filling, which was pretty when sliced. We would eat it in bits, from the open end of the spiral to the final bite in the centre. (I'm sure children around the world found it amusing to eat it that way too!)
"Swiss roll" was probably the most exotic and glamorous name for a cake we had heard. Why is it called Swiss roll? Is it really from Switzerland? How do they get the jam in the middle? My parents would have fielded those questions repeatedly.
Imagine if we had ever come across something called a whoopie pie. And red velvet at that? It didn't look like any pie we would have seen. And the only cream cheese we were familiar with was that processed goo that came in glass jars.
Whoopie pies would have kept us in awe for quite a while.
Nowadays "whoopie pie" has become part of mainstream culinary vocabulary, just like macarons, cake pops, Korean tacos and molecular gastronomy. Red velvet – not new in the cake world – is simply one of the latest variations in whoopie pie-dom. 
I've wanted to make whoopie pies for a while now but it wasn't until I was over at Baking Diary  that Jeannie's gorgeous red velvet cookies inspired me to finally get to it. A good way to celebrate Merdeka Day (Malay for freedom or independence), I thought.
I wasn't fortunate enough to get the day off today. When you work in a newspaper, you have to put one out every day (we have four press shutdowns in a year and Merdeka Day is not one of them). But at least I'll have a nice treat to look forward to at the office.
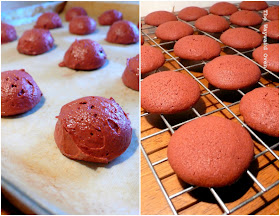
Use an ice cream scoop for consistency in size
I had imagined myself coming with an unusual flavour for both cake/cookie and filling, but in the end I went with red velvet. It is chocolate, after all (despite the red colouring), and that's never bad.
I used the recipe at Jeannie's blog, which comes from Joy of Baking, with just two changes. The recipe calls for buttermilk which I made by reconstituting powdered milk and then added a tablespoon of lemon juice. However, the milk didn't become as thick as real buttermilk, so I used slightly less (150ml compared to 180ml) of it.
As for the red colouring, I used food gel instead of liquid colouring. The gel comes in tiny tubs that hold, oh, I would say a tablespoon, and I used about 1½ teaspoons. I'm pretty happy with the rosy shade of red.
I formed the cookies with a small ice cream scoop to keep the size uniform, and got 44 cookies from the batter. One was a little bigger and the last one was smaller than the rest, so of course those two became the cook's treat!
When the cookies were cool, I started out sandwiching the pies one by one – holding one half, laying on the filling (also with an ice cream scoop) and placing the top on, like so: 
An ice cream scoop apportions the filling equally as well
And then I wised up and made a whoopie pie-filling assembly line – halves laid out on a tray, filling scooped on each one, and lids on. Quick and with less handling by my clumsy self.
Pretty rosy maids all in a row
For two of the cookies, I separated a little frosting and mixed in a tinge of green food gel and a drop of peppermint extract. I thought I would press the sides of the filling in some chopped up green mint sweets but by that time, the frosting had softened and was spreading all over the place. 
Red velvet whoopie pies with mint frosting
To those who have the day off today, have a good break and a lovely three-day weekend. And to Malaysians,
HAPPY MERDEKA DAY!

Tuesday, August 28, 2012

Fermented beef sausages

FERMENTED BEEF SAUSAGES WITH FRUIT AND VEGETABLE CHUTNEY 
When I first made these fermented sausages for a book review, I didn't realise that they were based on the Northeastern Thai sour sausages known as Sai Krok Isan, those fat little wieners that street food vendors in Thailand cook up at every corner.
Authentic Sai Krok Isan are made with pork and pork belly. They are spicy and wrapped in hog's casing, and they contain curing salt apart from rice which helps with the fermentation process.
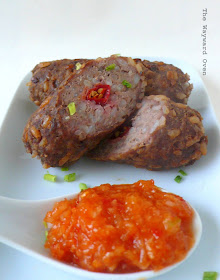
The sausage pictured here is made with beef. The recipe comes from a book containing contributions from chefs of two hotels in Malaysia. The recipes are interesting, but I think the collection serves more as publicity material for the hotels because most of the recipes are just not practical for the home cook. Some of them have really long lists of ingredients  that's fine for an executive chef with a brigade of assistants but another matter for those of us who prep, cook and clean alone. This sausage recipe was one of the shorter ones and the process of making it is much simpler than authentic Sai Krok Isan. There's just a bit of resting time as the rice in the sausage mix has to do its fermentation job.
The Sour Masala Jam was a recipe from another chef in the book and but it goes very well with the sausages and I decided to include as a dipping sauce.

Spicy Thai Fermented Beef Sausages
Makes 4 sausages

200g minced beef
70g chilled cooked white rice
50g garlic, chopped
Salt and pepper to taste
4 bird’s eye chillies
Banana leaf*
350ml cooking oil

Cut the banana leaf into four pieces, each about 25cm x 25cm. Soften the pieces by scalding with boiling water or passing each one briefly over  a flame. Set aside.
Mix the minced beef, chilled rice, garlic, salt and pepper till it becomes sticky. Divide the mixture into four portions. Form four patties and place a bird’s eye chilli in the centre of each one. Enclose the chilli with the meat mixture and form into sausages. 
Wrap each sausage in a piece of banana leaf*. Secure the ends with toothpicks. Let the wrapped patties sit at room temperature for about 6 hours or for 2-3 days in the fridge.
Remove the banana leaves and deep-fry the sausages until well cooked.
* The banana leaf imparts a nice aroma to the beef. Alternatively, wrap the mixture tightly in cling film and then in aluminium foil.

Sour Masala Jam

5 shallots
5 cloves garlic
100g fresh pineapple
2 red chillies, seeded
100g cucumber, seeded
50ml tomato ketchup
50ml chilli sauce
1 tsp garam masala
100g sugar
50ml water

Blend all the ingredients in a food processor until smooth. Pour into a saucepan and cook the sauce for 10-15 minutes until thickened.

Friday, August 24, 2012

Sourdough Indian flatbreads

SOURDOUGH CHAPATI AND HERBED ROTI 

Chapati is one of those foods I grew up with. We usually ate it with a curry made of tinned sardines in tomato sauce and tinned peas. To bulk up the curry with extra starch for her seven active growing children, my mother would add cubes of potatoes.
At first, she used to manually roll out balls of dough into discs. I never helped, being averse to the kitchen. Later, she got a chapati/tortilla press and then, I decided pressing out circles of dough was fun and would fight for a turn at the gadget.
I don't know when my palate started rejecting tinned sardines (still love tinned peas and spuds!) but I have never grown out of my love for chapati. When I started cooking (later in life and only as a fully grown adult), I made and ate the flatbread at least once a week, sometimes with a simple dhall or potato curry, but most often, just on its own.
I've received all sorts of suggestions on the best way to make chapati. The flatbread is often associated with the Sikh community, and all the expert aunties have their own wonderful recipes: Mix ghee into the dough. Brush ghee on the chapati only at the end! Knead for half an hour. Don't knead! Use tepid water. The water must be as hot as you can stand if you stick in a finger! ... and so on. Thankfully, the ladies were not all together in one room when they were proffering advice and I didn't get caught in the crossfire.
The method I like best involves a combination of equal amounts of atta and plain flours, salt to taste and enough freshly boiled water to amalgamate everything into a soft dough. The dough is only briefly kneaded until smooth and set under a mixing bowl on a work surface for about 30 minutes. The residual heat from the water keeps the dough soft. From this basic recipe, other ingredients can be added for various flatbreads, like this Spinach Roti I posted on some time ago.
And why not a sourdough chapati? Technically, a chapati is unleavened, but a starter adds flavour more than leavening. The dough will puff up anyway on the heat even without any rising agent. With the starter, however, I use warm instead of boiling water.
Look at that pufferfish, er, dough go

Sourdough Chapati
Makes 8 (15cm) chapati

1 cup atta flour
¼ cup plain flour, plus extra for rolling
½ tsp salt
Large pinch of green fennel seeds
½ cup fed sourdough starter
½- ¾ cup warm water
Ghee or oil

Stir atta flour, plain flour, salt and seeds together in a mixing bowl. Add the sourdough starter and ½ cup water; stir until the mixture comes together. If still dry and crumbly, add extra  water a little at a time to form a soft, but not sticky, ball. Cover bowl and set aside for 10 minutes.
Divide dough into 8 equal pieces; form into balls. On a floured surface and with a floured rolling pin, roll out each ball of dough into a thin circle, about 15cm in diameter.
Meanwhile, heat a skillet or tawa until very hot. Brush some ghee on the surface. Cook chapati until puffed and lightly charred in places, about  2 minutes. Flip over and cook the other side. Place on a plate covered with a cloth to keep warm (brush with ghee and sprinkle with seeds, if desired), and cook the rest of the chapati.
Making herbed roti

Sourdough Herbed Roti
Makes 8 (12cm) roti

Sourdough Chapati dough
About 3 tbsp chermoula or any kind of herb paste

Form the dough and roll out as for the chapati into 15cm rounds.
Spread the circle of dough with about 1 tsp of chermoula.
Roll up the dough like a Swiss Roll.
Form the roll into a spiral like a snail's shell, pressing the spiral together to form a fat disk.
Flatten the dough lightly and roll out again to about 12cm. It will be thicker than the chapati. Cook like the chapati.

Don't discard, do 
Sourdough Pancakes
Sourdough Pizza

Monday, August 20, 2012

Sourdough Surprises: Pie

SOURDOUGH PÂTE BRISÉE FOR PIES
Sourdough in a pie crust? I never knew that this was done until Sourdough Surprises suggested it for the August project.
I knew it would be a challenge when I read the suggested recipe but I didn't know how big it would be. Mixing the pâte brisée wasn't difficult and neither was doing the fraisage, a dough blending method to achieve flakiness. The heat and humidity were another matter though. At least, that is what I'm blaming ;-)
As suggested, I made a double-crust apple pie and divided the pâte brisée into two discs. Even chilled, the base portion softened pretty quickly when it came out of the refrigerator and I ended up practically smearing it into the metal pie dish! Then I realised I had used the smaller of the two portions of pastry for the base and a patch-up job was necessary. 
The top part didn't behave any better. After taking a chunk out of it to patch up the base, the circle of pastry had to be rerolled and adjustments made. Despite that, it did taste good though it wasn't flaky. Not to be expected, I suppose, after all the pushing and pulling.
I have only provided the recipe for the sourdough pâte brisée below (the way I made it), and not for the pie since it didn't turn out as well as I would have liked. To rub salt in the wound, the base didn't cook properly, and undercooked dough has a rather unpleasant texture. But I'm glad I tried and aspire to do better next time!
Link up like those of us listed here. I'd love to see what everyone has made.

Apple pie with sourdough crust
Sourdough Pâte Brisée
For the original, see Bojon GourmetMakes one 12cm double-crust pie.

110g all-purpose flour
Pinch of salt
½ tbsp sugar
110g cold salted butter, in 1cm cubes
110g cold sourdough starter, approximate

Mix flour, salt and sugar together in a mixing bowl. Add the cubes of butter. Using a pastry cutter, cut into the butter and flour until the mixture looks like gravel, with chunks of butter remaining. Alternatively, rub the butter and flour together with the fingertips. Gradually add the starter while bringing the mixture together into large clumps. You may not need to use all the starter.
Turn the dough out onto a surface, floured lightly if the dough is at all sticky. Divide roughly into 8 portions. Fraisage the dough: using the heel of your hand, scrape a portion of dough across the surface. Repeat with the remaining dough.
Divide the dough into two equal balls. Flatten into discs and wrap each portion in cling film. Chill for at least 30 minutes.
Remove one disc from the fridge. If it is very firm, you may need to let it soften at room temp for 15 minutes or so. On a lightly floured surface, roll the dough out into a 16cm round. Fit into a lightly greased 12cm pie pan leaving a slight overhang. Roll out the second disc to a 12cm round. Place on a piece of parchment and slide onto a rimless baking sheet. Chill both while preparing the pie filling.

Friday, August 17, 2012

Forget-me-(k)not

GARLIC KNOTS TO SHARE... OR NOT! 
Whenever I make white bread, I usually set aside a large handful of the dough to make garlic knots. These little savoury snacks were apparently created by a pizzeria to use up scraps of pizza dough and the garlic-parsley sauce for the garlic bread.
Bits of the dough are rolled out into pencil lengths and tied into a simple knot. If I want to play around with them a little, I make a rosette (make a knot and tuck the ends into the centre; one end in the bottom, the other in the top). Lay them on a tray to proof and from tiny portions, they grow into fat twists of dough. Bake, and while still hot, dress.
Now, about the dressing. I say if you're going to eat garlic, then use a sufficient amount. The minced garlic is heated gently in oil and butter which gets rid of the rawness, but it will still have a kick.
Some people like to brush the dressing onto the knots with a pastry brush. That just gets the dressing on to one side, and I think the coating should be liberal and all over the knot. I prefer to put the freshly baked knots into a large mixing bowl, pour all the dressing on and toss everything together to mix. Leave aside for a couple of minutes to allow the bread to soak up all the dressing, tossing occasionally in between to help the process along.
And then eat the knots straight from the mixing bowl. You don't want to waste even a bit of the dressing.
Oh yeah, this gets the thumbs up!
Garlic-Parsley Dressing
This is enough to liberally dress 20 fat 6cm-long bread knots. Also good spread on toasted baguette slices.

2 tbsp butter
1 tbsp olive oil
2 tbsp minced garlic (about 3 large cloves)
2 tbsp minced fresh parsley
Salt to taste

Heat the butter and olive oil over medium-low heat. Add the minced garlic. Stir occasionally until aromatic but don't allow the garlic to brown.
Remove from heat and pour mixture into a mixing bowl. Stir in parsley and salt. Add the baked bread knots to the bowl and toss until coated with the dressing. Leave knots in the bowl for 2 minutes to soak up the dressing. Serve warm.

Monday, August 13, 2012

Sticky rice snack

STICKY RICE TRIANGLES WITH FRUIT AND YOGHURT 

In Asia, we make loads of dishes with glutinous rice. We steam the rice, at times flavouring it with coconut milk, colouring it yellow with turmeric or blue with bunga telang (a blue flower), and eat it with curries, layer it in a dessert, wrap it around sambal and roast it... the list goes on. There are really a lot of dishes cooked with glutinous rice over here.
Frying it, however, is a little unusual as far as I know (and if I'm mistaken, please let me know). I can't think of a single Malaysian dish in which the glutinous rice is fried. I suppose it's because sticky rice is already so heavy, and frying it would only make it sickeningly rich. We may love our food, but even we know our limits.
But I do remember reading a recipe in an Australian cookbook for deep-fried sticky rice. I don't have an actual recipe, and so simply winged it. It's not a snack I would have very often, but it didn't turn out badly. The fruit and yoghurt make it seem lighter, and I didn't feel like I was just clogging my arteries.

Crispy Glutinous Rice Triangles
Serves 3-4

1 cup (200g) white glutinous rice
1 cup (250ml) water
¼ tsp rosewater
Chickpea flour
Vegetable oil for deep-frying
2 tbsp caster sugar
¼ tsp ground cinnamon
Pinch ground cardamom

Place rice in a bowl, cover well with water, cover, stand overnight.
Grease a 7cm x 7cm square slice pan. Drain rice, combine with 2 cups of water in medium heavy-based pan, bring to boil, reduce heat, simmer, covered, about 40 minutes or until liquid is absorbed and rice tender. Stir in rosewater. Press rice firmly into prepared pan, refrigerate until cold.
Turn rice onto board, cut into triangles. Dredge in chickpea flour; tap off excess. Deep-fry triangles in batches of hot oil until crisp and browned. The rice is already cooked, so as soon as the outside starts to brown, remove from oil to prevent the triangles from becoming too hard. Toss in combined sugar, cinnamon and cardamom. Serve warm with fruit, ice cream or Greek yoghurt.

Friday, August 10, 2012

Sojourn in Sarawak

SALTED TILAPIA DEEP-FRIED LONGHOUSE STYLE 

This was the saltiest dish I had tasted in a while. It was also one of the most delicious dishes I have had.
I have just come back from Sarawak (largest state in Malaysia; situated on the island of Borneo) after a three-night stay with my mother, aunt and sister. This was one of the dishes we had for lunch at the.Dyak café in Kuching (state capital; also the Malay word for "cat") on the day after we arrived.
Every state in Malaysia has its own kind of salted fish and Sarawak is no exception. While I am not unfamiliar with deep-fried salted fish, I only know it as a sort of side dish and smaller fish are often used for that. None of us – and my mum and aunt are expert cooks! – could even tell that what came to the table was salted fish until we took out first bite. No one expected it to be so salty though, but I enjoyed it. I ate most of the fish anyway!
Enjoying the beach (map, with my additions, from Damai Beach Resort)
The four of us stayed at Damai beach and swam (paddled about gracelessly, more like it!) in the South China Sea with Mount Santubong as a backdrop. I haven't had a dip in the ocean in years. The sea bed was a little rocky and the water wasn't very clear, but it was clean and warm. There weren't many people around so we had practically the whole beach to ourselves. I lost a toe-ring in the ocean – I can always get another one; a day at a nice beach is obviously more difficult to come by for me. 
the.Dyak dishes (clockwise from left): ulam raja; paku kubok gulai kechala; and jani tunu
We didn't just have the deep-fried salted Tilapia at the.Dyak, of course. 
There was also Jani Tunu, or grilled three-layer pork. To me, it looked and tasted like char siu with some belly pork still on the meat. It was served with a "special sauce", which I thought was a good blended chilli paste but again, nothing special. The dish was tasty, but not unusual.
What was truly delicious was the Ulam Raja. Translated as king's salad, it's also a plant with soft, pungent leaves. These leaves are minced and mixed with other greens, herbs and spices, and a sweet lime dressing. It was garnished with deep-fried ikan bilis (anchovies).
The other green we had was jungle ferns stir-fried with chillies. These ferns are called bilin or midin in Sarawak. In a raw salad with a similar lime dressing as the ulam raja, they make what is probably Sarawak's signature dish.
We were supposed to go to the Bako National Park the second day of our visit, but it rained heavily that night and into the morning, and our expedition had to be cancelled. We would have had a lovely boat ride through the jungle before arriving at the park, so we were pretty upset. And that's how we ended up driving the 35km to Kuching and having lunch at the.Dyak. Not to take anything away from the café and its good food, but both my sister and I would definitely have preferred spending the day in more natural surroundings.
Seduku (left) and offspring
But we did get to visit the Semanggoh Orang Utan Rehabilition Centre the next day, which was delightful. I have never seen orang utan in the wild so we were very lucky to see seven of them that morning. Visitors come at feeding times in the mornings and afternoons, but the apes don't always show themselves even when the rangers have left goodies for them. 
The oldest one at the centre is a grandmother named Seduku and we saw her first with her offspring (I didn't catch its name). Up next was a female named Delima with her baby. The rangers have nicknamed Delima "Hot Mama", not so much for her attractiveness but because of her temper. She's always the troublemaker and has even bitten off a finger of one of the rangers! Later, we saw a male and then another female carrying her two-day-old baby.
That visit was the best part of the trip for me.

Monday, August 6, 2012

Oven trials


Living without a microwave oven has been more difficult that I thought. Mine went on the blink a while ago.
I've never cooked meals in the microwave. The one I had was basic: a dial for low, medium high; another for the timer. I only ever used it for reheating food (often) and melting butter or chocolate (sometimes). But because I normally cook in bulk, making several meals at a time, the microwave has been a great help when it came to reheating and having a warm meal.
A lot of people I know have never had a microwave oven and have got along just fine. They reheat food by steaming or giving it a quick fry in a wok. Well, I'm not one of them.
So last weekend, I went out and got a new oven.


Wait, no, no, I am fully aware this is not a microwave oven. I haven't gone daft, I know it's a toaster oven.
See, after giving it some thought, and considering my limited use of the microwave oven, I decided a toaster oven would be better. It can reheat and melt, but also toast. Best of all, it can also bake. Small items and small amounts, of course, but that also meant I could bake just one or two items, enough for one or two people, and, best of all, I didn't have to turn on the big oven, which generates too much heat in my apartment. I live in Malaysia, for goodness' sake; I need warmer days like I need a hole in the head.
The first thing I did was test the temperature of the toaster oven. I cranked the oven up to "Toast", put an oven thermometer on the little shelf inside, and turned on the oven. In just five minutes, the thermometer read 230°C! Even the big oven (the same wayward one of this blog's title) takes 40 minutes to get there.
Fortunately, I already had some sweet yeast dough that I had made earlier and could carry on with my experiment. I pinched off two golf ball-size pieces of dough, shaped and placed them on the oven tray which measures 22cm by 18cm (about 9" by 7.5"). When the dough was proofed, they went into the oven at 180°C and after 20 minutes, out came two perfect buns!
You can't have everything, of course, because notice that the bread took 20 minutes to bake – about 12 minutes too long for buns these size.
But baking them didn't increase the temperature in my flat.
Later in the week, I did another trial. I filled the last bit of sweet dough with some date paste like this:
Rolls proofing
... and baked the pastries. They came out like this:
Baked in the toaster oven
Again, they took longer than if they were baked in a standard oven, but hey, that's not bad. And you could never do that in a microwave oven.

Friday, August 3, 2012

Giardiniera: A drunk gardener?

USE YOUR HEAD: HOT CELERY GIARDINIERA 

You know how you have to buy a whole head or bunch of celery (why is it called a head, and who's head is shaped that way?) and it takes forever to use up all the ribs? Celery keeps well, but still, finding ways to use it is not always easy for me.
But an episode of Man v Food filmed in Chicago featured a restaurant that served a sandwich garnish/relish called giardiniera (here's a video; the giardiniera appears at the 3.23 mark). It was made with celery and had chilli in it and it looked delicious. I had never heard of this pickle and looked it up.
It was interesting to find out that the word "giardiniera" does not only refer to mixed pickles, but is also Italian for a lady gardener and a station wagon. And since "pickled" is slang for drunk, well, I don't need to say what image popped into my head.
Some pickles have to be "cooked" in heated vinegar and undergo a few steps before they can be eaten, but making the giardiniera seemed a lot easier. Here are a few recipes I looked at before I made mine:
Michael Symon's recipe was the one that used only celery along with the chillies and what-not, while the other two had other vegetables in the mix as well, like cauliflower and peppers (capsicum). There were differences in the kind of vinegar that was used too: some used white, others used apple cider or wine. All had some kind of chilli pepper and various spices.
I went with the spirit of all these recipes, but didn't follow any particular one. And that's completely okay, I'm sure. The pickling juice has a good flavour, which was absorbed by the celery. The vegetable retained its crunch, and I am pretty happy with it. 
Slice the celery, chilli and onion
I sliced up (thinly) almost a whole bunch of celery which was around 450g or about 3½ cups. I added a couple of sliced green chillies (don't know what they're called; they're Asian chillies and not very hot) and some red onion. Shallots would have been better, I think, but I didn't have any. 
They were tossed together, salt was mixed in, and enough water went on top to cover all the ingredients. The bowl was covered with cling film and left on the kitchen counter overnight.
Add the spicy vinaigrette to the vegetables 
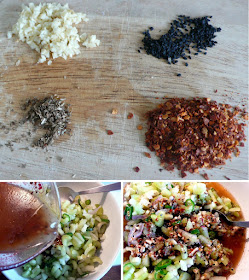
The next day, the mixture was drained well to get rid of the salted water. A combination of spices came next: minced garlic, chilli flakes, dried oregano, nigella seeds, black pepper, and sugar – just enough of each to produce what I thought was a good flavour. Because the fresh green chillies were quite mild, I added quite a lot of chilli flakes to increase the heat. Everything was whisked into a mixture of apple cider vinegar and rice wine vinegar (I had to use two types because I didn't have enough of either to make up the required amount! But this proves how easy it is to adapt the recipe) and sunflower oil, and this was poured onto the celery, which was then bottled and placed in the fridge for 48 hours before I tasted it.
Now I have to make a sandwich so that I can top it with giardiniera just like that episode of Man vs Food which inspired me to make the garnish in the first place. Only problem is I've been so engrossed in watching the Olympics that I haven't bothered to cook at all this past week.
Crunchy garnish for burgers
Hot Celery Giardiniera
Makes about   cups

450g celery, sliced thinly (about 3½ cups)
2 finger-length green chillies, sliced thinly
1 medium red onion, sliced thinly
2 tbsp table salt
3 cloves garlic, minced
1 tbsp dried oregano
2 tsp nigella seeds
3 tbsp dried chilli flakes
1 tsp freshly ground black pepper
1-2 tbsp brown sugar
250ml (1 cup) apple cider or rice/white vinegar (or a combination)
250ml (1 cup) sunflower oil
Sea salt to taste

Combine the celery, green chillies and onion in a large non-metallic bowl; mix well. Stir in table salt and cover with water.  Cover with cling film and leave on the kitchen counter overnight.
The next day, drain the celery in a colander. Place in a bowl and set aside while you make the vinaigrette/marinade.
Whisk the remaining ingredients together until amalgamated. Add to the drained celery. Stir to combine and place in a clean bottle. Cover the top of the bottle with cling film, cap it and refrigerate. Marinate for 48 hours before using.