Pages

Tuesday, January 29, 2013

Caro mio, please bring me my slippers

BATTERED FOOTWEAR: SEMOLINA CIABATTA AU LIQUID LEVAIN 
When I decided to try out some breads that are made with liquid levain and more water than usual, I was a little apprehensive. A 130%-hydration dough is much higher than I am used to and I was worried that it would be too wet for my inexperienced self to handle.
I am happy to report that the two loaves I have made so far have turned out well. Now, while I am not yet putting to rest my concerns, at least I know I am not completely incapable of handling such high-hydration doughs.
Both were hybrid doughs with a touch of instant yeast. The first loaf was a straightforward pain au campagne (pictured right), made solely with unbleached bread flour. It was shaped as a boule and baked in a Dutch oven. (The scoring is atrocious but I'm working on that.)
The second dough had semolina flour along with a combination of all-purpose and strong bread flours which is said to replicate French T65 flour (high-protein baguette flour). The recipe for the dough was loosely based on applepiepatispate's take on Eric Kayser's Ciabatta au Liquid Levain.
As expected, the dough was wet and slack. I used the slap-and-fold method to knead until the gluten was developed and the dough became smooth, and then did the stretch-and-fold a few times over an hour. Overnight in the fridge, the dough rose but not by much. As I didn't have time to make the loaves, I had to leave the dough in the fridge for another day, and at the end of it, the dough had almost come up to the top of the container.
The dough tripled in bulk after two days in the fridge
Many recipes instruct to divide the proofed dough, fold each portion into thirds and leave them to rise a little before baking as loaves. I didn't do his, nor did I stretch the pieces into slipper shapes. I simply cut off three pieces with the bench scraper, placed each log on parchment paper and handled them as little as possible to avoid degassing.
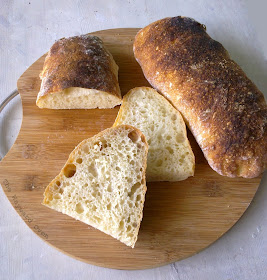
The loaves had a good tang and the semolina flour is slightly sweet, so I have no problem with the taste of the loaf. The crumb is moist and springy, although I would have liked bigger holes. And I would like to say that the dark crust is totally intentional, but it is, in fact, burnt. But like those bits at the end of a roast, the flavour is really good. Ciabatta are supposed to look like battered slippers, aren't they?

Overnight Semolina Ciabatta au Liquid Levain
Makes 3 loaves

Liquid Levain

25g mother starter
130g water
100g bread flour

Combine the ingredients in a jug, cover and leave at room temperature until bubbly and tripled in size, 8-12 hours. 


Final dough

150g liquid levain
350g water
233g all-purpose flour
117g bread flour
150g semolina flour
11g salt
⅛ tsp instant yeast

Mix levain and water. Stir in the three kinds of flour. Autolyse 20-30 minutes.
Sprinkle salt around the edge of the dough and the yeast in the centre. Incorporate until combined.
Knead until smooth, using whatever method is comfortable. The dough will still be soft but will start to feel more elastic.
Ferment at room temperature for 60 minutes, with three stretch-and-folds, ending with a ball. The ball should expand slightly each time.
Place dough in a large lidded container and refrigerate overnight or up to four days.
Remove container from refrigerator an hour before shaping.
Dust a work surface heavily with flour. Cut three wide strips of parchment paper and place them on a tea towel with space between them.
Transfer dough to the floured surface, degassing as little as possible. Dust the top with flour and divide into three fat logs. Place a log on each of the strips and bring up the tea towel between them to keep them apart. Cover with another tea towel and proof for 1 hour.
Prepare the oven for hearth baking with a steaming pan in the bottom. Preheat to 230°C.
Transfer loaves (still on parchment) to the oven and pour hot water into the steaming pan. Bake for 12 minutes, then turn the loaves around. Turn down oven to 190°C and bake a further 15-20 minutes until tops are dark and crusty.
Cool for 45 minutes before slicing.

Sunday, January 27, 2013

Daring Bakers: Gevulde Speculaas

SPICY DUTCH PASTRY: GEVULDE SPECULAAS 
Francijn of Koken in de Brouwerij was our January 2013 Daring Bakers’ Hostess and she challenged us to make the traditional Dutch pastry, Gevulde Speculaas from scratch! That includes making our own spice mix, almond paste and dough! Delicious!
Francijn was right – the Gevulde Speculaas was indeed delicious, and fun to put together too. At first, it was daunting to see the number of different spices used in the mix – nine in all! – but when combined, every one of them was essential: cinnamon, cloves, mace, ginger, white pepper, cardamom, coriander, (star) anise, and nutmeg.
I had all the spices in my pantry as many of them are used in curries. While I am not a big fan of cloves, I did not omit them from the mix. After tasting the pastry, I was glad I didn't.
Most of the spices I stock are whole – the only ground ones I have are cinnamon, ginger, white pepper and nutmeg in ground form. I chose to use the whole ones and proceeded to toast them separately, then pound (with a mortar and pestle) each one into a powder, and finally to sift them! That was the most elaborate part of the challenge for me, but I was getting pure spices and didn't mind the extra work.
Here's the recipe in PDF. In it, Francijn writes about the history of Dutch spice trading and the background on this lovely pastry. Malaysia, or Malaya at the time, was of course part of the spice route, and there is a history of the Dutch in this country too. 
Gevulde Speculaas is two layers of dough with another layer of homemade almond paste (pictured right) sandwiched between them. I used ready ground almonds which I get from the baking supply shop over here. The paste also consists of sugar, and lemon zest and the binding agent is an egg. I had read that flax seed paste can be used as a substitute for egg so I toasted and ground flax seeds and mixed the powder with water. After sitting for a while, the mixture has a gel-like consistency. In place of one egg, use 1 tablespoon of whole flax seeds, grind them and then mix with 3 tablespoons of water. The flax seeds give the almond paste a light brown hue, which is perhaps why the middle layer is not so distinct in the pastry.
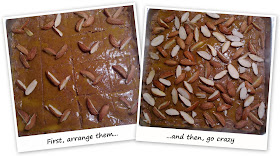
I only strayed from Francijn's recipe in one respect, and that was to use almonds with their skin on for the decoration on top. I think they taste better after they get toasted in the oven. They are halved to offer some contrast in colour.
After seeing the finished pastry from some of the Daring Bakers on the DB forum (see the pictures in a slideshow at the site), I was keen to try the beautiful patterns made with slivers of almonds, but I knew it would be too much to handle since I only made the gevulde speculaas last night. I started out with a simple arrangement, and then decided to just sprinkle on a whole lot of the halves. More crunch to enjoy!

Wednesday, January 23, 2013

Shay... um, say yay for shakshuka

SHAKSHUKA MAKES ME SMILE
When chef du jour Yotam Ottolenghi talks about the food he eats and cooks, I immediately make a mental note to go look up some recipes for those very dishes. He's featured in The New Yorker food issue of Dec 3, 2012, and when I turned to the opening page with his portrait, the first thing that came to mind was: Take notes Nigella, now THIS is how you lick your fingers.
In the profile piece, Ottolenghi's friends talk about how the food at his delis and restaurants has to be "smiling" and he's been known to remove the food on display if it is not. The interviewer, Jane Kramer, wrote, "The smiliest dish I'd seen that week was shakshuka – a North African breakfast from Plenty, cooked and served in little cast-iron skillets".
I knew exactly what "smiling" food was after I made and ate shakshuka.
In his Guardian column a few years ago, Ottolenghi gave a recipe for shakshuka from his cookbook Plenty. There's also a video of him preparing the dish.
I didn't use the recipe but my dish has similar elements.
The essential ingredients are egg(s) and tomato sauce; the others are a bonus 
The tomato sauce is homemade and uses both fresh and tinned tomatoes. The lovely and flavourful cherry tomatoes add chunkiness and freshness to the dish.
But the star of the show, at least in my pan, is the egg. It is one of the freshest eggs I have ever bought – but it is certainly the most expensive. I was at the organic produce shop and picked up a pack of 10 eggs, paid for it and only checked the receipt when I got home. The pack cost RM13, which is almost two and a half times the price I usually pay for another brand of free-range eggs!
And it wasn't a mistake because I went to check the price at the shop the next day. Yikes!
With such expensive eggs, I told myself that I should have them fresh and not use them in baked goods, which is what I usually use eggs for. Shakshuka fits the bill.
I made the dish this way: Sauté some halved cherry tomatoes briefly in a skillet, add chopped garlic, then some tomato sauce. When it starts simmering, make a hole in the sauce, put in a sliver of butter and break an egg directly into the space. (I don't like a runny yolk so I broke it. Not so pretty, I know.) Cover the pan and leave until the egg (the white actually) is just set. Grate Parmigiano-Reggiano over the top and sprinkle some chopped spring onion around the pan. Serve with homemade crusty bread and eat straight from the pan.
I know this is not an authentic shakshuka, but it made me smile. And then I licked the sauce dripping off my fingers...

Sunday, January 20, 2013

Sourdough Surprises: From brioche to babka

MOCHA-CINNAMON SOURDOUGH BABKA
Who would have thought that you could have too much chocolate. Being generous was certainly detrimental this time.
Sourdough Surprises had a double challenge this month: use our starters to make sourdough brioche, and then use the brioche dough to make babka. I kept to the traditional flavours of chocolate (grated) and cinnamon for the filling.
The dough I made was a little too wet and so I added a lot more flour to firm it up. I took about a third of it and made panettone, and the rest, I filled, rolled and formed into a babka. The loaf was quite heavy and didn't look like it would rise much, so I placed it in a small cardboard loaf case (great for gift loaves). In the oven, however, the loaf expanded and the box looked like it might burst its seams! (The panettone turned out well because they were baked in cupcake-size boxes.)
Babka 1: Bursting out of the cardboard loaf case; and too much chocolate
This was like trying to encase my wobbly bits in Spanx, only I used a pair that were a tad small so that the lower part was compressed and the upper part was pushed upward and outward like a muffin top. Add to that too much filling and the result was a very close crumb and oozing chocolate. The loaf was still a little undercooked, I felt, even though I had baked it for longer.
Okay, first time, not good, so I tried again. This time I didn't add extra flour (but with a tiny bit of instant yeast just for insurance) and instead of kneading the "usual" way, I used a kind of slapping and folding technique shown by Richard Bertinet in this video (I did it in a less professional manner, of course). I kneading directly in the large ceramic mixing bowl and with just one hand. 
It was amazing how that sticky slack dough was transformed and though it took me about 20 minutes, it did lose its stickiness.
The slap-and-fold method of kneading dough in a bowl
When you first start to knead, there is a dull thud as the heavy dough hits the bottom or side of the bowl. As it gets more elastic, the sound transforms from a plop to a thwack and finally a slap. You can feel the texture changing as well. It's all very exciting!
The pictures are a little lemony-green because I was doing the kneading at night when the light wasn't good. When the dough was slapped against the bowl, it sometimes caused the bowl, heavy though it was, to clatter against the counter-top. If any of my neighbours could hear all the noises, they must have wondered what the heck was going on in Apartment 12!
For the second loaf, I looked up some Jewish babka recipes. This one has an interesting filling of  instant coffee, cocoa powder and cinnamon, and I mixed up the filling to my own taste. There's only a little coffee but it boosts the flavour of the chocolate.
This time the loaf rose during proofing (and I didn't overfill the cardboard box!) and it had a nice open crumb. Peter Reinhart's advice is to use a toothpick to poke a few holes into the loaf to burst the air bubbles before baking, but I forgot and that's why there is a separation between the filling and the dough (see opening picture, top). Anyway, it proves how light this babka is so I am not  complaining.
See what the Sourdough Surprises baking group came up with:

Babka 2: This time it fits the cardboard box perfectly
Mocha-Cinnamon Sourdough Babka
Makes 2 medium loaves + a few buns
Without the filling, the dough can be baked as brioche.

Levain
50g mother starter (at 80% hydration)
65g water
100g flour

Dough
All the levain (about 217g; it is quite stiff)
56g water
21g honey
⅛ tsp instant yeast (optional)
1 whole medium egg
2 egg yolks
Seeds from 2 vanilla pods or 1 tsp pure vanilla extract
315g bread flour
4g salt
49g caster sugar
150g butter, at room temperature

Filling and topping
20g soft brown sugar
5g icing sugar
5g cocoa powder, sifted
1g instant coffee granules
¼ tsp ground cinnamon
1 egg white
2 tbsp caster sugar
1-1½ tbsp almond meal (ground almonds)

Make the levain: Combine all the ingredients, cover and set aside for 12 hours. If it is not bubbly at this time, remove half and feed it again. Leave for another eight to 12 hours.
Make the dough: Place the levain in a large mixing bowl. Combine the water, honey and yeast (if using); stir into the levain. Leave for five minutes.
Combine whole egg, yolks and vanilla seeds. Stir into levain mixture.
Combine flour and salt and stir into levain mixture. Stir in sugar.
Add butter in three batches, stirring together well each time to incorporate completely. The dough will be slack.
Knead the dough using whatever method you are comfortable with until the dough holds together well. It will be elastic and leave the side of the bowl.
Line a baking tray with parchment, with two sides overhanging. Spread dough onto tray, place tray inside a food-grade plastic bag and proof overnight in the refrigerator. The tray "shapes" the dough into a rectangle and makes it easier to roll out when ready to fill.
The next day...
Lightly grease two loaf pans.
Make the filling: Combine brown sugar, icing sugar, cocoa powder, coffee granules and cinnamon in a small bowl. Set aside.
In a medium bowl, mix egg white with 1 tsp water.
Assembly
Transfer cold dough rectangle to a lightly floured surface. Roll out to a 5cm-thick rectangle. Brush egg white over the dough, then sprinkle the cocoa-coffee mixture on top. Reserve the remaining egg white. Roll up jelly roll style. Cut dough to a length that will fit the loaf pans, and twist each half three times. Place in the loaf pans. Slice any remaining dough for cinnamon rolls. Cover with cling film and leave to rise.
Preheat oven to 180ºC.
Make the topping: To the remaining egg white, add sugar and almond meal. Brush the mixture over the top of the loaves. Using a toothpick, poke a few holes into the loaves to burst the air bubbles. Place loaves in the oven. If the tops brown too quickly, cover with foil. Bake until a toothpick inserted in the centre comes out clean, 40-50 minutes.

Thursday, January 17, 2013

Dough! It's not so hard

BUTTERMILK CAKE DOUGHNUTS 
I don't deep-fry many things, but when I do, it's usually a sweet snack food. And nothing says sweet snack food more to me than doughnuts.
From the snack food vendors, I can get delicious tapioca or banana fritters, and the local doughnuts they make are usually with sweet potato. Chain-store outlets have some nice doughnuts, and they look enticing with their chocolate-covered tops and sugar glazes, but they all have an after-taste that is unappealing.
I usually leave deep-frying to the experts. I never know how to gauge when the oil is at the right temperature, and when I tell people I use a clip-on thermometer, they laugh at me because to them deep-frying comes naturally.
But I go ahead with these doughnuts. I like the taste and texture and I think it has something to do with the cakey crumb, which I prefer, but the vanilla and allspice are definitely plus points.
Use a doughnut cutter for easy shaping
Buttermilk Cake Doughnuts
Makes 12 (7cm) doughnuts and 12 doughnut holes

90ml milk
2 tbsp white vinegar
270g all-purpose flour
1 tsp baking powder
½ tsp baking soda
½ tsp salt
¾ tsp ground allspice
2 tbsp vegetable shortening
90g caster sugar
1 medium egg
1 tsp pure vanilla extract
Vegetable oil for deep-frying
Snow sugar (a non-melting powdered sugar; alternatively use regular icing sugar)

To make the buttermilk (actually, soured milk), combine the milk and vinegar and set aside for 10 minutes; it will curdle and thicken.
Sift flour, baking powder, baking soda, salt and allspice together.
In a large mixing bowl, cream the shortening and sugar together. Beat in the egg and vanilla.
Stir in the flour mixture and buttermilk alternately in three batches, starting with the flour, and mix to a soft dough. Cover the bowl and refrigerate for at least 1 hour but no more than 6 hours.
On a lightly floured surface, roll out dough to 1cm thick. Use a doughnut cutter to cut out 6cm rounds and the holes. Alternatively, use cookie cutters in two sizes.
Pour about 6cm of oil into a medium saucepan and heat until simmering (a deep-fry thermometer will show 190°C). Fry the doughnuts and holes until golden, 20-30 seconds on each side. Remove from oil onto a plate lined with kitchen paper. Dust with snow or icing sugar and serve.

Saturday, January 12, 2013

Whole bread kit and caboodle

WONDER BREAD 
If I'm going to make new year resolutions, I'd rather they be something I already do and enjoy doing... and just aspire to do them better and/or more often.
Well, it's no secret that I like baking and most of all, I like making bread.
I haven't actually resolved to bake bread more often, but if I had, I have so far stuck to it. In the first two weeks of 2013 alone, I have made more varieties of bread than I have in any one month last year.
This enthusiasm actually started a few days before Christmas when my leave started, but continued even when I had to go back to work a few days ago. I've made sweet, savoury and everyday breads with both wild yeast and commercial and I'm happy that, except for one loaf, every attempt has turned out well, and a couple that surprised me because they were so good.

References
There is still much to learn in breadmaking, but the little success I have today I owe to some excellent reference material.
Read, read, read
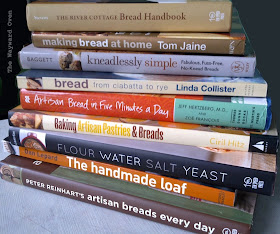
First and foremost, my bread books. All have benefitted me tremendously since I bought them, but the four at the bottom were especially helpful when my baking blitz started. I still have Jeffrey Hamelmann's latest book to add to this stack.
And when it's difficult to visualise a technique from the written word, I turn to YouTube. I've learned a lot from watching demonstrations by both professional and home bakers alike. Trying our different methods has also helped me develop my own way of doing things, for example, kneading and shaping.

Raising agents
I bake bread with wild as well as instant yeast, and they both have their merits. Sometimes, I make hybrid doughs, with a touch of instant yeast. I don't apologise for it because in the end, this is bread that I want to eat and it's still so much better than the commercial varieties.
Leaveners: wild yeast mother starter and instant yeast
My mother starter (I use Peter Reinhart's term because it helped me understand the different "roles" of a leavener) is made from the recipe from Dan Lepard. It was originally made with rye flour. I keep the mother at 80% hydration and feed it weekly – if I remember; sometimes there's a 10-day break between feedings – and lately, it has been with atta (chapati) flour. When I refresh a portion for a loaf, I always make it into a white leaven by adding natural bread flour.

Tools
I do like gadgets, and sometimes I give in to temptation but most times, I resist the urge since I don't have much room in my apartment to store everything.
I did buy a good electric stand mixer a couple of years ago though, but I find myself using my hands to mix and knead bread dough.
Helpful and essential utensils
There are only a few trusty tools for the task: A dough whisk starts off the mixing and then dough scrapers help during the kneading process.
A digital scale, knives for scoring and baking parchment are essential and thermometers have been invaluable. The instant read thermometer tells me whether a loaf is cooked through and I don't have to rely on my own judgement of whether a loaf sounds hollow or not. But the one for the oven has saved my baked goods. As my oven got older, it was taking longer to warm up. My cakes used to come out with the centre still soupy, so I would bake them longer and then the crust would dry out. I only found out after I got the thermometer that the oven is off by about 40ºC! 
An upturned oven tray simulates hearth baking 
Speaking of that wayward oven, I've tried to simulate hearth baking in it not with a baking stone but with an upturned tray. The oven came with a heavy metal tray and I slide bread (that has proofed on parchment paper) directly onto the preheated tray. My "peel" is an old cake board. I put another tray on the wire rack below and fill it with water to create steam.  
Dutch oven
Like many people, I learnt about baking bread in a Dutch oven from Jim Lahey's no-knead method. I have to admit, however, that while I was fascinated with how it worked in the beginning (and there have been times when the bread came out like a dog's chew toy!), the fascination wore off since, besides having bread to eat, I enjoy the whole hands-on breadmaking process.
And then I got Ken Forkish's Flour Water Salt Yeast (my latest book), which uses the Dutch oven in all the recipes. He also uses his hands to do all the mixing right from the start! So I have fallen back in love with using the pot for breadmaking. The picture at the top of the post, by the way, is Ken Forkish's White Bread with 80% Biga. Why would I not want to make more bread in the Dutch oven when it comes out looking like that! More on it in a future post.
And now on with the show!

Monday, January 7, 2013

Studly cranberries

GRINNING CRANBERRY CINNAMON LOAF
"Fruited bread should be just that: bread so thick with rich, plump fruit that some inevitably breaks through the outer surface of the dough, no matter how carefully it is shaped." ~ Dan Lepard, in The Handmade Loaf.
And that's exactly how Dan Lepard makes his raisin and cinnamon loaf – with 50% raisins. This kind of percentage would punish the profits of bakeries, he says, but it's not a dilemma the home baker faces.
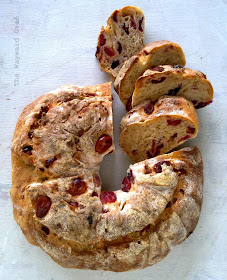
I was certainly all for cramming in the fruit when I adapted Dan Lepard's recipe for my cranberry cinnamon hybrid bread. By commercial bakery standards, it would probably be one of the rejects – I mean, look at that uneven surface and all those fruits poking out of it. It looks like it had been accidentally dropped on the floor before it went into the oven.
But we home bakers are more discerning and know what's really important, don't we?
And what's important to me is seeing those red studs all over the bread and in the crumb too. The cranberries even add a tinge of rosy pink to the dough.
Dan Lepard doesn't call this a hybrid bread, but since it is leavened both with a wild yeast starter and a small amount of commercial yeast, I thought the name was appropriate. I would have put the dough in the fridge for a slow final proof and to build flavour, but since most of the flavour comes from the cranberries, there's no need for overnight retardation. The loaf also contains a small amount of rolled oats.
The entire mixing and kneading (stretch-and-fold method) process is done by hand. The dough is only moderately hydrated (about 56%) and is easy to handle.
Preparing the dough
  1. The oatmeal and cranberries are mixed with the wet ingredients to hydrate them.
  2. Wet and dry ingredients are combined into a rough dough.
  3. After the first stretch-and-fold. The dough is still a little rough.
  4. After the second stretch-and-fold. The dough has become more elastic and smoother.
  5. After the third stretch-and-fold, the dough is left to proof for an hour. A bit of hardened dough in the bowl is used as a gauge of how much the dough will rise.
  6. After an hour, the dough has risen significantly and is closer to the imaginary line.
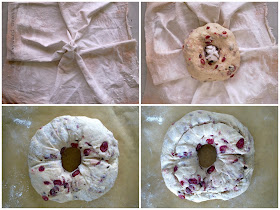
The next step in the process is to shape the loaf. It can be shaped into a simple boule or bâtard, or placed in a loaf tin, but why not follow Dan Lepard's suggestion and make a ring or couronne?
Shaping the loaf
He says that traditionally, bakers use their elbow to make the hole in the centre. I contemplated doing it this way for a second and then went with my fingers instead. Next time. The dough ring is placed on a tea towel or proofing cloth, and the centre of the towel is pulled up though the hole to prevent it from closing as the dough rise.
When the loaf is ready for the oven, it is inverted onto a baking pan and the top is slashed all along the circumference. It comes out of the oven looking like it has a huge grin.
This loaf has been submitted to YeastSpotting.
Ring around the cranberries
Cranberry Cinnamon Hybrid Loaf
Makes a 450g loaf

75g refreshed stiff leaven (mine is at 80% hydration and fed with atta flour)
107g tepid water
12g agave nectar (or honey)
¼ tsp instant yeast
12g rolled oats
100g dried cranberries
188g bread flour
½ tsp salt
¼ tsp ground cinnamon
Rice flour for dusting (it sticks better)

Place leaven, water and agave nectar in a large mixing bowl. Stir in the yeast. Leave for five minutes.
Stir in the rolled oats and cranberries. Leave for 10 minutes.
Combine flour, salt and cinnamon, and stir into the wet ingredients until the mixture comes together. If it  is a little dry, add extra water by the teaspoon. Leave for 10 minutes to hydrate.
Using a wet hand, stretch one side of the dough as far as it will go without tearing and fold it over to the middle. Give the bowl a quarter turn with the other hand and repeat the stretching and folding. Go around the dough a few more times, then form it into a ball. Turn the ball over so the seam in on the bottom. Cover the bowl with a tea towel and leave for 10 minutes.
Repeat the stretch-and-fold two more times at 10-minute intervals. The dough will be more elastic and smoother each time. Cover the bowl and leave to rise for 1 hour.
Transfer the dough to a lightly floured work surface and reshape it into a ball. Using two fingers make a hole in the centre of the ball. Enlarge the hole until the dough is in the shape of a ring.
Dust a linen proofing cloth (or a tea towel) with rice flour and bunch it up in the centre. Place it on a dinner plate. Place the dough ring on the tea towel with the hole over the bunched up bit and pluck it through the hole. Cover the dough with a tea towel and leave to double in size.
Preheat oven to 210°C.
Place a piece of non-stick parchment paper over the dough and a baking tray on top. Invert the loaf onto the paper-lined tray. Remove the proofing cloth. Brush off the loose flour. Using a blade/serrated knife, make a 5mm-deep slash around the circumference of the loaf near the top. Mist the surface of the loaf with water and place it in the oven. Bake until dark brown and the loaf feels light, 25 to 30 minutes. The internal temperature will be at least 94°C.
Let the loaf cool slightly before slicing.

Friday, January 4, 2013

Potato chips on toast

POTATO & SHALLOT FLAT BREAD 
The picture of the Genzano Potato Pizza (right) in Daniel Leader's book, Local Breads, caught my eye. Look at how golden the bread is, with those charred edges and bits on top. It popped off the page and I was prompted into making my own.
Daniel Leader makes the dough for his potato pizza from the recipe for his Genzano Country Bread. I had some leftover pizza dough. The other ingredients for this pizza are potatoes, onions and fresh rosemary. I had new potatoes that were already starting to shrivel; onions, but shallots too; and dried rosemary.
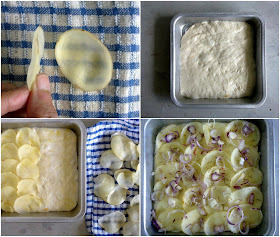
The most interesting thing about Daniel Leader's recipe for me is that he slices the potatoes thinly and suggests using a mandoline for the job – thankfully, a tool I happen to have. I don't know if I could slice anything so thin that you could see through it.
So I put everything together and into the oven it went. And when it came out, well, compare his bread and mine and there's a huge difference, isn't there? It's hard to believe that for the most part, they were made the same way. Oh, how these seductive pictures mislead a person in thinking they can produce goods as beautiful to look at as the ones the experts make.
But I ate the whole thing myself so looks obviously didn't matter.
Use a mandoline to slice the potatoes and layer over the dough
I'm calling this a flat bread though, because it's "spongy", not crisp, which to me is the hallmark of a good pizza. That's my idea of pizza anyway. That's why I can't stand the stuff from chain restaurants. Even with a domestic oven, you can get a good crusty pizza using a cast-iron pan on the stove and the oven grill (broiler).
To make the topping, slice the potatoes very thin. I soaked the slices in water and then dried them on a tea towel before use. I could see the pattern of the tea towel through a slice. Slice some onions or shallots thinly as well. Daniel Leader asks for quarter-inch slices, but I went as thin as I could.
Spread the bread dough into a baking pan. It should be half an inch (1.27cm) thick, but I only had 170g of dough and used a 17cm square tin so it wasn't as thick (however, the dough did rise as it baked). Lightly brush the surface with olive oil.
Layer the potato slices over the dough, overlapping them slightly, and then sprinkle the onions and rosemary over them. A fairy dusting of salt flakes completes the assembly. Bake at 180°C until "the potatoes and onions are tinged brown and the crust is golden".
I really like those thinly-sliced potatoes and next time, I'll put more on. Because they're so thin, the dough won't be weighed down, and the extra slices will still crisp up. It'll be like eating toast with potato chips. Mmmm, carbs...