The Oven has baked its last loaf. This blog is no longer being updated.

My cooking videos appear at youtube.com/janeragavan

I write on food at star2.com

Just three cheesecakes

Tuesday, July 31, 2012

MINI BAKED CHEESECAKE WITH FRESH MANGO 
I am not a big fan of cheesecakes – I would rather eat cheese on its own – but out of the blue, I had a craving for cheesecake. Maybe because I saw this recipe at taste.com.au. I tell myself I am not influenced by pretty pictures, but in this case I was. For shame!
But upon reading the recipe, I saw that it wasn't complicated, there was no long baking in a water bath, and, best of all, I could scale the recipe down to make only three mini cakes.
For the biscuit base, the original recipe uses an actual biscuit (cookie) – Arnott's Granita biscuit. A whole biscuit is placed in the base of the muffin mould and the cheese mixture is spooned on top before baking. The biscuit softens in the heat of the oven. 
I just happened to have leftover crumbs from a homemade digestive biscuit dough (recipe below) and used that instead. These digestives taste just like the commercial type although mine didn't look like those. But The Little Loaf, where I got help with the recipe, managed to replicate it quite well and even added an interesting design.
Chilled and ready for the fruit garnish
With these mini cheesecakes, it's important to pay attention to the baking time. As soon as the tops start to dome and crack a little, the cakes should come out of the oven. The filling will be a little jiggly, but it will firm up as the cakes cool. The top will flatten out as well and provide a level surface to pile on the fruit. I've used mango and a little bit of passion fruit pulp plus a sprinkling of more digestive crumbs.
For my personal taste, I thought the cheese was a little too rich and I could only manage half the cake. Perhaps that richness needed to be balanced with a more tart fruit, or more lemon juice can be added. I'll consider that next time.
Rich and creamy
Mini Baked Cheesecakes
Based on a recipe at taste.com.au
Makes 3

125g cream cheese, at room temperature
55g caster sugar
¼ tsp vanilla extract
½ tbsp fresh lemon juice
1 egg
½ cup Wholemeal Digestive Biscuit crumbs (recipe follows)
Fruit and icing sugar, to serve

Preheat oven to 180°C. Line 3 ramekins each with 2 paper cases.
Use an electric beater to beat the cream cheese, sugar, vanilla and lemon juice until light and creamy. Beat in the egg just until combined.
Divide the biscuit crumbs between the paper cups. Tamp down with the base of a drinking glass. Top with the cream cheese mixture. Bake for 15-20 minutes or until slightly risen and just beginning to crack a little on the surface.
Set aside for 10 minutes, before removing the cheesecakes from the ramekins (leave the paper cases on) and placing on a wire rack to cool completely. Refrigerate for 1 hour or until chilled. Top with fresh fruit (sliced if large) and dust with icing sugar just before serving. If there are leftover digestive biscuits, crumble them on top of the fruit for crunch. 
Digestive biscuits
Wholemeal Digestive Biscuits
From a recipe at The Little Loaf

100g rolled oats, lightly toasted
100g wholemeal flour
1 tsp baking powder
50g soft brown sugar
Pinch salt
100g salted butter, cubed
1-2 tbsp milk

Process the oats to a fine powder in a food processor. Add wholemeal flour, baking powder, brown sugar and salt to the food processor and pulse to mix. Add the cubes of butter. Pulse several times until mixture is crumbly. While the motor is running, add the milk a little at a time until a smooth dough forms.
Use ½ cup crumbs for the base of the 3 Mini Baked Cheesecakes.
If making digestives, proceed to wrapping the dough in cling film; refrigerate it until firm, about 15 minutes.
Preheat oven to 180°C. There are two ways to shape the cookies:
  1. Place the dough between two pieces of cling film. It will be very crumbly. Press or roll to around 3mm thickness. Take off the top piece of cling film and cut out circles using a cookie cutter or drinking glass (about 6cm in diameter). 
  2. Because the dough is crumbly, I prefer this second way of shaping. Line baking sheet with parchment paper. Place a 6cm cookie cutter on the sheet. Place a heaped tablespoon of biscuit dough in the centre of the cutter. Using the base of a glass, tamp down the dough to flatten and compress it into a biscuit. Remove the cookie cutter carefully and repeat with the rest of the dough.
Carefully arrange on a parchment paper-lined baking sheet and bake in the middle of the oven for about 15 minutes. When lightly golden, remove from the oven and cool on a wire rack. Store in an airtight container. If desired, spread one side of the cookies with melted chocolate for chocolate digestives.
Daring Bakers: Crazy for crackers

Friday, July 27, 2012

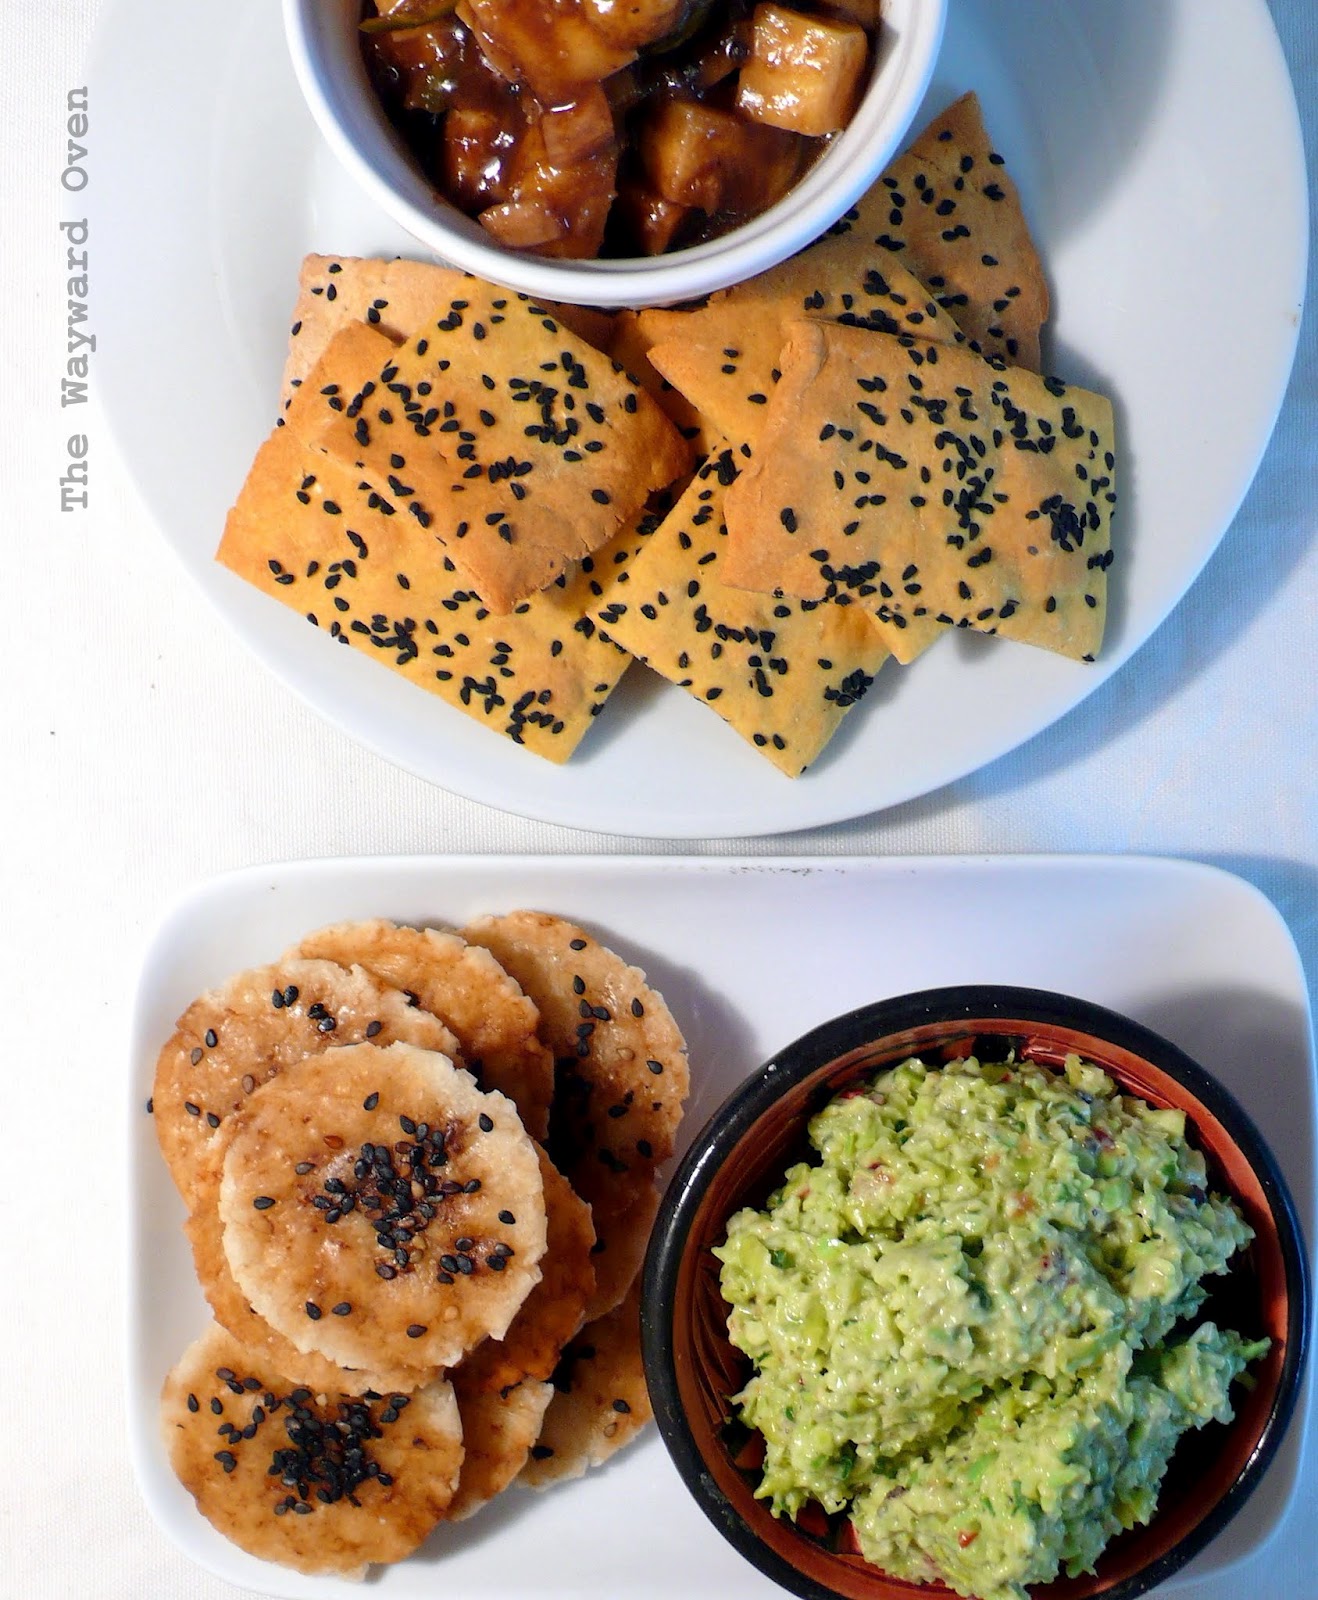
THEY CRACK ME UP: CHICKPEA AND RICE CRACKERS  
Our July 2012 Daring Bakers’ Host was Dana McFarland and she challenged us to make homemade crackers! Dana showed us some techniques for making crackers and encouraged to use our creativity to make each cracker our own by using ingredients we love.
Dana provides several recipes for crackers, all of which inspired variations for my own two. And she inspired the other Daring Bakers as well, as evidenced by the slide show at The Daring Kitchen.
It was mandatory to prepare two different crackers using two different methods of forming. Both of my crackers are formed by hand, but one is rolled out with a rolling pin, and the other is shaped into a ball and then flattened with the base of a glass into disks. I hope those two methods are sufficiently different and meet the spirit of the challenge.
I am not gluten-intolerant, but decided to make some Japanese-style rice crackers called senbei, and some seeded chickpea crackers inspired by Indian papadums that have a cheese flavouring thanks to nutritional yeast.
I only made a small number of each, but the recipes are easily scaled up. They're nice to eat on their own and go well with dips too: rice crackers with edamame pesto, and chickpea crackers with mango chutney. Switching them is an option, though I'd personally stick to the original pairings. 
(I have to admit though that I made the dips primarily because the crackers looked so sad on their own. The dips are easy to make and online recipes abound. I actually ate most of the chutney – the sourness comes from tamarind paste – on its own!)
These crackers will make good TV-watching snacks during the Olympics. Go-o-o-o-o Teams!
Rice crackers with edamame pesto
Japanese Rice Crackers (Senbei)
Makes 12. Easily scaled up.

50g white rice flour (not glutinous)
30g cooked sushi rice
1 tbsp vegetable oil
Pinch of salt
2-3 tbsp warm water

Cracker topping
½ tbsp shoyu (Japanese soya sauce)
½ tbsp honey
Black sesame seeds

In a (mini) food processor, blend the rice flour, cooked rice, oil and salt together until fine. Add water a little at a time until the mixture comes together into a soft dough. Place in a mixing bowl and knead until smooth and elastic, about 2 minutes.
Preheat the oven to 180°C. Divide the dough into 12 portions. Roll each one into a ball. Place a ball of dough in between cling film. Using the base of a glass, flatten the ball into a thin disk. The edges may be a little uneven. Place the disks on a lightly greased baking tray. Bake for 5 minutes, then flip with a spatula and bake the other side until the edges look dry (the crackers may start to brown too), another 4-5 minutes. Turn off the oven.
Meanwhile, combine the shoyu and honey. Remove the crackers from the oven and brush one side with the sauce. Sprinkle with sesame seeds and return to the turned-off oven to dry, 5-7 minutes (not too long or the crackers will get too hard!). Cool on a wire rack. Store in an airtight container.

Chickpea crackers with mango chutney
Chickpea 'Cheese' Crackers
Makes about 20 medium crackers. Easily scaled up.

50g chickpea flour, sifted
50g rice flour
15g nutritional yeast (tastes like cheese!)
½ tsp baking powder
Pinch of salt
¼ tsp chilli powder
2 tsp vegetable oil
3-4 tbsp hot water

Cracker topping
Nigella seeds

Stir all the dry ingredients together. Stir in the oil. Add water a tablespoon at a time until the mixture comes together into a soft dough. Knead gently for a minute until the dough is smooth and firm. Cover and set aside for 10 minutes.
Preheat the oven to 180°C. Roll out the dough on a thick piece of aluminium foil into a rough rectangle or square about 1.5mm thick. Sprinkle the seeds on and press them down lightly into the dough. Score the dough into squares or rectangles with a pastry scraper, crinkle cutter or the blunt edge of a knife. Place the whole sheet of foil with the crackers onto the baking tray and place in the oven. Bake for 12-15 minutes until the tops are brown. Cool and separate along the scored lines. Store in an airtight container.

Sourdough Surprises: Pizza

Friday, July 20, 2012

STOVE-TOP PIZZA ... WITH A LITTLE HELP FROM THE OVEN 
Sourdough Surprises decided on pizza as the theme for its fifth month of the sourdough adventure and boy, was I eager to again use the latest technique I had learnt.
Some time ago, I made a pseudo pizza Margherita in the style of the Neapolitan (pictured right) for the newspaper column, and I was delighted with the result. By adapting recipes (from Peter Reinhart and Cook's Illustrated Cookbook) and instructions (primarily from J. Kenji Lopez-Alt's excellent tutorial at Serious Eats), I managed to produce a pizza that was as close to one cooked in a 400-degree Celsius wood oven: the bottom was crisp and chewy, the crumb was airy and the edges were charred in spots (perhaps a little too charred!). It wasn't a perfect representation, of course, but to be able to make a pizza like this at home was a revelation to me.
Sourdough Surprises recommended the recipe from Sourdough Home but I tweaked it slightly to include some cake flour. Italian '00' flour, which is the best kind of flour for pizza, is apparently softer than normal bread flour and to get that same kind of consistency, America's Test Kitchen suggests the addition of softer cake flour.
Not being an expert pizza-maker – or pizza eater, for that matter! – I couldn't really tell the difference if all bread flour was used, but in terms of look and texture, this was miles ahead of any chain-store pizza. And I didn't even have to try tossing the pizza dough over my head.
Place pizza base in a very hot cast-iron pan on the stove to cook the bottom
So what does one need to achieve that? For a start, good pizza dough of course, and everyone has their own. The other important element is a heavy-based frying pan. I use a a 20cm (8-inch) cast iron pan so my pizza is on the small side. From the amount of dough I make (recipe below), I get three pizzas.
When ready to make the pizza, crank up the oven grill and put the pan on the stove to heat up. Form the dough into a disk to fit the base of the pan. Sprinkle flour on the base of the pan and shake out the excess. Place dough circle into pan and wait a few minutes for it to puff up a little.
Now, depending on the pan that is used, the bottom of the dough will have cooked and turned brown and will not be sticking to the pan. If this happens, then the stove can be turned off. Otherwise, keep the fire on low as you move to the next stage of the cooking.
Put on the toppings, then into the oven to crisp the top
Put on the toppings (but not the fresh leaves – like the basil here), and place the pan under the oven grill. The cheese will start to melt and brown and the edges of the dough will char in spots.
When the top is cooked, place the pan back on the stove to brown the bottom of the pizza. If this had happened earlier, then the pizza is already done. If using fresh basil, for example, sprinkle the leaves on the pizza. Remove it from the pan onto a cutting board, slice and eat.
For this sourdough pizza, I think I may have left the crust on the stove for too long so the bottom was a little burnt. Although it was puffed, the crumb wasn't as open as the commercially yeasted pizza dough I had made before, but I think that was also because it had remained too long on the stove. 
This stove-and-grill method is more involved than baking completely in the oven, but I think the effort is worth it.
See who else went on the sourdough pizza adventure:

The bottom is a little burnt but none the worse for taste
Sourdough Pizza Crust
280g strong bread flour
40g cake (superfine) flour
1 tsp salt
210g (1 cup) fed sourdough starter
1 tbsp olive oil
120g tepid water

In a mixing bowl, combine the bread and cake flours and salt together well. Add the starter, olive oil and water and stir everything together with a large wooden spoon until well blended. The dough should be shaggy (coarse) and a little sticky. Rest for 5 minutes.
If using a mixer, use the dough hook and mix on medium-low speed, or continue mixing with the wooden spoon for 2-3 minutes until the dough is smoother but still soft and supple. It will be tacky but not sticky. If it is still crumbly, add a little more water; if it is sticky, add a little more flour. Rest for 5 minutes.
Continue kneading in the mixer, or if kneading by hand, spread a little oil on a work surface and on your hands. Transfer the dough to the oiled surface. Knead the dough until smooth and elastic, about 10 minutes. 
Form into a ball and place in a lightly oiled mixing bowl. Cover and leave to double in size. 
Alternatively, divide dough into 2 or 3 portions and place each portion in a separate bowl. Place bowls in large plastic bags and refrigerate overnight. Remove dough from the refrigerator 1½-2 hours before making the pizzas.


Pizza with Feta, Sun-dried Tomatoes and Basil Leaves
3 balls Sourdough Pizza Crust Dough
1 block of feta, crumbled
3-4 slices bottled sun-dried tomatoes (sliced into slivers) + oil
Flaky salt
1 bunch fresh basil, leaves picked
Plain or bread flour, for dusting

Put about a handful of flour in a bowl. Use some to dust the work surface. Working with one portion of dough, form it into a ball and dip the bottom into the flour. Place on the work surface and gently stretch it with your fingers to form a disk large enough to fit the fit of your pan, leaving the outer 2.5cm edge slightly thicker than the centre. It doesn’t have to be a perfect circle.
Have all the ingredients ready next to the stove top. Preheat the oven’s overhead grill to high and arrange an oven rack so that you can just fit a cast iron or heavy-bottomed oven-proof stainless steel frying pan (with metal handle) on top of it.
Heat the frying pan on the stove over high heat until lightly smoking, about 3 minutes. Dust the frying pan with flour, tap out excess (remember, the pan is hot). Transfer the dough round to the pan. It should fill up the entire bottom surface. The dough should start puffing up after about 30 seconds. Working quickly, spread some feta and sliced sun-dried tomatoes over the centre of the dough. Season with salt and drizzle with the oil from the sun-dried tomatoes. Transfer frying pan to the oven and grill until pizza is puffed and darkly charred in spots (2-4 minutes). Return the pan to the stove top and scatter a few basil leaves over the surface. Cook until the bottom is darkly charred in spots.
Transfer the pizza to a cutting board and serve immediately. Make two more pizzas the same way.
* * *
Here's the recipe for the tomato sauce I used in the Pizza "Margherita".

No-Cook Tomato Sauce

1 (400g) can whole peeled Italian tomatoes
A few grinds of freshly ground black pepper
½ tsp dried oregano
1 large clove garlic, finely minced
1 tbsp red wine vinegar or freshly squeezed
lemon juice
Salt to taste

Place tomatoes in a sieve over a bowl and drain the juice. Squeeze the tomatoes to crush them. Use the juice for another dish. Place the crushed tomatoes in a bowl with the remaining ingredients. If not using immediately, store in a tightly covered container in the refrigerator for up to 1 week.