Pages

Saturday, December 13, 2014

Spiced macaroni soup

I never thought this recipe would get the reception that it did when I put it up on my newspaper's website, but it did so I thought I would put it up in this space too.

Spiced Macaroni Soup
Serves 3

3/4 cup elbow macaroni
1/2 cup broccoli, cut into small florets (optional)
1/4 cup finely diced celery
1/4 cup finely diced carrot
1/4 cup finely diced onion
1 large garlic clove, minced
1cm fresh ginger, peeled and bruised
1 stalk lemon grass (white part only), bruised
1 cinnamon stick
1 star anise
1-2 bird's eye chillies (cili padi)
750ml water
salt or soya sauce, to taste

Spice powder*
1/2 tsp white peppercorns
1/4 tsp fennel seeds
1/4 tsp cumin seeds
1/4 tsp coriander seeds
2 whole cloves

To garnish
fried shallots (store-bought)
torn coriander leaves
Cooked the macaroni in boiling salted water until firm to the bite (al dente). Rinse in cold water, drain and set aside.

Pound or grind all the ingredients for the spice powder with a little salt into a powder.

* If you do not want to grind the whole spices, get each one in powdered form and mix them together. 

Heat a tablespoon of oil in a medium pot. Add diced celery, carrot and onion and fry over medium heat until the onion turns translucent (do not let the vegetables brown), 8-10 minutes. Add the garlic, ginger, lemon grass, cinnamon stick, star anise, bird's eye chilli and half the spice powder. Cook for 1 minute, then add the water, cover and bring to the boil.

Taste and add salt or soya sauce and more of the spice powder, if desired. When you're happy with the seasoning, add broccoli florets and cook for 30 seconds. Turn off heat.

Divide the cooked macaroni between three bowls and pour in the soup. Garnish with fried onion and coriander leaves.

Thursday, November 20, 2014

Sourdough Surprises: Rolls (Garlic Knots)

Does this look like fried chicken to you? I took this to the office for a colleague's farewell tea and more than one person said they thought it was fried chicken. Huh?

They're garlic knots. I admit they're a lit-t-tle big for a snack but they make good-sized rolls for dinner. They're for this month's Sourdough Surprises.

Anyway, they're made with the 1:2:3 sourdough formula ~ one part leaven to two parts water to three parts flour by weight. It's easy to remember and always produces a good loaf. For these knots, the amounts were: 92g refreshed and very active leaven (at 80% hydration), 184g water, 276g all-purpose flour and a teaspoon of salt (which should be weighed so that it is around 4%, but I winged it this time).

Lately, I've been making cooking videos for work and made this one which I can probably use when I write about bread in the future ~ although before I put it up on YouTube, I will have to edit in new bread knots that don't look like fried chicken!


The dough is bulked proofed in a square container so that when it is transferred to the work surface, I don't have to fiddle around with the shape too much (I learnt this from Paul Hollywood's recipe for ciabatta and watching the latest series/season of The Great British Bakeoff). Using a pizza cutter, I divide the dough into 11 strips (the last one was runty!), tie them in knots and bake them for around 25 minutes. I didn't let them get crusty or too brown on top or they wouldn't soak up the garlic-parsley dressing.


Tuesday, November 4, 2014

The Wayward Oven meets Work

I have neglected this blog. That doesn't mean I haven't been cooking though. My job as a journalist involves writing about food and cooking for print and our website and since I have been doing a lot of that for work, the blog has been dormant.

But I've decided that to keep this blog current and when I don't have any blog-specific things to post about, I should just put up some of the things I've done for work.

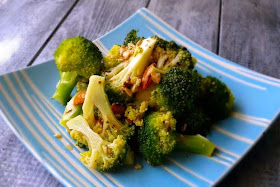
Yesterday, I put up web-exclusive recipes for a cured broccoli dish (that's the picture at the top of the page) and last week, it was for chilli tuna fish cakes, which came with my own stop-motion video:


Stop-motion films ~ that's what I've been interested in for a while now and I plan to make more. It's time consuming ~ so many pictures to take! ~ but it keeps me amused.

Last week, my colleagues and I made four types of cake for our monthly column, Don't Call Me Chef. I made a video of the photo shoot:


I used Windows Movie Maker but I also love YouTube's royalty-free music/sound effects and editing help.

So that's the blog updated. On to working on more articles...

Wednesday, August 20, 2014

Sourdough Surprises: Granola bars

Granola bars are the challenge this month for the Sourdough Surprises baking group. I've made mine with homemade granola that's based on "Aunt Melissa's Recipe" from the book, Artisan Bread in Five Minutes a Day (the recipe can be found online at the authors' site). My tweaks: coconut oil, black sesame seeds, pumpkin seeds, dates and crystallised ginger. This is really good tasting granola.

So I was surprised that the bars didn't taste all that great the day I made them. I used 100g of starter and simply added a spoonful of agave nectar and enough granola for the mixture to hold its shape without being too stiff. But the next day... the taste was so much better. This seems to be the case with all my baked goods made with sourdough starter. Odd. You feed your starter and let it mature through the months and years, and yet it still takes a day to develop in flavour. Huh. You just gotta love it...

Have a look at all the other other granola bars in the group.


Sunday, August 3, 2014

Coconut and lemon curd bars

I made the lemon curd used in these bars with this foolproof method. The only tweak I made to the recipe was to add a tablespoon of corn starch to the mix after the eggs are beaten in. It's advice I took from a cooking show many years ago, and it works ~ the corn starch prevents the eggs from curdling as well as thickens the custard.

Coconut and Lemon Curd Bars
Makes sixteen 4.5cm square bars

Grease an 18cm square tin. Line the base with paper that extends over two opposite sides. Preheat the oven to 180 degrees Celsius.

Place 75g cold butter, 3/4 cup all-purpose flour and 1/4 cup icing sugar in a bowl. Blend with a pastry cutter. Tip into the prepared tin and press to compact. Refrigerate for 15 minutes, then bake the pastry until light brown, 8-10 minutes. Cool.

In a bowl, beat 1 egg and 2-1/2 tablespoons caster sugar together. Add 1 cup lightly toasted dessicated or shredded coconut (or a mix of both).

Spread 3-4 tablespoons lemon curd on the cooled pastry base. Tip the coconut mixture on top and press lightly to even out. Bake until golden, 10-12 minutes. Cool and cut into bars (they're easier to slice after being refrigerated for about 30 minutes).

Tuesday, July 29, 2014

Bread in a clay baker

I have been baking bread in a cast iron Dutch oven, but the loaves are round because of the shape of the pot, and I don't find them completely suitable for sandwiches. But I got a Romertopf unglazed clay baker ~ don't think it was ever used ~ from a thrift shop in San Jose on my last trip to California. Brand new, it's priced at US$59 plus shipping. I got it for just an odd cent over US$4, and carried it home as hand luggage safely bubble-wrapped. How's that for a bargain? I baked an Italian semolina loaf in it yesterday. Had a toasted cheese and mango chutney sandwich this morning.

Thursday, July 17, 2014

Four-times-the-coconut doughnut

Having consumed all manner of the edible parts of a coconut probably since I was a baby, coconut surely flows through my veins. So when I saw the picture for Top Pot Triple Coconut Donuts at Saveur, I had to make it. But an addict never has enough coconut, so mine has four types. Instead of the melted butter of the original recipe, I used coconut oil. It's also used to shape the doughnuts before frying. I didn't use the oil for deep frying though. That would have been over the top even for me.

Wednesday, July 2, 2014

Asian-style braised beef with orange and yam

I made this dish months ago. It was for an article on how to use up Mandarin oranges left over from Chinese New Year ~ which was in January. Since I had the picture, recipe and a blog that hadn't been updated in a while, I thought why not plonk this in.

Asian-style Braised Beef With Orange
Serves 5-6
2 medium oranges
15 cloves
450g braising steak, cut into 3cm cubes
1 tbsp all-purpose flour
2 tbsp black vinegar
2 tbsp soya sauce
1 tbsp Chinese rice wine (optional)
1 tsp whole Szechuan peppercorns, ground
1 1/2 tbsp tomato purée
1 large clove garlic, minced
2 medium onions, peeled and cut into wedges
2 cinnamon sticks
4 whole star anise
1 beef stock cube
300g yam (taro)
Cooking oil
Celery leaves (daun sup), finely chopped

Wash the oranges well. Dry them and stud with the cloves.
Dab the beef cubes with paper towels to dry them. Dredge them in the flour.
In a bowl, combine the vinegar, soya sauce, rice wine (if using), ground peppercorns and tomato purée.
Heat two tablespoons of cooking oil in a large heavy pot. Fry the beef cubes so they are brown all over. Do this in batches and do not crowd the pan. Remove beef from the pan and set aside.
Drain most of the oil from the same pan and add the garlic and onions. Sauté briefly, then add the combined sauce, cinnamon and star anise. Let it come to a boil and return meat to the pot; add just enough water to cover the cubes.
Stir in the stock cube and drop in the two clove-studded oranges. Cover the pot, bring to the boil, then turn down the heat to low and simmer, covered, until the meat is tender and the sauce has thickened, 60 to 90 minutes. Scrape the bottom of the pot now and then so there’s no sticking.
Meanwhile, peel the yam and cut into 1cm-thick wedges.
Scoop out the oranges into a large sieve placed over the pan. With the back of a wooden spoon, press them to extract the juice. Discard the mashed oranges. Taste the sauce and adjust seasoning.
Add the yam to the pot, cover and cook until tender, another 10 to 15 minutes.
Sprinkle beef with celery leaves and serve with steamed rice.

Friday, June 13, 2014

Pide: Rockin' boat-shaped bread

This dough contains vinegar. The smell is strong but only through the kneading and proofing process. Once the dough is baked, the smell dissipates. It's a tip I got from a Dan Lepard recipe for bagels. The dough is more pliable, but it can also be a little sticky. There's very little handling though so I don't add any extra flour. The bread is cooked in a hot pan on the stove and then grilled/broiled in the oven so the top browns. Little pockets of air form in the crust, which is lovely. This bread is based on a Turkish pide, which should be long and narrow ~ they should resemble a sampan or canoe. Mine is more like a Vietnamese round fishing boat.

In Turkey, they use uncooked but spiced minced meat as the filling. I've used cooked ingredients ~ caramelised onion, which Ivy gave me, grilled discs of zucchini and eggpkant, and grated emmental cheese. But just about anything works if it's good. Nothing with too much sauce or gravy though ~ a dry chicken curry would be quite nice.

To make the Pide dough, combine in a bowl: 2 cups bread flour, 1/2 tsp instant yeast, a large pinch of sugar, a large pinch of salt, 1 egg, 1 tablespoon apple cider vinegar, 1 tablespoon neutral flavoured oil, and 3/4 cup water. Stir until the mixture clumps together, adding extra water if it is too dry. Form into a rough ball, cover the bowl and set aside for 10 minutes.

Knead the dough using the fold and stretch method (a 10-second knead three times every 10 minutes) until smooth and elastic. Cover the bowl again and leave until well-proofed and springy. Divide into three or four fairly equal portions. Form into balls. At this stage, the dough balls can be individually sealed in lightly oiled plastic bags and refrigerated for up to 4 days.
Assembly and cooking
Turn on the oven grill. Heat a heavy-based oven-proof pan on the stove over high heat. Add a little oil to the pan.
Flatten out a ball of dough into an oblong shape. Place cooked filling in the centre and cheese along the outside edge. Roll the edges in over the cheese and form into an oval with high sides and tapered ends. If desired, spoon a little beaten egg over the filling.
Carefully place the pide into the hot pan. Turn the heat down and cook the bottom until brown and the dough puffs up, about 1 minute. Transfer the pan to oven and cook until the cheese has melted and the edges of the bread are golden and done, 8-12 minutes. Transfer to a cutting board and slice. Eat while the crust is crisp.

Sunday, June 8, 2014

Custard-based buttercream

This German-style buttercream, based on a recipe from Cook's Illustrated, starts out with a custard made from egg yolks. It is then added to whipped butter. It is not as light as a Swiss or Italian meringue buttercream, but there's no need to make a sugar syrup as in those. If you're making a dacquoise (nutty meringue layers sandwiched with buttercream), this is a great way to use both the egg whites and yolks. The buttercream can be flavoured as desired ~ my recipe here is a coffee flavour.This buttercream remains stable for quite a while, which is great for our very warm room temperature. I have also tried making this style of buttercream with custard powder instead of eggs. Both recipes follow.

German-style Coffee Buttercream
Makes about 2 cups. Based on a Cook's Illustrated recipe.

120g egg yolks (about 4 large)
60g sugar
1 tbsp cornstarch
1/4 tsp salt
175ml full-cream milk
2 tbsp water
1-1/2 tbsp instant coffee
225g unsalted butter, softened

Whisk egg yolks, sugar, cornstarch and salt in a bowl. 
Place milk in a small pot and bring to a simmer over medium low heat. Pour half the hot milk into the yolk mixture, all the while whisking until smooth, then add this to the milk in the pot. Return the pot to the stove and continue whisking until the mixture bubbles and thickens. Transfer custard to a bowl, cover and refrigerate until set, about two hours. Before using, let custard warm up a little.
Stir water and instant coffee together; set aside.
Using electric beaters or a stand mixer, beat the butter until light and creamy. Beat in the custard in three batches until just combined. Add coffee mixture and continue to beat until mixture is light and fluffy, 3-4 minutes.

With custard powder
Place 175ml milk in a small pot and stir in 3 tablespoons custard powder, 60g sugar and a pinch of salt until well mixed. Bring to a simmer over medium low heat, whisking until  the mixture bubbles and thickens. Transfer custard to a bowl, cover and refrigerate until set, about two hours. Before using, let custard warm up a little. Using electric beaters or a stand mixer, beat 225g softened unsalted butter until light and creamy. Beat in the custard in three batches until just combined. Add flavouring to taste and continue to beat until mixture is light and fluffy, 3-4 minutes.

Tuesday, June 3, 2014

Holy moly! Thai basil chicken stir fry

I don't use enough Thai holy basil in my cooking ~ but I aim to make up for that omission by cooking this stir fry as much as I can. It's called pad kra pao gai in Thai, and according to this site (from which I also got the recipe), the chicken can be substituted with pork, prawns and even tofu. Being a stir fry, it is a quick dish to make. The chicken is flavoured with common ingredients, and it is the Thai basil leaves that really give it that extra bite. I have added chunks of boiled potatoes to the dish and probably more basil leaves than the recipe called for. It was a hearty meal.

Sunday, June 1, 2014

Ginger: naked, cordial, and in a cookie

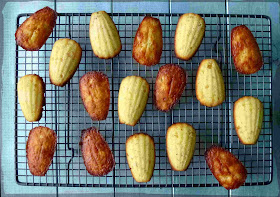
Continuing my use of Australian-made ginger products, I've made madeleines. They have three types of ginger in them ~ crystallised, powdered and cordial ~ as well as almond meal. The recipe is the result of blending a number of different ones to come up with something that works for me and with the ingredients I wanted to include in this cookie. I've used a silicone mould ~ each of the nine scallops in it is 7cm long and 4cm at its widest.


Three-times-the-Ginger Almond Madeleines
Makes 17

Prep: Mince 75g crystallised ginger. Melt 75g butter and cool.
1. Stir together 50g all-purpose flour, 50g almond meal1 tsp ground ginger and the minced ginger until well combined.
2. Beat 2 medium eggs and a pinch of salt until foamy. Add 75g caster sugar, and whisk until the ribbon stage, 12-15 minutes. Whisk in 1 tbsp ginger cordial.
3. Fold in the flour mixture quickly but gently, and then the melted butter. Cover the bowl with cling film and refrigerate overnight.
4. Preheat the oven to 190 degrees Celsius. Grease a silicone madeleine mould well (I used coconut oil). Fill the moulds three-quarters full of batter (place mounds in the centre of each mould; they will spread out naturally) and bake until madeleines are springy and brown, about 12 minutes. Remove from the mould and cool. Best eaten the same day.
Note: If using only one mould, allow to cool slightly and grease it again before filling. Refrigerate the batter while one batch is baking.

Friday, May 30, 2014

Ginger: fresh, naked, candied, and in cake

I am finally getting around to cooking with ingredients I got from Australia's Sunshine Coast where I was on assignment a couple of weeks ago. The day after I got home from the trip, it was straight back to work (which included working on the weekend), and so I have had to wait for my days off to get back into the kitchen.

I got some fresh ginger and naked ginger, among other things, from The Ginger Factory. Naked ginger is candied ginger coated with a very fine sugar. It is delicious eaten straight from the packet but I will be putting it into a confection I am planning to make.
The fresh ginger was young and tender. The guide at The Ginger Factory explained that this is the best type to make candy with. It still has a lot of zing though. I made a jam with it ~ although it's more like a relish, as can be seen in the picture right at the top of the post. It was 168g after peeling and I simply used 75% of that weight to measure out the sugar and water (126g each) for a simple syrup. The three ingredients, plus a pinch of salt ~ always! ~ were simmered for about 35 minutes until thick and jammy. I can imagine how good this would be stirred into ice cream or a bowl of muesli, but I have other plans for it...

Thursday, May 29, 2014

The Guardian's sardine pasta with tweaks

In Malaysian kitchens, tinned sardines in tomato sauce are a store-cupboard staple. Not in mine though, I'm not even a bit of a fan although I did grow up eating the stuff. My mother used to make sardine curry with peas and potatoes to eat with chappati, and would also fry it with rice. I guess my childhood taste for tinned sardines has waned. But fresh sardines? Gimme. And tinned sardines in oil. Oh yes. I saw this recipe on The Guardian website and made the dish with a few tweaks. The onions are sliced, not finely chopped; had run out of fennel seeds so used a spice mix from Turkey; and no pine nuts but never mind. I used craisins instead of sultanas because I had a huge bag of them from my US trip, but I don't think they added much to the dish.

Wednesday, May 14, 2014

Chilli tuna chappati taco

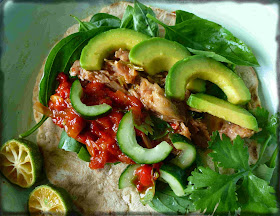
A can of chilli tuna is fit for a meal. This dish is like a taco, only I used homemade chappati instead of tortilla for the wrap. One of the things my sister asked for from Malaysia when I visited her in the US recently was Ayam brand chilli tuna. This is the best of all the flavours in the range, we think. At first I got the full-fat variety but she wanted the one with 33% less fat, which meant it was down to me to use up the unwanted cans. Oh, how troublesome... Not! She likes to have her chilli tuna this way, so I followed her cue. This one has roasted red pepper sauce, fresh avocado, cucumber and basil leaves, and a squeeze of lime along with the tuna. Simple and delicious.

I'm looking forward to eating a lot more fish ~ the fresh variety ~ over the next few days. I'll be covering the Noosa Food Festival in Queensland, Australia, and will probably return home 5kg heavier!

Sunday, May 11, 2014

Soba noodle soup with squid balls

Some time ago, my colleague Ivy got a copy of Jamie's 15-Minute Meals to review. I decided to try my hand at one of the recipes too and chose the sticky squid balls, grilled prawns and noodle broth. It took me 19 minutes to make the dish, but I think it could have been within the time frame had I used two cooking pans as the recipe asks for. I didn't like the amount of washing up I had to do afterwards but that's another story. What I did particularly like about the dish were the squid balls ~ squid meat blitzed with chilli, ginger, coriander stalks, and salt and pepper, formed into balls and pan-fried ~ which were easy to make and delicious. When I made them again for the bowl of noodles here, I put all the ingredients together without even measuring and they were just as good.

Saturday, April 26, 2014

Hold the meat: Spaghetti with roasted red pepper sauce

I think I have eaten the equivalent of a normal year's intake of meat in the past week or so. I'm being a bit melodramatic, of course, but once a week is normal for me ~ it's unusual to eat meat every day and completely abnormal to have it for two meals in one day! But that's how I ate in America while visiting my sister and her family. And so it's spaghetti with roasted red pepper sauce today ~ I made and froze the sauce before I left on holiday. Got in at three this morning and had already planned what to eat. Talk about having food constantly on the mind!

Sunday, April 20, 2014

Sourdough Surprises: Hot cross buns

These buns were made in the USA with starter made in Malaysia. I am visiting my sister and her family in California over the Easter holidays and since I knew I would only be making these sourdough buns for the Sourdough Surprises challenge while I was here, some of the starter had to fly over with me. It behaved very well, and has produced these dual-nationality hot cross buns.

If I had made these in Malaysia, they would probably have contained some stout, a variety of spices and fillings. But my sister said to keep it child-friendly for her little girls, so it only has raisins and a light cardamom flavour.

I didn't follow a precise recipe. What I did was feed my starter twice. There was just over a cup of it after the second feeding to which I added an egg yolk, less than a half cup of brown sugar, ground up cardamom seeds, salt, and enough flour to mix to a soft dough. Then in went some softened butter and two cups of plumped up raisins. The dough was left to rise overnight, then I shaped nine buns, baked them without (I forgot!) an eggwash and later brushed on some jam to give them shiny tops. I would have preferred baked-in flour crosses, but my sister said to use icing instead.

I know I would have been more precise with weights and scheduling back home, but the buns turned out edible so I'm okay with them.
Happy Easter!

Thursday, April 17, 2014

Upside-down cake in a ring

Is it right to mess with a classic? Should the traditional look of a pineapple upside-down cake be altered? Well, I think if I can get more pineapple in every bite, then it's forgiveable. Normally, the cake has full rings on it, but an American chef ~ darn it, I cannot remember who it was other than that it was a lady ~ gave this suggestion of using pineapple ring halves so that the whole surface of the cake would be covered in the fruit. About using a ring pan instead of a round or square one, well, I had to for practical purposes: the middle of my cakes sometimes don't cook because of my wonky oven. One final change to the classic recipe: it's not a sponge cake; it's made with a sour cream pound cake batter. A little heavier, but it still managed to absorb all the lovely brown sugar syrup.

Monday, April 14, 2014

Two-step mushroom lentil ragu


If portobello mushrooms weren't so expensive, I'd cook them three or four times a week. Unlike other fungi, portobellos don't disintegrate so easily or shrink when cooked in dishes like stews. They have such an intense flavour, even being compared to meat; and like meat, benefits from being seared before being added to stew-like dishes. That is what I did when I made this mushroom and lentil ragu: braise green lentils in a chilli tomato-based sauce; separately fry thickly sliced portobellos and flavour with soya sauce; combine the two components and simmer for a bit before tucking in. I served them (to myself!) with potato-cheese pierogies only because I had a stash of those and needed to clear out the freezer. Portobellos play second fiddle to no one.


Monday, April 7, 2014

Vacating the fridge and baking a pumpkin seed sourdough loaf

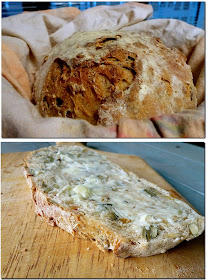
When Indra wrote a post on making seeded sourdough bread using some of my starter, she graciously pointed her readers to this blog and my post on making a seeded sourdough loaf for the first time using a leaven (both recipes from Dan Lepard) which I had cultivated for a while. I went back to that post and realised how things have changed. I've become more confident in how I use my leaven and I'm not afraid to try making a loaf without referring to a trusted recipe. There's much more to learn, but I'm happy with how far my sourdough loaves have come. A couple of days ago, I made that same loaf from so many posts ago. Wasn't happy that it was slightly undercooked, but here's the thing: I actually know the reason for it (lousy time management) and know what needs to be done to improve. I also know that slice needs a lot more butter spread on it than what's in the picture.

Friday, April 4, 2014

The Shift and a Lao brinjal dip

It's not working. I just can't seem to put in the time that I used to into this blog. So, things need to change. The purpose of this space needs to change. As with life, less clutter. Fewer words. Lists and instructions only when necessary. I want to remember what I baked on my day off, what I thought of cooking with those tomatoes I bought yesterday, how I felt when I ate what I cooked today. Recipes... they're just a guide ~ even for bread. I'll follow rules elsewhere, not in my kitchen. And so I kick off today with jeow mak keau, a Lao roasted brinjal dip. Roast brinjal, garlic, chilli till soft; pound everything together. Good with glutinous rice. Good tossed through long pasta. Good start to a much-needed change.

Sunday, March 2, 2014

Daring Bakers: Beautiful breads

A LOVE FOR BREAD ART 
Beauty surrounded the Daring Bakers this month as our host, Sawsan, of chef in disguise, challenged us to make beautiful, filled breads. Who knew breads could look as great as they taste?
This was the brief for the February challenge and it was a challenge I really enjoyed. I still like the whole breadmaking process even after making breads for so long, but I have wanted to it to be a little "different" and bread art is the perfect way to liven it up a bit.
Cinnamon sweet bread
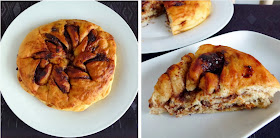
Sawsan gave recipes and showed us how to shape two breads: one is a cinnamon sweet bread and the other a Nutella twist. I used my own recipe for the dough but filled and shaped them as suggested. Because my loaves were smaller, I couldn't make enough slits in my Nutella bread (pictured below) to get properly shaped twists. But even with a less elaborate pattern, I still liked how the bread turned out.
Nutella twist
This year, Valentine's Day coincided with Chap Goh Meh (lovers' day in Chinese custom) and my section head decided we would have an office party to celebrate it. With the love theme, how could I not come up with a heart-shaped item?
Of course, it had to be bread. It's filled with a savoury chilli-date paste and shaped using instructions from this site. I added Cupid's arrow, although it is a little misshapen!
I will definitely be trying out more bread art from now on.

Thursday, February 20, 2014

Sourdough Surprises: 'Satay' Pull-apart Bread

FILLED SOURDOUGH PULL-APART BREADS 
These were fun loaves to make. I've made monkey bread only once before (in the shape of a spider for Halloween, although the "blobs" didn't come out well-defined) and I wonder why I don't do it more often. The bread is nice to look at and easy to eat too. So thanks to Sourdough Surprises for coming up with this suggestion.
I knew I wanted a savoury bread and when I spotted a packet of ready-made satay peanut sauce in my pantry, I thought why not. But the sauce is quite sweet and a little too fluid to spread, so I added some fresh chilli paste and a little more chopped peanuts. 
Satay sauce-filled sourdough pull-apart 'sun' bread
I made enough dough for two loaves, so the first one I made into a sun shape. No complicated shaping here – just a few cuts and twists. I couldn't stop pulling off the "rays" – crisp and chewy like breadsticks – to munch on!
The second loaf was a regular rectangular pull-apart bread shaped in a loaf tin. There was a little less peanut sauce for this one so I looked through the fridge for something to add bulk. It probably sounds gross but you'd be surprised how well sweet and hot peanut sauce goes with salty mozzarella cheese!
Cheese-topped sourdough pull-apart loaf
For more ideas, check out the monkey breads and pull-apart breads made by the other bakers in the Sourdough Surprises group.

Sourdough Pull-apart Breads with Peanut Sauce
Makes 2 loaves

Sponge
45g mother starter (100% hydration)
75g bread flour
75g water

Mix the sponge ingredients in a jug, cover with cling film and set aside until well risen and bubbly, about 8 hours.

Final dough
250g bread flour
¼ tsp salt
1 egg
All the sponge (about 180g)
1 tbsp neutral-flavoured oil

Fillings and toppings
180g packet satay peanut sauce
Fresh chilli paste, to taste
Finely chopped roasted peanuts
Shredded mozzarella

In a large bowl, combine all the ingredients for the final dough. Stir together so mixture comes together. If there are dry bits, add water by the tablespoon until the mixture forms a rough dough. Cover and set aside for 20 minutes, then knead the dough (use your preferred method) until soft, smooth and elastic. Form into a ball and leave on the work surface covered with the mixing bowl until tripled in size. In warm weather, this takes 4½ hours.
Divide the dough into two equal portions. Combine the peanut sauce, chilli and chopped peanuts until it is thick but still spreadable.
To make the "sun" loaf, divide one portion of dough into two. Roll each portion out into a thin disc. Place one disc on a baking tray and spread with some of the peanut sauce; top with the other dough disc. Place a ramekin upside down in the centre and make slits (to make 16-18 sections) through both layers from the rim of the ramekin to the curved edge of the discs. Twist each section several times. 
To make the rectangular loaf, roll out the other portion of dough into a rough rectangle, about 30cm by 20cm. Spread with peanut sauce. Cut the rectangle into three 10cm strips and stack them. Cut through the stacks into squares. Arrange in a loaf tin, sprinkling mozzarella in between and around the stacks, and more on top.
Cover both loaves and set aside while the oven is preheating at 180°C. Bake the loaves until cooked through and golden, 20-25 minutes.

Sunday, February 9, 2014

I would date this cookie

DATE-ALMOND-COCONUT NUGGETS 
I may never bake another cookie again after today. There just doesn't seem a need to do it any more.
These unbaked date-almond-coconut nuggets are superb. I love the chewiness. There are few ingredients, all the mixing is done in a food processor and then some fridge time is involved.
I wanted a coconut theme running through the cookie, so I included coconut oil and milk. The dates are the “binding agent”, but the cookie opens itself to one's own interpretation by combining the dates with one's preferred ingredients. The nuts can remain slightly chunky if that's preferable, and I think candied ginger might also be a good addition. I read somewhere about a South African version that has chunks of a rich tea biscuit called Marie after the basic mixture comes out of the processor, so that when the bars are cut, there's a nice slightly crunchy layer. 
Unbaked snacks make life easier
I don't have a proper recipe for these date-almond-coconut nuggets – I don't think it's really necessary. I simply placed ingredients in a food processor, whizzed them around and added the liquids and dates as I saw fit from the texture of the mixture.
First into the machine went almond meal, dessicated coconut (I don't know... maybe a cup of each) and a large pinch of salt. And then I added a small amount of coconut oil (about one tablespoon) because the smell is wonderful. To get the mixture to clump together a little, in went a little thick coconut milk (also about one tablespoon) – which also boosted the nutty flavour.
Once that was achieved, in went handfuls of pitted dried dates, pulsing as I went along. I must have put in a little more than a couple of handfuls. Once everything was combined and clumped together, the mixture was dumped into a 17cm square tin lined with baking paper, compressed with the palm of my hand, scored with a metal spatula and put in the fridge. After 30 minutes, the bars were cut (I got two dozen) and separated. I must have eaten a whole row of them before they went into an air-tight container.

Monday, January 20, 2014

Sourdough Surprises: Focaccia with chilli oil

HOT AND AIRY: SOURDOUGH FOCACCIA WITH CHILLI OIL TOPPING
My leaven turns three on Jan 24. It's made from a recipe by one of my gurus, Dan Lepard, from The Handmade Loaf, a book that has been a great source of reference.

The challenge for Sourdough Surprises this month is focaccia, which was perfect for Dan Lepard's recipe for olive oil flatbread from his book. He also uses a tiny amount of commercial yeast, which I left out, but since I practically followed his recipe word for word, it's not right for me to reproduce it here.

Having said that though, Dan Lepard does say in the intro to his recipe that in Genoa, Italy, the focaccia is "simply made with the house white dough, and it is the shape that defines it."

But what is most important, and what really gives focaccia its character, is this:
"Contemporary artisan bakers work the dough over many hours, so that holes created by the fermenting yeast are stretched and enlarged, giving an exaggerated honeycomb effect."
After the initial proofing, Dan Lepard says to pat out the dough into a rectangle, fold it in thirds, and flip it over. This is done every 40 minutes for two hours. By the end of that time, the dough is airy and light.

Following that, the dough is gently stretched out in a tray, dimpled, spread with whatever topping, and baked. It takes a long time, but it is worth it.
The focaccia could have done with more chilli oil ~ a lot more!
I topped my focaccia with a store-bought chilli oil. But then I left the bread too long in the oven and the top is a little dark.

A few days later, I made a pie with the focaccia dough which Dan Lepard also includes in his book. The dough is divided into two, the bottom layer is spread with the filling (mine was the chilli oil and a combination of fried onions, Turkish cheese and rocket leaves), and topped with the other piece of dough (right).

Here are more focaccia from the baking group.