The Oven has baked its last loaf. This blog is no longer being updated.

My cooking videos appear at youtube.com/janeragavan

I write on food at star2.com

Easter-slash-birthday cake

Sunday, March 31, 2013

MINT-CHOCOLATE MARBLE SOURDOUGH CAKE 
HAPPY EASTER!

10.30am: The troops are gathering. And by "troops", I mean my large family – who are far from doing anything together with military precision!
Today, we're also having an early celebration of my nephew/godson's birthday which is on April 3. My mother asked him what cake he wanted, he told her he'd like a mint-flavoured cake, she asked me if I had a recipe for said cake... and in my family, "Do you have the X recipe?" is code for "Can you make the X?"
I'm not complaining. I was going to make a crepe cake with a caramelised banana filling (I have a ton of frozen bananas), but that will just have to do for another day. This cake would have required more effort than a mint-flavoured cake anyway – all that standing over the stove and cooking 25 or more crepes.
After successfully adapting the King Arthur Flour chocolate sourdough cake recipe for a two-toned matcha sourdough cake, I decided to make the mint cake the same way, this time marbling two colours as well as two flavours.
The un-iced cake
And so I made a plain white sourdough cake batter and divided it. I flavoured one portion with peppermint and coloured it a soft green with food gel, and added cocoa powder to the other portion. The batters were then layered in a baba pan and swirled by cutting through them with a butter knife as the pan is rotated once. Just eight knife cuts are sufficent. The sourdough batters are thicker and stickier than normal cake batter, so there might be a tendency to swirl more than normal.
I tasted some crumbs when the cake was done, and there was a nice combination of mint and chocolate – which would be more pronounced once I added the two icings. But I couldn't tell what the inside would look like until my nephew cut it at his party.  
To be continued after the cutting of the cake...

The swirls in the crumb; (inset) embarrassing the just-turned-teenager with little-girl candles
5.52pm: The swirls on the inside of the cake didn't come out as evenly as I had hoped but they were all right. My nephew was very pleased with the minty taste, and that is all that matters to me.

Daring Bakers: Hidden veggies in sweet bakes

Wednesday, March 27, 2013

EDAMAME WHOOPIE PIES WITH MUNG BEAN FROSTING 
Ruth from Makey-Cakey was our March 2013 Daring Bakers’ challenge host. She encouraged us all to get experimental in the kitchen and sneak some hidden veggies into our baking, with surprising and delicious results!
Being sneaky when it comes to food is always exciting – whether it's trying to fool children or cheating on your diet. I don't have children and I never diet (although I should refrain from eating too much of a good thing... Butter, mmmm) but this challenge is about creativity and that's always good.
I reviewed Harry Eastwood's Red Velvet & Chocolate Heartache for work a couple of years ago and tried out the Sunken Apricot and Almond Cake (made with pumpkin), the Courgette and Camomile Cupcakes and the Heartache Chocolate Cake made with aubergine/eggplant (I read on the DB forum that a few others have also made this cake successfully). They all turned out well and produced very moist bakes.
I knew I wanted to make whoopie pies and I thought of using frozen spinach, but when I checked my freezer, I realised I had used it all up. I noticed there was a packet of edamame though (there are times when we all forget what we have in our freezers, don't we?). These beans are nutritionally rich, but more important, to me, is they are sweet and chewy, and they taste good even without seasoning. I had my veg. 
Springy and well-risen
The first thing that appealed to me about the cookies was their natural pastel green colour thanks to the edamame. I had kept some plain and had added a little chopped fresh mint and grated chocolate to another portion of the dough. Oddly, although I used the same amount of dough (with an ice cream scoop) for all the cookies, the mint-chocolate ones baked up larger!
To sandwich the cookies together, I used leftover cream cheese frosting that I had made for another cake – but with a few additions. To up the vegetable content, I added some mashed mung beans (another healthy food item), cocoa powder and a touch of wasabi since it goes well with  edamame.
I liked the whoopie pies, but I have to admit I couldn't taste the edamame – though that clearly fulfils the requirements of this challenge: hiding a vegetable in a sweet. The mung beans in the frosting, however, could be detected – mainly because I couldn't get them really smooth in my mini food processor. Mung beans are used in a lot of Asian sweet dishes anyway so I'm used to them. I actually liked the textural feel of the frosting.
Do stop by at The Daring Kitchen for a slideshow of other ways to sneak vegetables into sweets!
Fill 'em up
Edamame Whoopie Pies with Mung Bean Chocolate Frosting
Makes 8 whoopie pies

1 cup all-purpose flour

½ tsp baking powder
½ tsp baking soda
¼ tsp fine salt
Scant ¼ cup coconut oil
½ cup caster sugar
1 egg
½ tsp vanilla extract
½ cup edamame purée*

Mint and Chocolate variation

1-1½ tbsp finely shredded (chiffonade) fresh mint
1-1½ tbsp grated or finely chopped chocolate

Mung Bean Chocolate Frosting
1 cup skinless split mung beans, soaked overnight
1 tbsp cocoa mixed with 2 tsp water into a paste
100g cream cheese, softened
50g unsalted butter
75g icing sugar
¼ tsp wasabi paste, or to taste (optional)

Sift the flour, baking powder, baking soda and salt together. Set aside.
In a large mixing bowl, beat the coconut oil and sugar together until blended. Add the egg and beat until the mixture is pale and light. Beat in the vanilla extract.
Fold in the dry ingredients, then the edamame purée. For the Mint and Chocolate variation, fold ingredients into the dough together with the edamame puréePlace dough in the fridge for 15 minutes.
Meanwhile, preheat the oven to 170°C. Line two baking sheets with greaseproof paper.
Using a one-tablespoon capacity ice-cream scoop, place dollops of dough 5cm apart on the baking sheet. Bake for 12-15 minutes, rotating the pans halfway through, until the cookies are risen and springy in the centre. 
Remove from oven and transfer cookies to a wire rack to cool completely before sandwiching two together with frosting.
Mung Bean Chocolate Frosting: Drain mung beans and steam until soft. The frosting uses ½ cup so purée enough in a blender or mini food processor and freeze the rest for another use.
Beat the cream cheese and butter together, then stir in the mung bean purée and cocoa paste. Beat in the icing sugar and wasabi until smooth and soft.
* To make edamame purée, steam about 200g of edamame bean pods until soft. Shell them and remove the skin from the beans. Place beans in a blender or mini food processor with about ½ tbsp of water. Pulse to purée. Add a little more water if necessary to get it smooth.

Sourdough Surprises: Create waves with cake

Wednesday, March 20, 2013

TOPOGRAPHIC MAP SOURDOUGH CAKE 
When it comes to making sourdough cakes, many recipes say to just add unfed starter straight from the fridge. It's certainly as quick a method as making any creamed cake.
But from experience, I've found that a well-fed bubbly starter gives cakes better rise and lightens them. It takes at least two days to make the cake, but I think it's worth it.
So when Sourdough Surprises suggested cakes this month, I got started immediately. I've made chocolate, banana, and carrot sourdough cakes before and it would be a different flavour this time – I decided on matcha – but I also wanted an interesting appearance.
At first glance, this looks like any layer cake, but the design is actually made in an unusual way. I'd seen this cake with the wavy pattern on a few blogs and was intrigued. The original cake is just a rich butter cake and in Malay, it's called "Kek Alunan Kasih" – which leads me to believe that it may be a Malaysian invention – and this is translated as Waves of Love Cake. "Alunan" is also the word for "melody", which makes sense too since the pattern does look like sound waves. (Or perhaps something you might see on a heart monitor?) I didn't do the effect so well, but take a look at these better examples.
One blogger mentioned that it looked like a topographic map – as in geography – and that's the description I like best.
The outside of the cake (left); the waves in the crumb 
The process of creating the strata and waves is not difficult, but it is a bit fiddly. The cake batter – which has a dropping consistency  is divided and coloured, and after each layer, cocoa powder is sifted on top before another layer of cake batter is put on. The difficulty is in trying to level the batter over the cocoa powder without disturbing it. However, you don't want to make the layers too smooth because then the wavy effect would be lost. You can taste the cocoa but it's not very prominent.
Even without the strata, the cake is good on its own. The layers can be any colour (and from that link I provide above, you can see some kooky tie-dye combinations!) and the cake can be any flavour (the matcha powder is my cake provides the flavour and colour). I based it loosely on the sourdough chocolate cake from King Arthur Flour which I made some time ago, replacing the cocoa powder in the batter with all-purpose flour. This is a good basic recipe, and lends itself to other flavours.


Create waves with this cake
'Topographic Map' Sourdough Matcha-Vanilla Cake
10-12 servings. Cup measures are approximate.

Preferment
90g (½ cup) refreshed 100%-hydration sourdough starter
110g (½ cup) whole milk
150g (1 cup) all-purpose flour

Final batter
60g (6 tbsp) all-purpose flour
½ tsp salt
½ tsp baking powder
½ tsp baking soda
140g (¾ cup) caster sugar
110g (½ cup) butter, softened
1 medium egg, at room temperature
1 tsp vanilla extract
1½ tsp matcha powder, mixed with 1 tbsp of water into a paste

Wave pattern
2½ tbsp unsweetened cocoa

Combine the starter, milk and flour in a large mixing bowl. Cover and store in the refrigerator overnight or let rest at room temperature for 2-3 hours. If chilled, take it out of the fridge an hour before proceeding with the final batter.
Preheat the oven to 170°C. Lightly grease and base line a 20cm by 11cm (8"x4½") loaf pan.
Sift the flour, salt, baking powder and baking soda together in a bowl. Set aside.
In a large bowl, beat together the sugar and butter until light and fluffy.
Cut the preferment into four or five pieces. Beat one piece at a time into the butter mixture, blending well each time. Beat in the egg and vanilla. Fold in the flour mixture. The batter will have a soft dropping consistency.
Divide the batter into two equal portions and place in separate bowls. Take about 2 tablespoons from one portion and mix with the matcha paste. Blend this mixture into that same half-portion of cake batter.
How to create the layers
Spoon half of the white batter into the prepared cake pan and smooth the surface (1). Sift one-third of the cocoa powder evenly over the top of the batter (2). Using half of the green matcha batter, distribute small dollops all over the cocoa powder (3) and then spread them out without disturbing the cocoa powder (4). Sift another third of the cocoa powder over this batter. Repeat the layering process with the white batter, then the remaining cocoa powder (5) and finish with the matcha batter on top (6).
Bake the cake for 30 to 40 minutes, until the top springs back when lightly pressed in the centre, and a toothpick inserted into the centre comes out clean.
Remove the cake from the oven, and set it on a rack to cool for 10 minutes, then remove from tin and cool completely on the rack. Best to allow a day before eating.

From figs to persimmons

Saturday, March 16, 2013

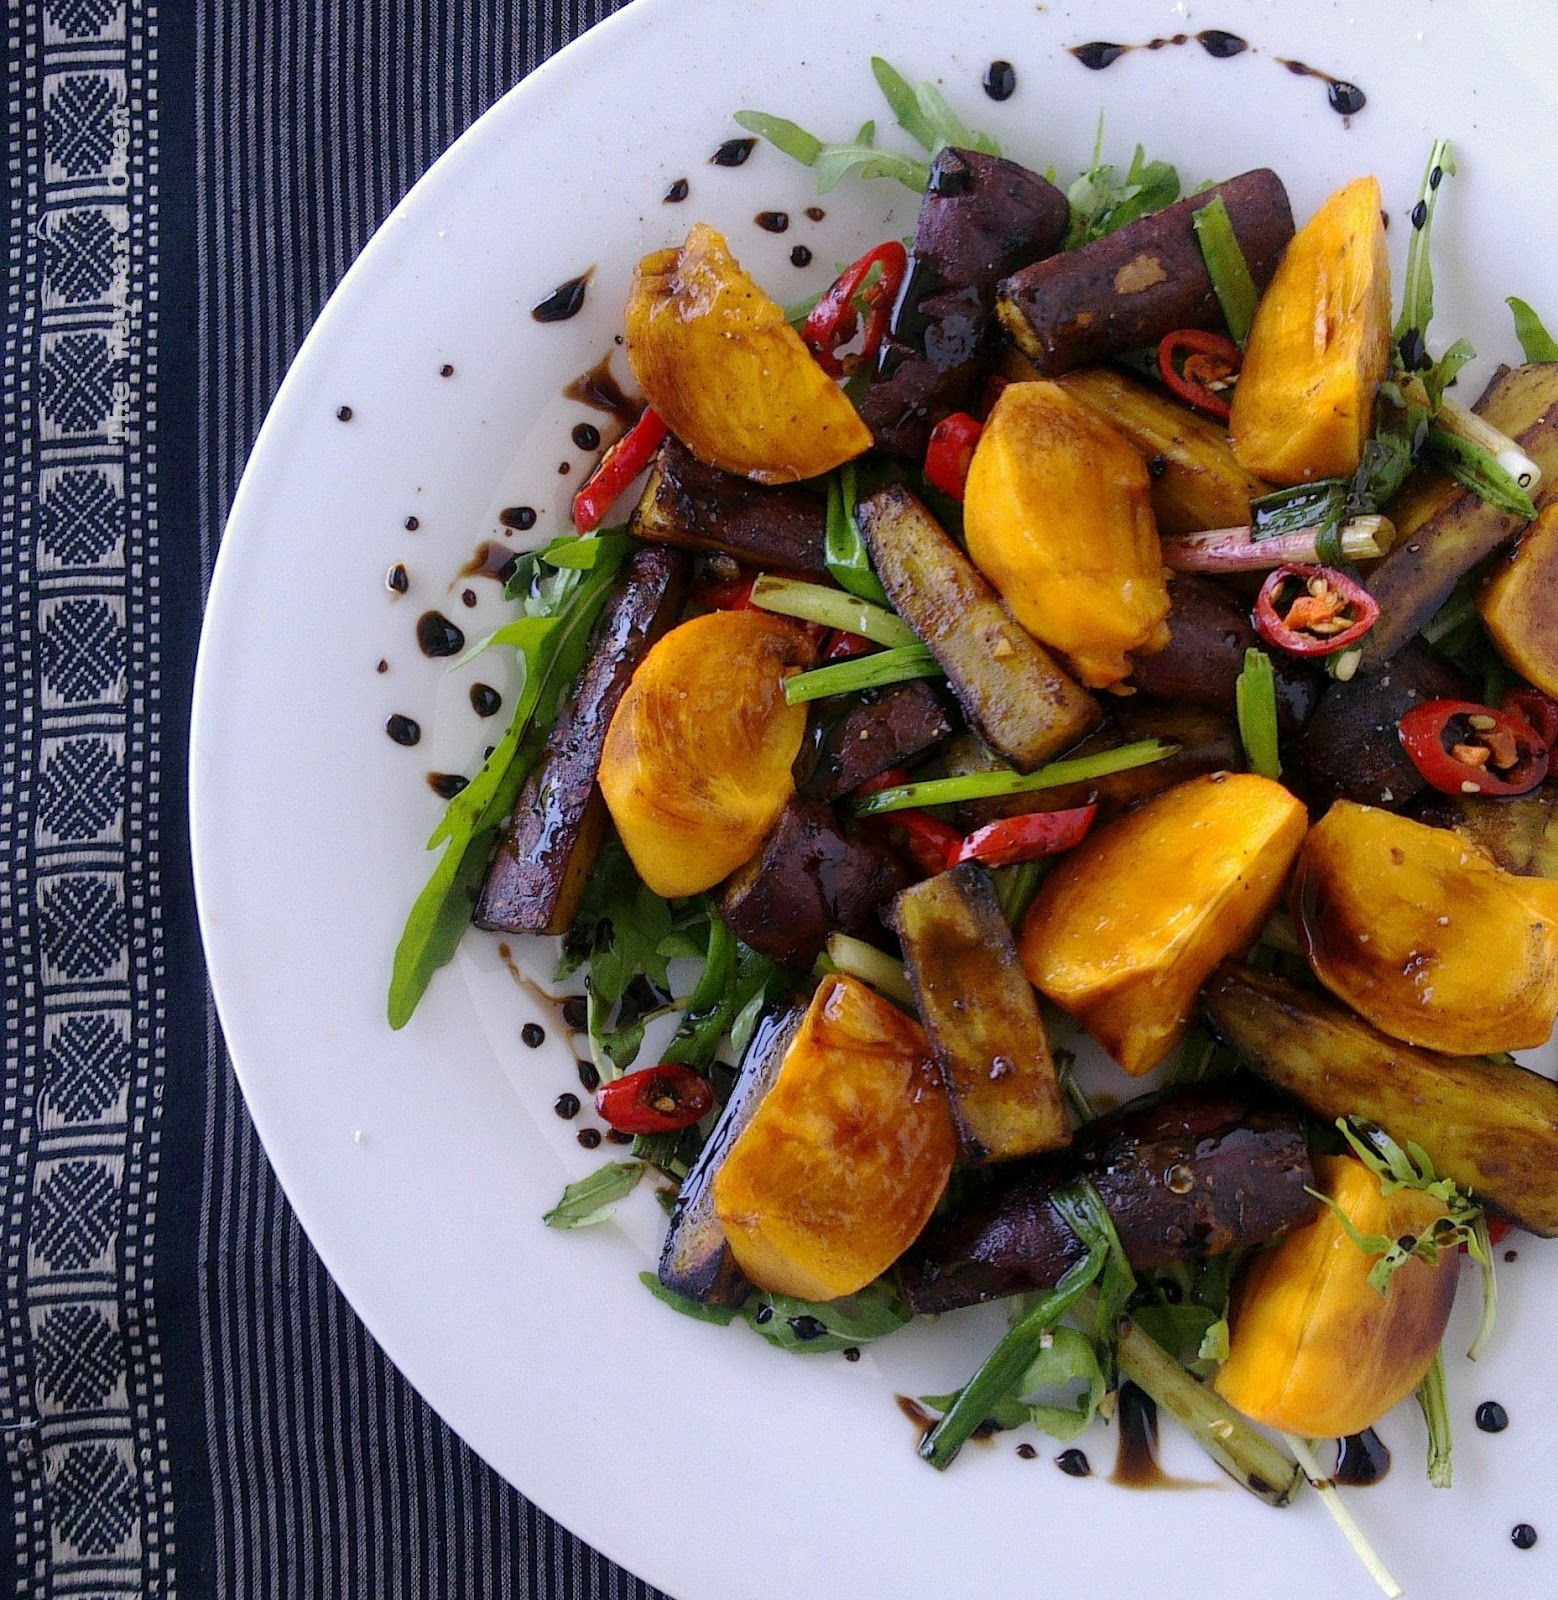
COOKED SWEET POTATO AND FRESH PERSIMMON 
Yet another vegetable dish inspired by my newest acquisition, Jerusalem by Yotam Ottolenghi and Sami Tamimi. There's more to come – a snack bread has already been lined up – and why not? The recipes in this book are enticing and not difficult to do, and I really like all the flavours from that part of the world.
I can't always get all the ingredients though, but that shouldn't be an obstacle. Take this dish. The original recipe calls for roasted sweet potato and fresh figs. The book authors say that this combination of cooked and raw ingredients is very popular at one of their restaurants. Well, fresh figs are difficult to find over here  although having said that, I did see some at the grocers last week (understandably, quite expensive) before I got this book – so I thought about a good substitute, and wanted to keep it local if possible.
Well, I went up and down the fruit aisle but couldn't find any local fruit that is similar to figs. And then I saw some persimmons (Korean, however) and thought why not?
As I mentioned earlier, the original recipe incorporates roasted sweet potato and fresh figs, as well as goat's cheese. I omitted the cheese, and used steamed sweet potatoes instead. They're just as good and I didn't want to turn on the oven. Well, good recipe writers inspire and Ottolenghi and Tamimi certainly do.
Substituting persimmons for fresh figs
Sweet Potato and Persimmon Salad
Serves 1-2

A handful of rocket or other salad leaves
2 medium sweet potatoes, skin on
2 tbsp balsamic vinegar
1 tsp sugar
3 thin stalks spring onion, sliced into 4cm lengths
1 long red chilli, sliced thinly
2 persimmons
2 tbsp sunflower oil
Flaky salt and black pepper

Arrange the salad leaves in a large plate.
Wash and dry the sweet potatoes and then steam them until tender. Cut into quarters lengthwise and then into 5cm lengths (like thick chips).
Heat a tablespoon of oil in a small frying pan and stir-fry the sweet potato chips briefly to crisp their skin. Arrange over the salad leaves in the plate.
In the same pan, heat the other tablespoon of oil and flash fry the spring onion and chilli. Scatter the mixture together with the oil over the sweet potato. Sprinkle with salt and pepper to taste.
In the same pan over low heat, place the balsamic vinegar and sugar. Simmer the mixture, swirling the pan around now and then, until reduced to about one tablespoon. Take off the heat while it is still runny as the reduction will continue to thicken.
Cut the persimmons into six wedges and tuck them around the sweet potato chips. Drizzle the balsamic reduction over all the plate (if too thick to drizzle, loosen with a drop of water).

Bread fritters

Thursday, March 14, 2013

FRIED CAULIFLOWER STEAK AND BREAD FRITTERS 
Yotam Ottolenghi and Sami Tamimi anticipated that readers of Jerusalem (yay, I just got the book!) might be sceptical about their recipe for a'ja or bread fritters.
"It may not sound appetizing, but taste it once, and see what it's all about," they say about the herbed-based fritters that use leftover bread and seasonal vegetables. I couldn't imagine what they would be like when I read the recipe, but I was really pleased with how they turned out. This is a simple recipe and open to one's own interpretation. 
And that is what I did when I made the fritters. I didn't have all the herbs that were asked for in the recipe, nor the feta that was included, so I just put in stuff that I had and produced something that I liked. I think the most important element is the bread – it must be robust and flavourful. I used a homemade sourdough. It was a little stale but that worked for the fritters. If you want to fool someone into thinking they were eating meat, these have the texture of minced chicken ;-)
Another inspiring recipe from the book is fried cauliflower with tahini. The cauliflower is separated into florets and fried and then served with a tahini- and pomegranate molasses-flavoured yoghurt. Unfortunately, I didn't have tahini, but again it didn't matter. Instead, I combined strained yoghurt with a little sesame oil and added chopped Chinese celery leaves, spring onion leaves, lime juice, chilli powder and pomegranate molasses (I'm sure another type of syrup would be fine).
Instead of florets, I cut a head of cauliflower crosswise through the stem to make a "steak", about 1.2cm thick. It's not seasoned but simply pan-fried on both sides. It's such an easy way to bring out the flavour of the vegetable.
The fried cauliflower, yoghurt dressing and bread fritters were excellent together, and I'm already on to more recipes from Jerusalem. The ones with vegetables all look so good and I'll be trying the meat dishes after Lent.
A'ja mixture (left) and fried with the cauliflower steak
Bread Fritters
Makes 6. Inspired by the recipe in Jerusalem. Herb and spice amounts are approximate; season to taste.

1 thick slice of good bread, crust removed (about 50g)
1 medium egg
½ tsp garam masala
¼ tsp paprika
½ long red chilli, chopped
1 tbsp chopped spring onion
1 tbsp chopped fresh Chinese celery leaves
Salt and black pepper, to taste
Sunflower oil for frying

Soak the bread in cold water for 1 minute, then squeeze well.
Crumble bread into a bowl and add the egg, spices and herbs.
Heat a tablespoon of oil in a frying pan. Scoop slightly heaped tablespoons of batter into the pan. Fry the fritters for 1-2 minutes on each side or until golden brown.

Scrambled tofu looks like eggs

Saturday, March 9, 2013

FORGET EGGS, SCRAMBLE SOME TOFU 
I have been known to make a face when I see tofu. And I have rolled my eyes when people say tofu can absorb flavours well. I've even sniggered at vegetarians who spout off about how wonderfully versatile tofu is. (Oh-oh, I've gone and done it now. Will I find a cauliflower head in my bed?)
But honestly, I don't dislike tofu. There are some cooks who know the most amazing ways to make it delicious. Fried, steamed, stuffed, they're all good. In the wrong hands, however, tofu can remain horribly bland. And I admit, sometimes those hands belong to me. So obviously, tofu isn't completely to blame.
Well, here's something that I made myself and really like: scrambled tofu. I made it for breakfast one morning and cooked it again the next two mornings. Maybe it was just fooling my eyes because it really does look like scrambled eggs, but with the robust spices I included, the taste was also appealing.
No need to list exact amounts here. First, roast some cumin seeds in a dry pan over medium heat. Then add a little oil and stir-fry the chopped white part of a stalk of spring onion and a little crushed garlic. Then add a load of different vegetables – as many colours as possible. I used: green capsicum (bell pepper), cherry tomatoes, a fresh chilli and grated carrot. Cook until tender.
Crumble in firm tofu. Don't mash it up too much – you want some small crumbs and some clumps as well. After all, that's how scrambled eggs look.
To make it look like real eggs, add turmeric powder for that egg-yellow colour. And for a kick, add chilli powder. Stir around a bit more, season with salt and pepper, and the "eggs" are done. Sprinkle with the chopped green part of the spring onion and breakfast is ready. Serve with buttered toast.

Cran-carrot sourdough cake

Wednesday, March 6, 2013

CRANBERRY-CARROT SOURDOUGH CAKE BARS 
This cake is nothing to shout about. It's not glamorous and is actually quite homely. If not for the cream cheese frosting on top, it would look quite plain. But if you're looking for something that tastes good and is a somewhat healthy snack to tide you over before dinnertime, this cake will fulfil that role well enough.
Like most sourdough cakes, this one has a tang to it and the degree depends on how hydrated you keep your starter/levain and the type of wild yeast you capture in the area where you live. But it also keeps well and should still stay fresh tightly covered in the fridge for a week or so.
I think the flavour develops only after a day – just after it's made, it tastes quite bland to me – and if kept in the fridge, I prefer to leave it at room temperature for at least half an hour before eating.
The recipe I based this cake on was twice as big. Other changes I made to the recipe were to use coconut oil (which gives the cake a light flavour of coconut) and to add some dried cranberries, since I had some in the pantry.

Cran-Carrot Sourdough Cake Bars
Serves 10-12. Based on this recipe.

130g all-purpose flour
160g caster sugar
½ tsp salt
½ tsp baking powder
½ tsp baking soda
½ tsp ground cinnamon
125g starter at 80% hydration, from the fridge (unfed)
85g coconut oil
2 medium eggs
115g finely shredded carrots
35g dried cranberries

Cream Cheese Frosting (optional)
100g cream cheese
50g butter
75g icing (confectioner's) sugar
½ tsp vanilla extract

Preheat oven at 170°C. Grease and line an 18cm square pan with parchment paper; grease paper.
Combine flour, sugar, salt, baking powder, baking soda and cinnamon in a mixing bowl; stir to blend well.
In another bowl, stir together starter, coconut oil and eggs. Place shredded carrots in a sieve and gently press with a wooden spoon to remove some of the liquid; the carrots should still be moist. Stir carrots into the starter mixture.
Add carrot-starter mixture to the flour mixture. Using an electric whisk, beat the mixture together for 2 minutes. Fold in the cranberries.
Pour batter into the prepared pan and bake for 35-40 minutes or until the top is springy and a skewer inserted in the centre comes out clean.
Cool cake in tin 10 minutes, then remove and cool completely on a wire rack. Place in an air-tight container or wrap in paper and cling film and set aside for a day for the flavour to develop.
To make the frosting, cream the cheese and butter together until light and fluffy. Beat in the sugar and vanilla until smooth. Frost the top of the cake and cut into bars to serve.
For the drizzle on top, take about a tablespoon of frosting and add enough water to it to loosen it. Add some food colouring.

Take a leaf from fougasse

Sunday, March 3, 2013

BLACK RICE AND ONION FOUGASSE 
In his book Artisan Baking Every Day, Peter Reinhart writes that his Wild Rice and Onion Bread was the most popular one at his Brother Juniper's Bakery after their struan.
The struan is a multigrain loaf with a wonderful mixture of ingredients, including cooked rice, cornmeal and oats. I first tried the struan recipe from the book when my sister and family were visiting from America over Christmas and they thought it was delicious. That first time, I had made it with brown rice, but since then have used black rice and changed some of the other grains as Peter Reinhart suggests. The bread makes excellent toast and just seems good for any savoury filling or soup.
Sandwiches are so much better with struan
So obviously, I had to move on to the second-most popular wild rice and onion bread. I didn't have wild rice so I used black rice, which I know are not the same thing – nor even in the same classification of plant – but they look somewhat alike.
To make it more interesting – which I realised later wasn't necessary – I made the loaf in the shape of a fougasse. Of course, my attempt was a little clumsy and my leaf shape was lopsided.
This bread surprised me. The onion goes into the dough raw, and it didn't make much of an impact. I considered adding some onion powder to boost the flavour, but I'm glad I didn't. When the loaves came out of the oven, the smell was simply glorious! I put some of the bread in a paper bag to eat at work and the aroma lingered long after I had finished. The co-workers I offered the bread to thought it was good. Those who don't like onion, however, may have been cursing me... 
Submitted to YeastSpotting.
The black rice stains the crumb with a purplish hue
Black Rice and Onion Fougasse
Makes 2 loaves
Based on Peter Reinhart's baker's percentage for Wild Rice and Onion Bread

200g bread flour
5g instant yeast
5g salt
44g cooked black rice (substitute with wild rice)
15g brown sugar
89g yoghurt whey (top up with water; or use all water instead)
30g soured milk 
60g fresh onion, diced
Pinch of za'atar (or another spice/spice mix)
A few grinds of black pepper

Combine all the ingredients. Stir to incorporate them. Develop the gluten using whatever method is comfortable. Place in a lidded plastic container and refrigerate overnight.
Transfer the dough to a floured work and divide into two. Shape each half into an oval. Using a bench scraper, cut slits into the dough like the veins of a leaf. Place loaves on lightly greased trays. (Shape into batons, if desired.) Cover and allow to proof for about 1 hour.
Meanwhile, preheat the oven to 190°C. If the slits have closed, gently pull the loaves to open them up. Place the trays in the oven and bake until the top is brown and the bread is cooked, 20-25 minutes, rotating the trays halfway through the cooking time. Cool on a wire rack for 20 minutes.