The Oven has baked its last loaf. This blog is no longer being updated.

My cooking videos appear at youtube.com/janeragavan

I write on food at star2.com

Merdeka Day cake

Saturday, August 31, 2013

MALAYSIA FLAG CAKE FOR NATIONAL DAY, AUG 31 
HAPPY MERDEKA DAY! 
To all Malaysians, here's wishing you a Happy National Day! And to those of you who are 56 today, Happy Birthday!
As an extension to my last post on ulam and kerabu, which I wrote as a run-up to today's cooking column in the newspaper (this is where to get all the links to the Don't Call Me Chef stories and the other Merdeka-themed stories in the lifestyle section of the newspaper), I wanted to make a cake using typically Malaysian ingredients. And what better ingredient than coconut (any excuse to include one of my favourite flavours into every dish!).
So I started out with a basic yellow cake recipe (a simple 1-2-3-4 recipe), and was going to use coconut extract for the flavouring, but of course being as prone to mishaps as I am, I reached for the lemon extract instead and ended up with a lemon-flavoured sponge!
Oh, well. I baked the cake in a rectangular tin and then cut out a triangle at the top and "pasted" it to the bottom using buttercream to make a wavy flag shape. 
Next was my attempt at cake decoration. I am hopeless at fancy swirls or sugar decorations, so I used an easier way. I iced the cake, piped out the outline of the national flag design and filled it in with dessicated coconut (have to include that somehow!) coloured with food dye. 
All the elements are accurate except for one thing: I just could not get 14 points on the star! It's two points short since it was too small to fit them all in. 

Ulam redux

Thursday, August 29, 2013

FERN-TASTIC ULAM INGREDIENTS 
I posted on kerabu (Asian salads) and nasi ulam (herbed rice) separately some time ago. For our National Day on Aug 31, IvyIndra and I are writing on the theme "Malaysia on a plate" for our Don't Call Me Chef cookery column in the newspaper. For me, the dish that screams Malaysia is nasi ulam, a mix of rice, fried fish, salted fish and prawns, toasted coconut and a whole bunch of herbs, shoots and leaves such as lemongrass, torch ginger, kaffir lime leaves, and various jungle plants.
For the column, I provided a recipe for Nasi Ulam Utara (Northern-style herbed rice; pictured below, top left) so as a prelude, I thought I would reproduce the recipes for the three types of kerabu that I wrote on before. These Malaysian salad dishes are prepared with similar ingredients to those found in a nasi ulam.
Clockwise from top left: Nasi Ulam Utara, served with sambal belacan; kerabu kacang botol; green papaya salad; and kerabu pucuk paku
All recipes serve 4.

Kerabu Kacang Botol (Four-angled Bean Salad)

200g four-angled beans
2 shallots, thinly sliced
2 bird's eye chillies, finely diced
1 tbsp dried prawns, washed and pounded
2 tbsp grated coconut, toasted
2 tbsp lime juice
1-2 tbsp palm sugar
Salt to taste

Pick off the ends of the four-angled beans. Blanch in boiling salted water, about 30 seconds, then run under cold water to stop the cooking process. Cut on the diagonal into 2cm-wide pieces. Toss with the sliced shallots and chillies; set aside.
Combine the remaining ingredients and dress the vegetables.

Green Papaya Kerabu
This salad is loosely based on the Thai som tam.

1 small green papaya (about 400g), peeled, cut into half and seeds removed
1 cup long beans, cut into 3cm lengths
1 tbsp palm sugar
Juice of 2-3 limes, or to taste
2-3 tbsp fish sauce
6-8 bird's eye chillies, thinly sliced on an angle
1 tbsp dried prawns, washed and pounded
6-8 cherry tomatoes, halved and seeds removed
2-3 tbsp chopped toasted peanuts

Grate papaya coarsely and into long strips.
To make the dressing, dissolve palm sugar in the lime juice. Add the fish sauce.
In a mortar and pestle, bruise the long beans. Add the chillies, dried prawns and some of the dressing. Toss well and add the papaya. Bruise the papaya so that it is mixed with the dressing. Add more dressing as needed.
Add the tomatoes and bruise them lightly, blending them with the rest of the ingredients. Serve sprinkled with chopped peanuts.

Kerabu Pucuk Paku (Fiddlehead Fern Salad)

300g pucuk paku (fern shoots)
50g fresh prawns, shelled and deveined
2 tbsp ready-made kerisik
2-3 tbsp coconut milk
2 large red chillies, pounded
2 tbsp lime juice
2-3 tsp palm sugar
Salt to taste
3 tbsp toasted peanuts, coarsely pounded

Pick off the tendrils and tender part of the stalks from the pucuk paku. Cut into 6cm pieces. If the ferns are a little tough, blanch in boiling salted water, about 30 seconds, then run under cold water to stop them cooking further.
Blanch the prawns until pink but still firm. Combine with the ferns.
Combine the rest of the ingredients and toss with the greens.

Avoca-dough is naan the better

Friday, August 23, 2013

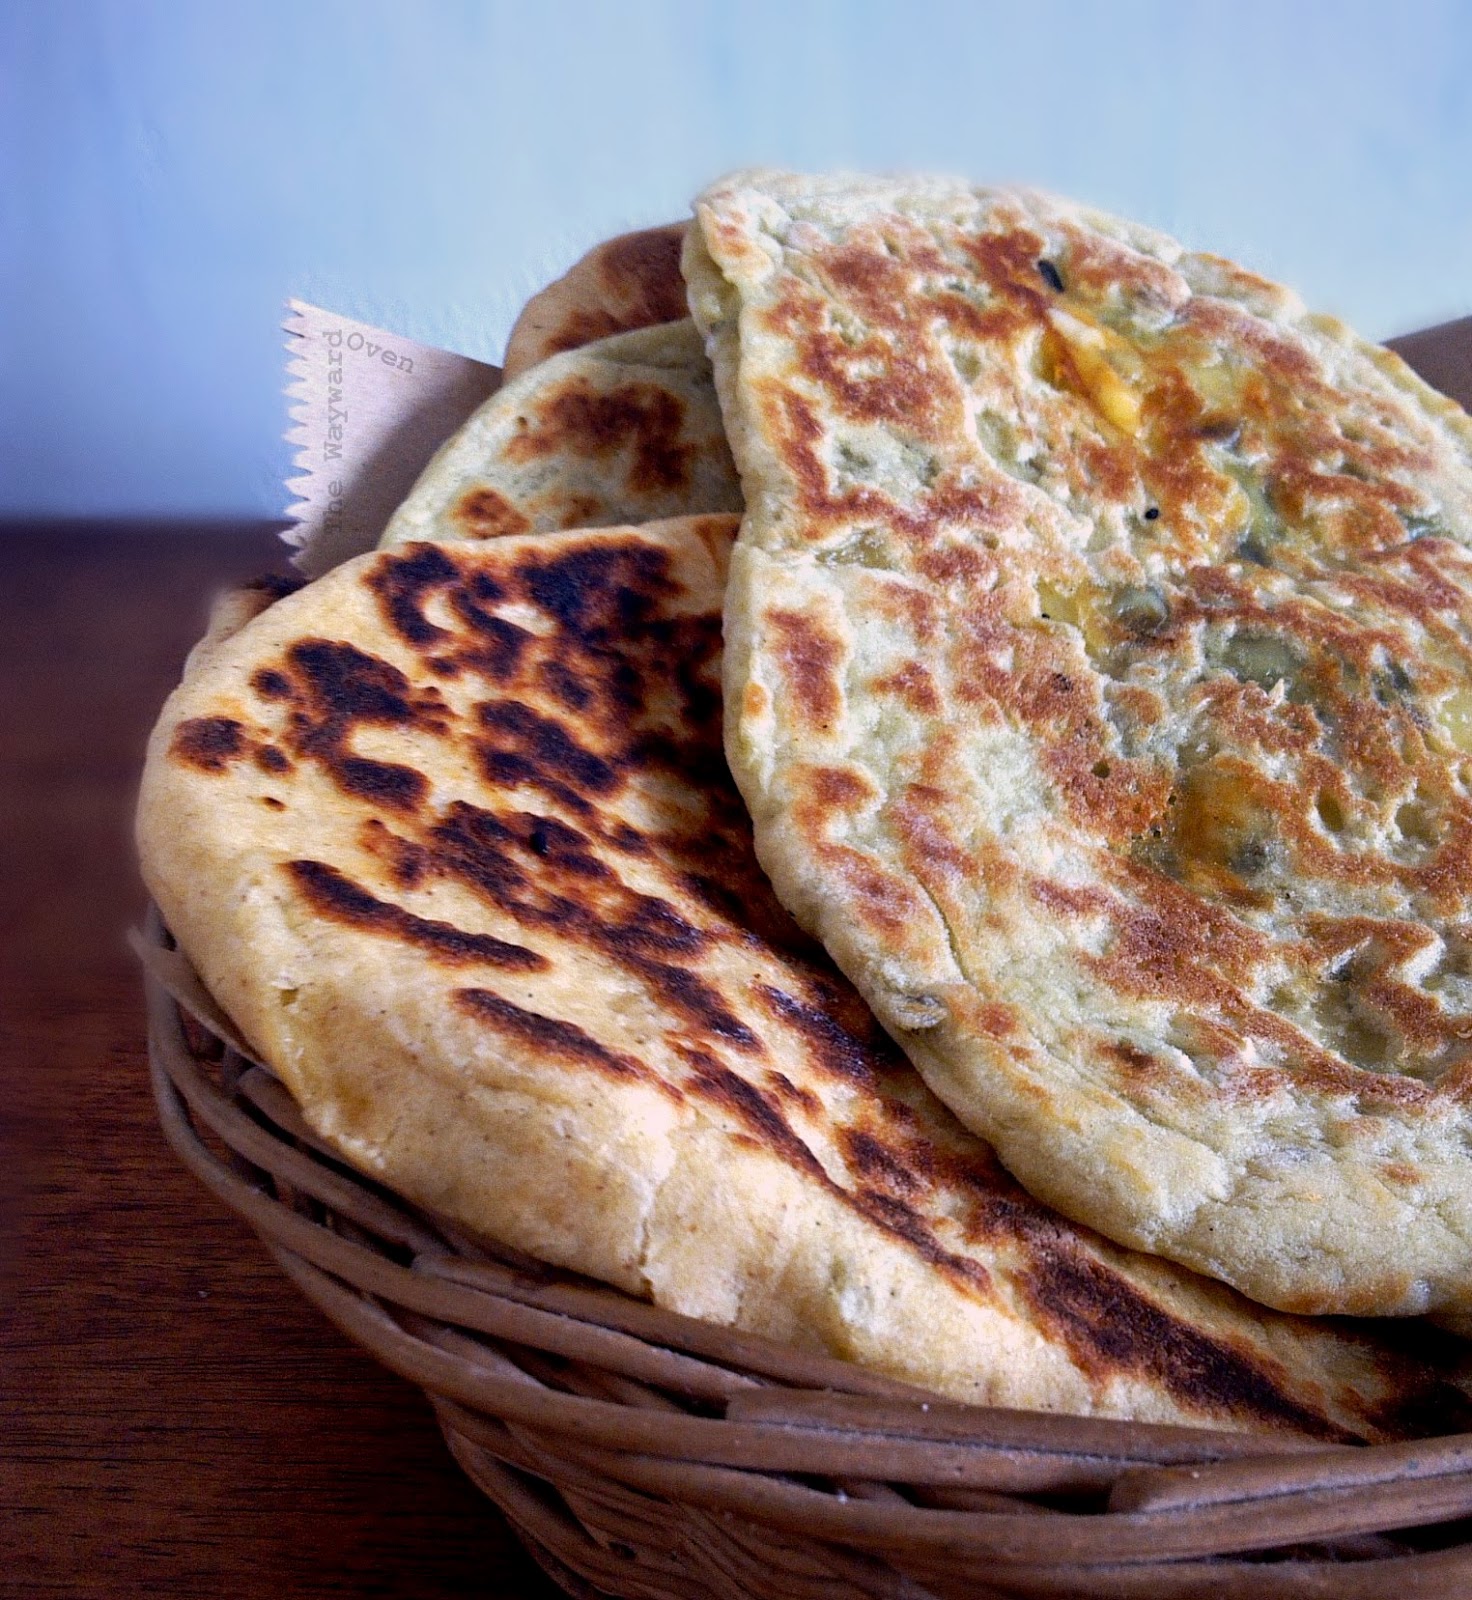
STUFFED NAAN AND AVOCA-DOUGH NAAN 
I couldn't pass up the hunk of gouda selling at a discount. With cheese being so expensive over here, it's a good idea to snap up the deals any chance you get. Even if the cheese is about to expire. I just get my fill of it and then ration myself until the next good deal comes along.
So it goes without saying that I've been making a lot of things with cheese. One of them is cheese-stuffed naan, which I cook on the stove top. Once cooked, the naan can be stored in the fridge or freezer, so the expiry date on the cheese is no longer an issue. I don't know if that's how it really works but if I tell myself that, then it true for me, hehe.
Stuffed naan made from plain dough
Naan dough typically contains yoghurt and sometimes egg as well, which help produce a soft and flavourful dough. I have both in mine.
And then I came across Vegan Richa's avocado naan. Not a naan stuffed with avocado, but a naan dough made with avocado mash. The avocado is the substitute for the yoghurt and egg. It's the fat from the fruit that you're after and not the flavour, because you can't really tell that there's avocado in the dough. And I found that the naan doesn't puff up as much as the ones with egg and yoghurt. But the avocado does give the dough a delightful natural pale green tinge.
As the blog name suggests, it's about vegan cooking. But while the recipe certainly gave me the inspiration, my dough is non-vegan. I always have dairy milk at home, so that's what I use.
Chickpea-yoghurt dip
I had the naan with a chickpea-yoghurt dip one day. Whizz up some cooked/tinned chickpeas, a clove or two of garlic, a pinch of cumin seeds and some Greek yoghurt. Drizzle in some olive oil while the motor is running until the mixture is smooth. Season with salt and pepper and top with argan oil (or olive), chopped herbs and sumac before serving.
Stove-top cheese-stuffed naan cooked in a griddle pan
Stove-top Stuffed Naan
Makes 3. Variation for avocado naan dough in bold in recipe instructions.

225g (about 1¾ cups) bread flour (or substitute some white flour with 
½ tsp table salt
½ tsp instant yeast
60ml (about ¼ cup) milk
1 egg
2 tbsp natural yoghurt*
1 tbsp sunflower oil (or other neutral-flavoured oil)
Stuffing (examples: roasted eggplant purée; chopped cheese and fresh herbs; date-tamarind chutney)

Combine flour, salt and yeast in a large mixing bowl.
In a measuring jug, combine milk, egg, yoghurt and oil; stir well to blend.
Add wet ingredients to dry ingredients and mix to a soft dough. Knead until smooth and form into a ball. Cover the bowl and set aside for dough to rise, one to two hours.
* For an avocado naan dough, omit the egg and yoghurt, and use the mashed flesh of one medium avocado. The milk can be substituted with a non-dairy milk, if desired.
Divide dough into three, form into balls and set aside, covered, to rest for 5 minutes.
The avoca-dough has a pale green tinge
On a lightly floured surface, press each ball out into a circle, with the edges thinner than the middle. Place a generous amount of filling into the centre of each circle and bring the edges up to enclose the filling, pressing the edges together to seal. Press down lightly to form a disk and set aside, covered, to rest for 10 minutes.
Press and stretch out the disks into elongated ovals or teardrop shapes.
Heat up a large non-stick frying pan or griddle.*
Place one naan at a time into the pan and cook over medium heat until the bottom is brown and it puffs up. Flip and brown the other side. Transfer to a plate and keep under a clean towel as you cook the other naans.
* Instead of cooking on the stove, naan can also be baked in the oven. Place a heavy baking tray on the middle rack of the oven and preheat oven to 225°C. Transfer naan onto the hot tray and baked until they are darkened, blistered and puffed, about five minutes. There is no need to flip the naan.

Sourdough Surprises: Papadum crackers

Tuesday, August 20, 2013

SOURDOUGH PAPADUM CRACKERS
This month's Sourdough Surprises challenge was to make crackers. I like crackers but I do have a problem with them – I tend to eat too many! They're really hard to resist, savoury ones especially, but even the plain type is moreish. It must have something to do with reliving our childhood – or further back, our baby years, when we were given rusks to chew on while we were teething. 
Well, I'm no psychologist so I shall get back to what we came here for: crackers. I decided to try making sourdough papadum.
Banana leaf rice lunch served in South Indian restaurants in Malaysia. Papadum is at top right.
Although papadums are eaten as a snack or used to scoop up dip, they're typically an accompaniment to a South Indian banana leaf lunch – rice is placed in the centre of a large piece of banana leaf and the meat, fish and vegetable dishes are placed around it with the curry poured over the rice. The food is usually eaten with the right hand although some people use a spoon and fork. The discs of papadum are crushed by hand and mixed in with the rice.
Papadum is made from a variety of flours. The dough is rolled out thinly into discs and dried out under the sun. I think all the papadum we find in Malaysia is imported from India; I doubt if anyone actually makes their own as it's so easily available.
I've seen dried papadum being cooked directly on a flame and parts of it will char, but when cooking a large batch, as in a restaurant, they are simply fried. The puff up immediately and are drained quickly, then stored in large air-tight containers.
Sourdough papadum ingredients
Besides the sourdough starter, my papadum contains multi-grain and rice flours, ghee, asafoetida powder and dried chillies flakes. I divided the dough into small rounds, then rolled them out into thin discs (about 10cm wide) on greaseproof paper. I didn't put them out in the open air but simply dried them out in a low oven, then cooked some of the papadum directly on a flame and shallow fried the others. The fried ones came out with little blisters all over the surface.
My recipe is sketchy because I didn't really measure anything but just went with the feel of the dough. Roughly, there's three-quarters of a cup of sourdough starter, a quarter cup of rice flour, two tablespoons of ghee, then enough multi-grain flour to mix into a firm dough. After that salt, asafoetida powder and chilli flakes to taste. I left the dough overnight and then carried on with the rolling and drying.


Centrepiece cakes: Dacquoise

Thursday, August 8, 2013

CHOCOLATE COFFEE DACQUOISE RAISES THE BAR 
I have no talent for cake decorating or even make successful cakes 100% of the time, but the dacquoise – this I can do.
It's made of meringue layers (which start off as a large cookie!), buttercream and chocolate ganache. Separately, each component is not difficult to do though together, they do take a little time. But to get something that looks pretty impressive without a whole lot of effort – now, that's the kind of cake I like.
It certainly doesn't take a professional pastry chef to make this cake. Which is why it was appropriately featured in the newspaper's Don't Call Me Chef cooking column which I write with Indra and Ivy. This month's theme was all about chocolate desserts and was just in time for the Hari Raya or Eid celebration.
The dacquoise is made of sterner fluff
Very often, meringue-type confections use the egg white in the cake or cookie and the yolks are either discarded or used for an unrelated dish. For this cake, the yolks are used in the buttercream, which is custard-based. This is one of my favourite ways to make buttercream frosting. I think it is smoother and more stable than whipping just butter and icing sugar together and it's not uncooked like a Swiss meringue frosting.
I think this cake is best cut and served straight from the fridge. In a less casual situation, I'd probably set out saucers and forks, but in fact, slices of chilled dacquoise can be picked it up with the hand to eat as the layers holds together well.
A cake to celebrate with
Chocolate-Coffee Dacquoise
Serves 12. Adapted from a recipe at cooksillustrated.com (requires subscription)

Meringue
80g ground almonds
50g ground hazelnuts
180g caster sugar, divided
1 tbsp cornstarch
¼ tsp salt
4 large egg whites (about 120g), room temperature
Large pinch of cream of tartar

Coffee Buttercream
4 large egg yolks
60g sugar
1 tbsp cornstarch
¼ tsp salt
175ml full-cream milk
1½ tbsp instant coffee
2 tbsp hot water
225g unsalted butter, softened

Chocolate Ganache
170g chocolate (60% cocoa), finely chopped
170ml whipping cream
2 tsp corn syrup
20 whole hazelnuts, to decorate

Mark out a 32cm by 25cm rectangle on baking paper; place it on an upturned baking tray. Preheat oven to 120°C.
Meringue: Combine the nuts, half the sugar (90g), cornstarch and salt in a bowl.
Place the egg whites and cream of tartar in a large metal or glass mixing bowl (the bowl should be very clean). Using electric beaters, whip the eggs until foamy, 30 seconds, then slowly add the remaining 90g of sugar until glossy, stiff peaks form. With a rubber spatula, fold in the nut-sugar mixture in two batches.
Spread the meringue evenly onto the paper and mist the surface with water. Bake for 90 minutes, then turn off the oven and leave the meringue inside for another 90 minutes. Do not open the oven doors at this time. Remove from the oven and cool the meringue on the paper on a wire rack.
Buttercream: Whisk egg yolks, sugar, cornstarch and salt in a bowl. Place milk in a small pot and heat until simmering. Pour half the hot milk into the yolk mixture while whisking until smooth, then add this to the milk in the pot and return to medium heat. Continue whisking until it thickens. Transfer custard to a bowl, cover and refrigerate until set, two hours. Before using, bring to room temperature.
Dissolve instant coffee in water. Whip the butter until light. Beat in the custard in three batches until just combined. Add coffee mixture and continue to beat until light and fluffy, five minutes.
Ganache: Place chocolate in heatproof bowl. Heat up cream and corn syrup until simmering and pour over the chocolate to soften; stir until smooth. Cool for five minutes.
Assembly: Make sure there is room in the fridge to chill the cake in stages.
Peel off paper from meringue and place on a cutting board. Using a serrated knife, trim edges and cut into four equal rectangles, about 25cm by 8cm.
Spread three rectangles each with ¼ cup ganache. Refrigerate until firm, 15 minutes.
Spread remaining rectangle with ½ cup buttercream; place on a wire rack. Place one ganache-coated meringue, chocolate side down, on top of the buttercream and press gently. Repeat this process with all the meringue layers. Finally, frost the top and sides of the cake with the remaining buttercream. Refrigerate until firm, two hours.
Warm remaining ganache in a heatproof bowl set over simmering water until it is runny but not hot. Pour ganache over top of cake and spread with a spatula, letting excess flow down sides.
Garnish top of cake with hazelnuts. Chill, uncovered, then transfer cake to a platter. To serve, cut each slice with a sharp knife dipped in hot water and wiped dry.
The dacquoise-making process
Pictorial guide
Top tier: Lay down baking paper on an upturned baking tray. Beat the egg whites with sugar until they form stiff peaks and then fold in the nut mixture.
Second tier: Spread out the meringue and spritz the top with water to prevent burning. Bake until brown and cooked, and trim off the uneven ends.
Third tier: Mark the meringue cookie and cut into four even strips. Spread chocolate ganache on three strips, and buttercream on the final strip.
Final tier: Layer the strips, spreading buttercream in between. Finally, spread buttercream on the outside of the stack and pour ganache over the top.


Bagel bombs

Sunday, August 4, 2013

BAGEL BOMBS: THE BREAKFAST OF SLACKERS 
If you're going to take the trouble to mix bagel dough, shape them into their familiar ring shape, and carefully poach them (without them deflating) before baking, then splitting one in half and spreading it with cream cheese shouldn't be a chore now, should it?
But often, I am too lazy even to do that and will eat a bagel "neat", without any embellishment except for whatever seeds are already on top of it. Which is a pity, because bagels are so much better when spread with cream cheese (and other delicious stuff).
This is why I love bagel bombs – bun-shaped bagels with a flavoured cream cheese filling in the centre. A lot of the recipes online have been credited to Christina Tosi's Momofuku Bagel Bomb (here she is making the bombs in a promotional video for a brand of mixer).
Now, I always associate bagels with poaching but Ms Tosi doesn't do this with her bagel bombs – which makes them simply filled buns, doesn't it? I didn't try her recipe so I don't know if her dough produces something that has the texture of a bagel (crusty outside, chewy inside) without the poaching, but I wanted something that I considered more along the lines of an authentic bagel.
So that is what I did, and I am happy with the results. Some of the bombs leaked, as can be seen in the picture below, but the filling was easily smeared back onto the bagel before eating. As long as the lovely cream cheese doesn't seep out into the poaching liquid, it can still be salvaged. And we all know how good baked cheese tastes! 
Now, about the huge cavity in the centre of bagel bombs: I think that is caused by the poaching, which makes the bagel puff up. It doesn't matter to me though because the lazy me now gets to enjoy a bagel already "spread" with cream cheese straight from the fridge (yes, they even taste good cold!).
This is submitted to YeastSpotting.
So what if the cheese oozes out; just spread it back onto the buns and enjoy!
Cheese-filled Bagel Buns (Bagel Bombs)
Makes 10

Cream cheese filling
175g cream cheese
2 tbsp shredded sharp Cheddar
2 tbsp chopped green (spring) onions
Pinch of cayenne pepper
Pinch of asafoetida powder

Whip the cream cheese until smooth, then add the rest of the ingredients. Adjust seasoning. Form into 10 balls (about 1 tbsp each; use an ice-cream scoop), place on a clingfilm-lined tray and freeze until hard. Store in a freezer-proof bag.

Bagel dough
375g bread flour
1/2 tsp instant yeast
3/4 tsp fine salt
1 tbsp barley malt syrup
180ml warm water, plus extra
3/4 tbsp vinegar (rice, malt, white wine, apple cider)
Garnishes: 4-5 tbsp mixed seeds; a pinch of onion powder

Poaching liquid
1 tbsp barley malt syrup
1 tsp fine salt
1 heaped tbsp bicarbonate of soda

Combine the flour, yeast and salt in a mixing bowl.
Dissolve the malt syrup in the water. Stir in the vinegar, then add to the dry ingredients. Stir mixture together, adding extra water a tablespoon at a time if necessary, until it comes together to form a stiff ball of dough. Cover bowl and set aside for 10 minutes.
Knead the dough briefly for about 1 minute and form into a ball. Cover the mixing bowl and leave for 15 minutes. Do the brief kneading two more times. every 15 minutes. The dough will be smoother and more elastic each time. Finally, cover the bowl and leave the dough to rise until about triple in size, 1 1/2 to 3 hours. Deflate, form into a ball again and place in a lightly oiled bowl. Place bowl in a plastic bag and refrigerate for up to four days.
Wrap, poach and garnish
Divide the dough into 10 equal pieces, about 60g each. Flatten the dough and place a ball of cream cheese filling in the centre, then wrap the dough around the filling, sealing it completely. Make sure there are no gaps. Place the filled balls on a flour-dusted surface. Cover and set aside for 15 minutes.
Preheat the oven to 180°C. Line a large baking tray with parchment paper; grease paper well. Combine seeds and onion powder in a plate and lay out a clean tea towel by the baking tray.
Bring about 1.5 litres of water to boil in a large pot. Add malt syrup and salt and stir to dissolve. Stir in bicarbonate of soda and turn the heat down so that the water just simmers. Poach the bagels in batches, 30 seconds on each side, then remove and place on the tea towel; dab to remove excess water then roll in the plate of seeds to coat the top and sides; place bagels on the prepared tray. 
Bake for 30-40 minutes, turning the tray around halfway through, until brown. Place on wire rack to cool.