The Oven has baked its last loaf. This blog is no longer being updated.

My cooking videos appear at youtube.com/janeragavan

I write on food at star2.com

Sourdough banana bread

Wednesday, May 30, 2012

SOURDOUGH BANANA BREAD WITH WALNUTS 
I've read that it's really hard to kill a sourdough starter. Even if you kept it in the back of the fridge and forgot about it for a while, it can still be revived after being fed.
Well, I thought I might have let my one-and-a-half-year-old mother starter die when I took it out of the fridge after weeks and weeks of neglect, refreshed it and it still lay there like sludge the next day.
So I discarded half of it, fed it again and the next day, there was one bubble. One!
Let's do it one more time, I told myself, and if it remained sluggish, it was so long starter.
The next morning, it had climbed up the sides of the glass jar and was foaming like a bubble bath.
There's life in this old thing yet! And I wasn't talking about myself.
Part of the refreshed starter went into making bagels for the June Sourdough Surprises project (a post for June 20), and the other half was used for a banana bread.
Looking around online, I found this recipe for sourdough banana bread at The Fresh Loaf (the recipe lists amounts in cups). After reading through the thread that followed, I took some of the suggestions and decided to change the butter to coconut oil, replace half the white flour with whole wheat and include chopped walnuts.
I was very pleased with the result – burned-the-roof-of-my-mouth-on-a-hot-slice-but-it-didn't-matter pleased. This banana bread rose higher than any sourdough-free ones that I'd baked before. It was quite light, yet substantial at the same time. Made partly with whole grains (I refreshed the starter with whole wheat, but it was originally made with rye flour), coconut oil and walnuts, this cake/bread is low-fat and even nutritious. Also, there's less refined sugar in it since I used very ripe bananas. They had speckled at room temperature and then the skin turned completely black after a few days in the fridge. The natural sugars in the bananas produced such a beautiful fruity aroma as the bread baked and formed a lovely caramelised crust.
It's hard to stay away from sweet snacks and desserts, but at least with this bread, I am not lethargic after the sugar high wears off. Instead, I'm as peppy as a well-fed sourdough starter.
This bread is filling so resist the temptation to cut thick slices
Sourdough Banana Bread with Walnuts
Makes 1 large loaf, about 15 slices  

110g all-purpose flour
110g whole wheat flour
1 tsp baking powder
½ tsp baking soda
1 tsp salt
60g coconut oil
100g-150g caster sugar (amount depends on sweetness of bananas)
1 egg
225g mashed banana (about 3 overripe bananas)
225g refreshed 100%-hydration sourdough starter
90g walnuts, chopped

Grease a 20cm by 9cm loaf pan and preheat the oven at 180°C.
Sift the flours, baking powder, baking soda and salt together three times. Set aside.
In a mixing bowl, beat the coconut oil and sugar together until combined. Add the egg and beat until smooth.
Stir in the mashed banana and sourdough starter.
Fold in the flour mixture and finally, the walnuts.
Pour the batter into the prepared tin and bake for 50-60 minutes until a toothpick inserted in the centre of the loaf comes out clean.
Cool in the tin on a wire rack for 10 minutes, then remove from tin and place on the wire rack to cool for as long as you can resist.

Daring Bakers: Challah back, y'all

Sunday, May 27, 2012

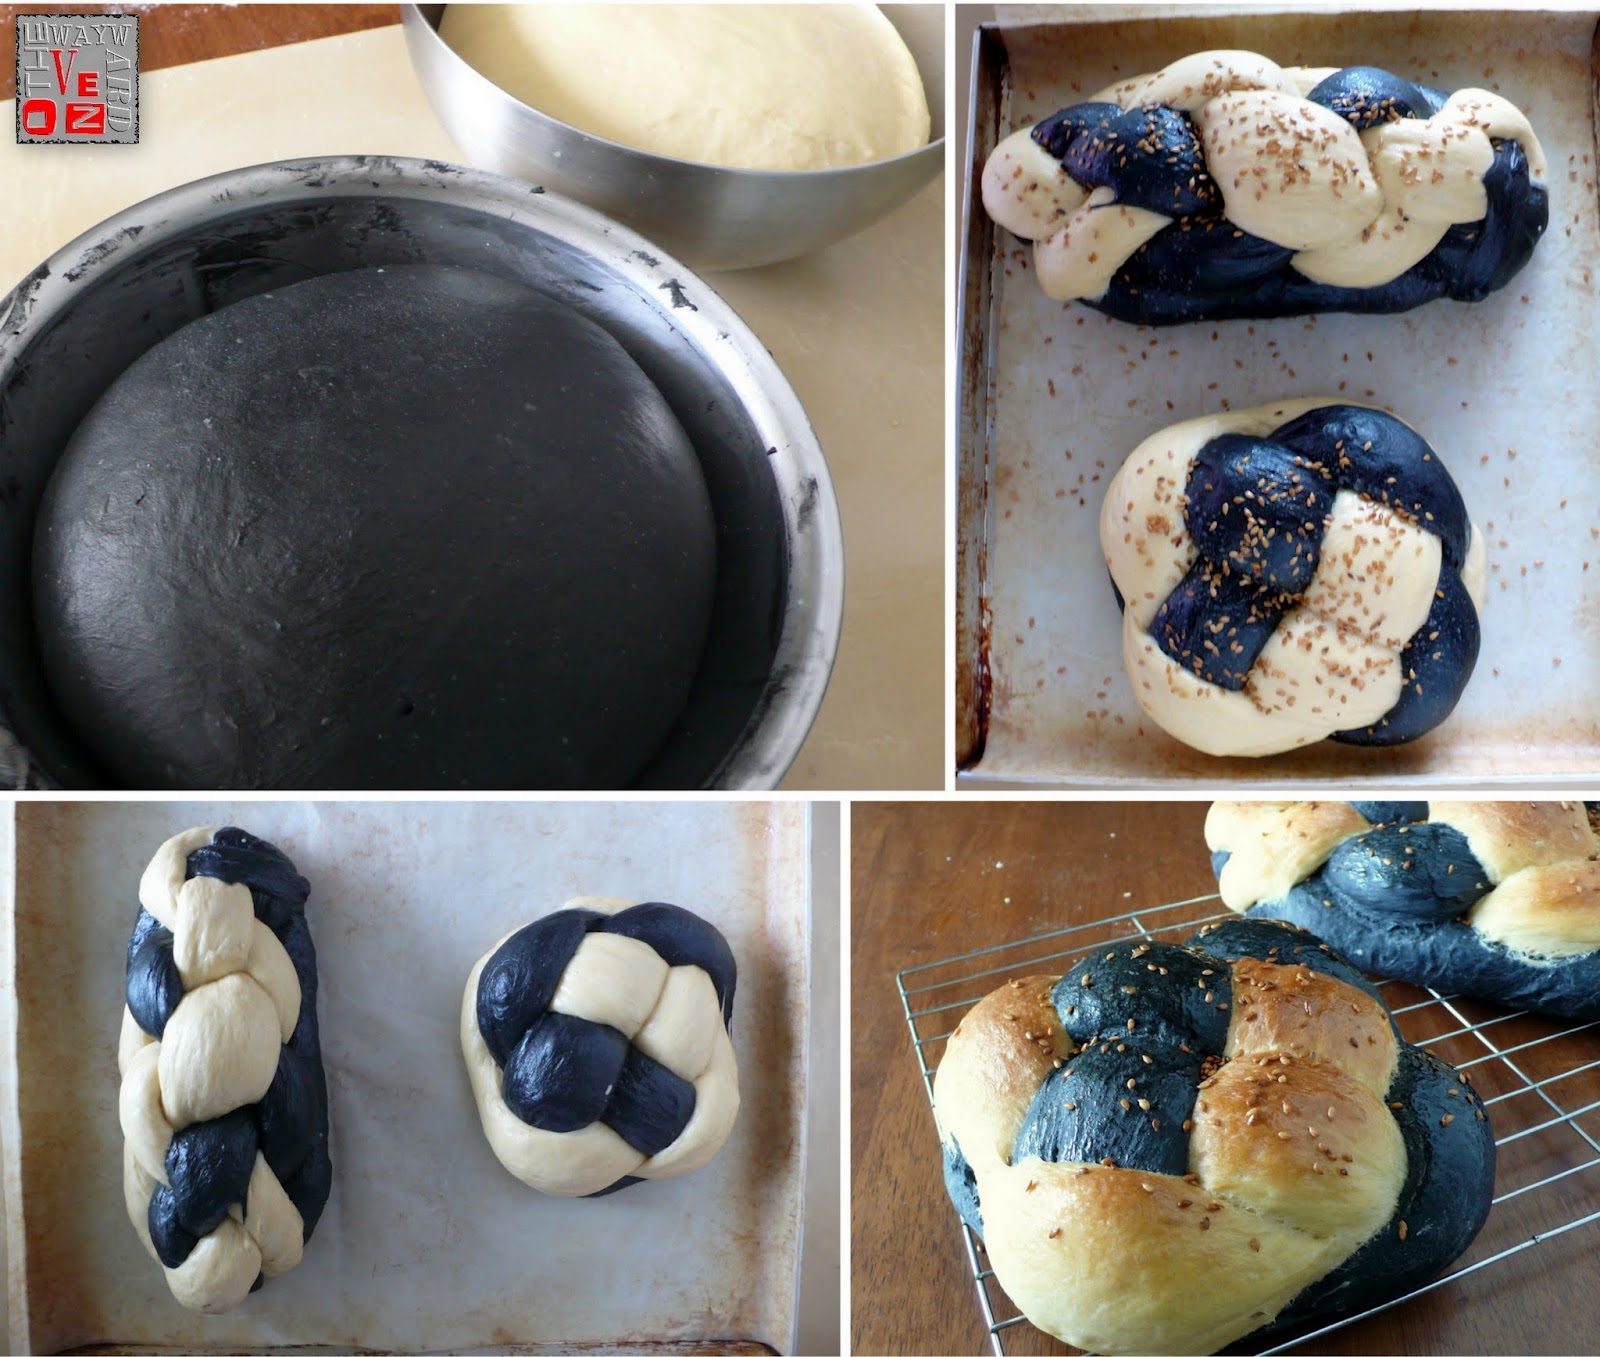
BLACK-AND-WHITE CHALLAH TINTED WITH CHARCOAL POWDER  
May’s Daring Bakers’ Challenge was pretty twisted – Ruth from The Crafts of Mommyhood challenged us to make challah! Using recipes from all over, and tips from A Taste of Challah, by Tamar Ansh, she encouraged us to bake beautifully braided breads.
And what beautiful breads they were judging from the ones made by the Daring Bakers (have a look). Here's the link to the recipe and instructions.
I knew I wanted to use bamboo charcoal powder in my challah. You can't taste the charcoal in the bread (I assume it cannot be pleasant) unless you use too much, but it apparently has health benefits. I just like the colour it gives to the bread, and along with the way the challah is braided, this makes for a loaf with striking looks.
Black and white dough; six-braid long loaf and four-braid round loaf
I used a tried-and-true challah recipe from Peter Reinhart's Artisan Breads Every Day, divided the dough into two and kneaded bamboo charcoal powder (mixed with a little oil into a paste) into one portion. The amount of powder used is important. Use too little and the colour doesn't pop; in fact, it can turn out to be an unappetising greyish-green colour as I found when I made a spiral rye once. Use too much charcoal powder and the dough might be ashy. I used about two teaspoons.
I sprinkled the tops of the loaves with flax seeds before they went into the oven, but the seeds didn't stick well. The tops should, of course, have been eggwashed first. So, when the loaves came out of the oven, I brushed the tops with honey and pressed the recalcitrant seeds back on. The honey gave the loaves a nice glossy surface.
Chocolate spread and cinnamon add stripes
A few days later, I made another challah using "Ruth's 'Go-To' Whole Wheat Challah" (only half the amount). This is a fantastic recipe! Since she's given it away, I bet it won't be only Ruth's go-to recipe from now on.
Again, I made the dough in two colours. Chocolate spread and cinnamon are added to a third of the dough and the two portions are then layered using instructions from this site. The cardboard baking pan that I used was a little too small and the loaf bulged over the sides as it baked. Not as pretty as it could have been but did it matter? Not one bit.

Oatmeal applesauce cake

Thursday, May 24, 2012

OATMEAL APPLESAUCE CAKE ~ LOW-FAT AND MOIST 
Here's a quick, low-fat and relatively healthy way to have your cake and eat it too.
I adapted the recipe from a magazine called Diabetic Living, so of course, there's less sugar in it. Most of the natural sweetness comes in the form of unsweetened applesauce, which is a cinch to make at home.
The cake also has a lot of good stuff – whole wheat flour, rolled oats and dried fruit, and spices like cinnamon and nutmeg.
The original recipe was made with a bigger quantity of ingredients for more servings, but I cut it down to about two-thirds. It was made with egg replacer (the equivalent of one whole egg), but I used a yolk for the batter. Using the egg white in the batter would have reduced the fat, but I find it tends to make a drier cake as well. And we don't want that, do we?
Since I didn't want to waste the white, I made a meringue-like topping. This adds more crunch but the egg white can be omitted. Just sprinkle the rolled oats and brown sugar on and press into the batter lightly.

Oatmeal Applesauce Cake
Based on a recipe in Diabetic Living magazine, winter 2004
Makes a 20cm square cake

⅔ cup plain flour
⅔ cup whole wheat flour
½ cup rolled oats
1 tsp baking powder
1 tsp ground cinnamon
¼ tsp baking soda
⅛ tsp salt
¼ tsp ground nutmeg
½ cup packed brown sugar
¼ cup butter, softened
1 egg yolk
1 tsp vanilla extract
1 cup unsweetened applesauce (preferably homemade; see note)
½ cup dried fruit bits (cranberries, orange peel, crystallised ginger)

Topping
1 egg white
⅓ cup rolled oats
1½ tbsp packed brown sugar

Preheat oven to 180°C. Lightly grease a 20cm square tin; set aside.
In a medium bowl, stir together the two flours, rolled oats, baking powder, cinnamon, baking soda, salt and nutmeg.
In a mixing bowl, combine the brown sugar and butter and beat until mixed.Beat in egg yolk and vanilla. Alternately add flour mixture and applesauce, beating after each addition, just until combined. Stir in fruit bits. Spread batter into the prepared pan.
For the topping, whisk the egg white until stiff but not dry. Combine the rolled oats and brown sugar and fold into the egg white. Spread mixture onto batter.
Bake for 25-30 minutes or until a toothpick inserted in the centre comes out clean. Cool in pan on a wire rack before cutting into bars to serve.
Note: To make applesauce, peel and chop up 2 cooking apples. Place in a saucepan with 2 tbsp water, cover and cook over high heat until the liquid comes to the boil. Turn down the heat to medium low, cover and simmer, stirring occasionally, until apple is soft and can be mashed easily. Uncover and continue cooking until liquid has evaporated. Cool and store chilled in an air-tight  container.

More snacks

Cirque de sorbet

Sunday, May 20, 2012

SORBETS ARE PERFECT COOLERS FOR WARM WEATHER 
The frozen yoghurt shop near my place has already closed. I hardly ever saw customers there. There is quite a lot of foot traffic in the area because of the great little grocery in the block, but RM11 isn't something many people would consider spending on a cup of frozen yoghurt.
In fact, with additional fruit, toppings and sprinkles, the price can go up to RM20. And that's just one serving. Even a 500ml tub of Greek yoghurt from the grocery store only costs RM19.90.
Frozen yoghurt is a little less heavy than ice cream, but for the hot weather, I think the best ice is a sorbet or granita. AiskrimMalaysia, which is just frozen flavoured ice in long tubes, is excellent actually and a snack many Malaysians will remember from their childhood, but it isn't smooth like sorbet.
Toasted coconut granita (left) and lime sorbet
Sorbets and granitas are not difficult to make, and one doesn't even need an ice cream maker. I featured a couple  lime sorbet and toasted coconut granita  for the recipe column in the newspaper recently. I loved the lime and finished that first. The coconut was a little heavier since it contained coconut milk. And then later, I made a fruit punch, which was simply fresh fruit pulp and various syrups mixed together. It's basically the process of making the ices that requires care and effort – the liquid itself is whatever beverage one enjoys.
Made with fresh peaches, pomegranate molasses and piña colada mix
Fruit Punch Sorbet
Makes about 400ml

2 peaches, halved and stone removed
250ml water
50ml lime juice
60ml pomegranate molasses
60ml piña colada mix
2 tbsp honey or to taste

Blend all the ingredients together. Pour the mixture into a container with a lid, cover and place in the freezer. After an hour, the edges of the mixture will start to firm up while the centre will be slushy. Use a fork to break up the ice crystals, stirring until the mixture is smooth. Return to the freezer. Repeat at least twice more every 45 minutes or so, then freeze until firm.
The edges will start firming up. Scrape the mixture with a fork to break up the ice crystals.
This next step is optional but will create an even finer sorbet. Break frozen sorbet into chunks and place in a large mixing bowl. Using an electric whisk, beat the chunks until they separate and appear like wet sand. This should take no more than 30 seconds. Do not allow the mixture to melt. This step can also be done in a food processor or blender. Return the mixture to the container, smooth the top with the back of a spoon and freeze until firm.
Transfer the sorbet to the refrigerator for 20 minutes before serving.

99.8% whole wheat bread

Thursday, May 17, 2012

IT'S HIP TO BE SQUARE: WHOLE WHEAT SANDWICH BREAD 
Whole wheat bread is hard to swallow. Literally. 
I include wholemeal flour in a lot of breads that I bake, but I am not kidding anyone by calling it whole wheat bread.
Most loaves in the shops are not 100% whole wheat either. In Malaysia, where bread isn't a staple, those kinds of loaves aren't popular. Mr Don Yong, the chairman of the Malaysian Institute of Baking, told me in a recent interview that while awareness of the health benefits of whole grains is rising, most people still prefer soft, sweet breads made with white flour and containing more sugar (or corn syrup) than necessary. And so, the so-called commercial "wholemeal breads" made here constitute mostly white flour.
Real or artisan whole wheat bread can also taste bitter and unless I slather toasted slices of it with butter, it isn't palatable.
So I've been reading up on whole-grain breads and how to make them taste better for me. I've come close with this loaf. It would have been closer if I hadn't burnt the top, but apart from that, this bread appeals to me.
Proof dough to double its size
My research told me I should include these two ingredients in the dough:
1. Orange juice ~ to counter the bitter taste of whole wheat flour.
2. Wheat gluten ~ to help form a stronger, more elastic dough which creates a lighter loaf with larger air pockets. A little extra water should be added to the dough when wheat gluten is used.
This is still a dense bread -- with this much bran, there's no getting away from that. The loaf I made had quite a tight crumb, but it was not a brick. Sometimes, the bottom of a wholemeal loaf has a thick mass of undercooked dough, but this time, the crumb was quite even.
I would say this is the lightest almost 100% whole wheat bread I have made. 
The reason I call this a 99.8% whole wheat is due to the fact that I used plain flour during the hand-kneading and to dust the work surface. It was only three tablespoons, but it should still be included in the baker's percentage.
Slice 'em thick
Almost 100% Whole Wheat Bread
Makes 1 large loaf. With some instructions from Peter Reinhart's Artisan Breads Every Day.

400g whole wheat flour
3 tbsp full-fat milk powder
1 tbsp wheat gluten (see note below)
1 tsp salt
1 egg yolk, beaten
2 tbsp vegetable oil
220g water
65g orange juice
2 tbsp honey
7g instant yeast
Unbleached plain flour
Egg white, optional, for glaze

In a mixing bowl, whisk the flour, milk powder, wheat gluten and salt together.
Combine egg yolk and vegetable oil.
Combine water, orange juice and honey. Stir in yeast and leave to bloom, about 10 minutes.
Add orange juice to the water mixture and add to the dry ingredients together with the egg yolk mixture. Incorporate all the ingredients well to form a wet and shaggy dough. Leave for 5 minutes.
This next step can be done in a mixer with the dough hook attachment. Alternatively, mix by hand using a large wooden spoon or dough whisk. If the dough is still too wet, add plain flour, a tablespoon at a time. The dough will still be sticky but should come away from the sides of the bowl (I added a little less than 3 tablespoons extra flour at this stage).
Transfer the dough to a lightly floured work surface (dusted with plain flour). Knead for a few seconds and form into a ball. Cover with the mixing bowl and leave for 10 minutes.
Gently flatten the dough with the tips of the fingers and do a stretch and fold: Reach under the front end of the dough stretching it out, then folding it back onto the top of the dough. Do this from the back, then from both sides. Flip the dough over and tuck it into a ball. Cover again with the mixing bowl and leave for another 10 minutes.
Repeat this process two more times at 10-minute intervals. Place dough ball into a plastic container or large lightly oiled bowl and cover with a tea towel. Set aside to double in size. At this stage, the dough can be refrigerated (place the container in a large plastic bag if doing this) overnight or up to four days. If the dough is refrigerated, remove from the fridge 3 hours before baking time.
Grease and flour an 11cm by 20cm loaf tin or line a sheet pan with parchment paper. Transfer dough to a lightly floured work surface and deflate with finger tips. Form the dough into a loaf shape and place in/on the prepared pans to increase to about 1½ times its original size.
Preheat the oven to 180°C. Brush the top with egg white, if desired. For the free-standing loaf, slash the top of the dough. Bake for 40-50 minutes, rotating halfway through, until the bread is a rich brown and it sounds hollow when tapped on the bottom. The internal temperature will be above 85°C in the centre.
Remove loaf from the pan and cool completely.
Note: Wheat gluten is optional. If it is omitted, reduce water by about 2 tbsp.

Turn to jelly (cakes)

Tuesday, May 15, 2012

JELLY CAKES COATED WITH AGAR-AGAR
I bet I'm not the only one with bakeware that they used once and then stored in the back of their kitchen cupboards. We all do it, don't we? Perhaps we see a cake with an attractive shape on TV or in a magazine or cookbook and we go out and get the mould. We come back, we use it, and once we've made a cake with the same attractive shape as the one on TV or in a magazine or cookbook, we're satisfied and stuff the mould somewhere and often forget about it.
Damn this need for instant gratification.
Well, instant gratification is bad enough, but then there's also the subliminal messages on TV that get you to make purchases. After watching a rerun of Seinfeld, the character Elaine convinced me that I needed to make muffin tops. And I needed a special pan for that. Later, however, I found that I was not the only one influenced by the sit-com because apparently, the episode also inspired bakeware companies to come out with pans for just the muffin tops!
I didn't find any muffin top pans, but I thought  this jelly cake pan would work just as well.
Jelly cake mould
They're like madeleine pans, I suppose, except without the shell shape. When the cakes cook, they form a dome so both the bottom and top are rounded.
Agar-agar powder in red
Well, after making muffin tops just the one time, that's when the pan ended up in the back of the cupboard. But last weekend, I dug it out and used it the way it was intended: for jelly cakes.
Like lamingtons, jelly cakes are Australian. But instead of cake blocks rolled in chocolate and tossed in dessicated coconut, jelly cakes are cake discs coated in partly set strawberry or raspberry jelly (for a pink colour) and then in coconut. 
The only time I've seen these baby snacks being prepared was when Australian chef Kylie Kwong makes her mum's jelly cakes on one of her cooking shows. As the jelly coating for the cakes, she mixes water with an 85g packet of raspberry or strawberry jelly crystals.
Since it is more easily available, I wanted to use agar-agar powder which comes in 10g packets and in all sorts of colours, including red. The instructions say to "cook" the agar-agar powder with water and sugar, unlike the jelly crystals which are simply dissolved in boiling water. Agar-agar also becomes firm quicker, and at room temperature, so timing is important. I had to work fast to coat the jelly cakes.
Jelly cakes are made with a yellow cake batter, but I had some egg whites leftover from another dish so I made white cakes instead.
My jelly cake pan only makes 12 cakes, so I had leftover batter which I baked in four dariole moulds, coating them in jelly and coconut as well to make English madeleines (with half a glacé cherry on top). These little cakes are traditionally coated in jam and sometimes topped with candied angelica.
English madeleines
Jelly White Cakes
Makes 12 cakes (with leftover batter)

75g cake flour
½ tsp baking powder
Pinch of salt
60g butter, at room temperature
90g caster sugar
¼ tsp vanilla extract
60ml milk
2 egg whites, at room temperature
80g dessicated coconut, approximate

Jelly coating
This makes twice as much as needed. Make jelly with the other half.
750ml water
250g caster sugar
1 x 10g packet agar-agar powder (red colour)

Lightly grease a 12-hole jelly cake tin and preheat oven to 180°C.
Sift flour with baking powder and salt three times.
Reserve 1 tbsp sugar and beat the rest with the butter until light and creamy. Stir in vanilla extract.
Place egg whites in a clean bowl with a pinch of salt. Whisk until foamy, then add the reserved 1 tbsp of sugar and whisk until stiff but not dry.
Add flour mixture to the creamed mixture alternately with milk in three batches. Fold in egg whites.
Drop heaped tablespoons of batter into prepared tin. Bake for 10 minutes, or until lightly browned and a skewer inserted in the centre comes out clean. Leave cakes in tin for 10 minutes, then remove from tin and transfer to wire rack to cool.
Make the jelly coating: Place water, sugar and agar-agar powder in a pot over low heat. Stir until sugar dissolves; bring to the boil. Pour half into a large shallow dish and the rest into jelly moulds. Leave both containers at room temperature (the agar-agar should set within an hour; refrigerate before serving). Stir the jelly coating occasionally; the edges should start setting in about 20 minutes. When it has the consistency of runny jam, it is ready to use.
Place the dessicated coconut in another shallow bowl. Dip the jelly cakes in the runny jelly, coating it evenly, then toss in the coconut. Can be served immediately, but I think they are better refrigerated before serving.

Black rice is beautiful

Saturday, May 12, 2012

ONCE YOU GO BLACK, YOU CAN NEVER GO BACK  
It was a surprise to take the lid off the rice cooker and find a mass of purple grains! I had expected specks of black throughout the brown rice instead of what I saw.
The "black wild rice" labelled on the package, I thought, was something else. It wasn't the seed of an aquatic grass of the Zizania species that is often cooked with brown rice as a side dish. And it wasn't black glutinous rice. No, this was actually a rice grain, only black  purple, actually.
Despite the confusion, there was no denying how good it tasted! The fact that it's nutritious as well is a bonus.
The black rice does colour everything it comes into contact with though. I only added a small palmful of it to about a cup and a quarter of brown rice, and as I said, the whole pot turned purple when it cooked.
I ate the rice with some dendeng daging or spicy beef strips I posted on a few days ago, and kneaded some of the leftover into a bread dough. It gave the bread a chewy texture and of course, added purple speckles. Rather attractive it was.
Bread with purple freckles
Even without the black rice, I now like brown rice. I didn't before and actually thought I would never eat it again after the first time I tried it.
A few years ago I thought I should try eating less white carbs and so I bought a bag of brown rice. I cooked a cup of it by the absorption method with plain water. The texture was a little firm but it was the taste that I couldn't stomach (pun intended). And the smell really put me off.
A few days later I tried again, this time cooking the rice in chicken stock in the rice cooker. With the offputting smell again wafting through the kitchen, I almost didn't want to taste the rice. But then I drowned it in a curry and cleaned the plate  but only because I didn't want to waste it. The curry helped (A LOT!) but I said I would never eat brown rice again and I gave the 1kg bag of rice  minus two cups  away.
A couple of weeks ago, I thought I would try it again and got a small bag of Cambodian brown rice. This time, there was no smell and the taste was delicious! The black rice made it even nuttier.
My taste buds are the same, so I don't know what changed. Maybe it was the type of rice. All I know is, brown rice – with a touch of black – will now be a part of my diet.

Feelin' groove-y: Coconut oil bread

Monday, May 7, 2012

MAKE AN IMPRESSION: USE LEAVES IN YOUR BREAD  
The top of the coconut trees are just out of reach from my apartment balcony. If I tied a couple of broomsticks together and attached a coat hanger at the end, I could probably hook one of the fronds.
But when I went downstairs, they were too high for me to reach anyway. I had to go outside the compound to find some smaller trees. The leaves were a little dry, but they would have to do.
Why did I need coconut fronds? Well, I was reading up on Cuban bread and apparently, to get the groove in the middle, a leaflet from the palmetto palm is used. The hard spine in the middle of the leaflet makes the indentation while the dough proofs and later bakes. Bay leaf is also apparently used. It would probably be fresh, but I only had dried leaves. I should have used kaffir lime leaves instead.
Groove with it
From what I've read, Cuban breads come in two varieties: pan de agua is made with just water, while pan de manteca contains lard. The bread is used for all types of sandwiches, most famously for the medianoche.
There are many recipes online for lard bread. This site says a medianoche sandwich is made in a challah-like egg bread. Looking for an authentic recipe, I stopped by at 3 Guys From Miami which has a recipe for pan medianoche but it makes a whole lot of bread and I don't have the freezer space to store it all.
The other thing was the lard. I thought of rendering down some bacon at first and using the fat in the bread, but then decided against it. Keeping with the coconut theme, I thought why not use virgin coconut oil. I imagine it isn't the same as using lard but the resulting bread was soft, eggy and fluffy, and perfect for sandwiches.
During the kneading, the aroma from the oil was absolutely gorgeous, and I was looking forward to the taste. Too bad it didn't stick around after the bread was baked. But it did leave me with rather soft hands!
Fill the rolls, toast and press in a pan on the stove
Grooved Coconut Oil Sandwich Bread
Makes 2 loaves or 6 rolls

350g bread flour
1 tsp salt
190g tepid water
1 tbsp sugar
4g active dry yeast
1 tbsp malt syrup
2 egg yolks
1½ tbsp virgin coconut oil
1 egg white, beaten, for glaze
Coconut leaflets or bay leaves

Combine flour and salt in a large mixing bowl.
Combine water and sugar in a jug. Stir in yeast, cover and leave to bloom, 10 minutes.
Combine malt syrup and egg yolks, and stir into the yeast mixture. Add this to the flour and bring together into a shaggy dough. It will seem quite dry at this stage.
Add the coconut oil and mix the dough until it forms a rough ball. Transfer the dough to the work surface and  knead until smooth and elastic, about 10 minutes. Form into a ball and leave on the work surface. Cover with the mixing bowl. Leave for 10 minutes.
Deflate the dough with the tips of your fingers and knead briefly. Form into a ball and leave covered under the mixing bowl for 10 minutes. Repeat this brief kneading two more times at 10-minute intervals. Form into a ball and place in the mixing bowl. Cover with a tea towel and leave until doubled in size.
Deflate the dough and divide into 2 loaves or 6 rolls. Place on a baking tray dusted with semolina or lined with parchment. Brush the tops with egg white.
Cut coconut leaflets into short lengths, wet them and press into the centre of the loaves or rolls. Press down hard so that there is a deep groove. The impression will become shallower as the dough puffs up. Alternatively, use bay leaves, placing three leaves diagonally. Leave to rise, about 20 minutes.
Meanwhile, preheat the oven to 180°C. Place a heavy pan in the bottom of the oven while it is heating. 
Boil some water just before baking time. Pour boiling water into the heavy pan and place dough in the oven. Bake until tops are golden and bread sounds hollow when tapped, 25-30 minutes. Remove leaves and cool on a wire rack.


A few favourite sandwiches
Grilled cheese and chutney
Grilled vegetables
Pressed sandwich with shrimp and surimi
Broccoli burger

Dendeng daging

Saturday, May 5, 2012

STRIPS OF BEEF COOKED IN A MALAY-INDONESIAN STYLE 
I don't eat a lot of beef, and hardly cook it. But whenever I eat out at a Malay or Indonesian restaurant, I like to have something called dendeng daging. These are thin slices of beef cooked with chilli and other spices until dry. They're almost like beef jerky, except that they are a little saucy as well.
Not everyone does it well, but when they do, it usually happens after a lengthy process of first poaching large chunks of beef until tender, then cutting each chunk into slices and pounding them out to make them even thinner. In some recipes, the thin slices of meat are first dried out under the sun before finally cooking them with a blend of spices into a rich, unctuous dish.
I'll leave all that to the experts and enjoy the dish when I go eat at a restaurant, but at home, I'm keeping it simple.
Dendeng Daging (Spicy Beef Strips)
Serves 4

500g beef, cut into medium large chunks
2 tsp cumin seeds
1 tsp black peppercorns
2 tsp lime juice
4 tbsp cooking oil, divided
½ tsp turmeric powder (or 1 fresh turmeric leaf, finely shredded)
1 tbsp palm sugar
Salt to taste

Blend together into a paste
1 medium onion
4 cloves garlic
2 shallots
2 red chillies

Use a meat mallet to pound the chunks of beef into thin cutlets about the size of half your palm. Fry the cumin seeds and peppercorns in a dry pan for a few minutes, then grind/pound finely and add to the beef with the lime juice. Marinate for 1 hour.
Heat 2 tbsp oil and and saute the blended paste until fragrant. Add the beef pieces and stir together until almost dry. Mix in 3-4 tbsp water, cover and cook on low heat until beef is tender, stirring occasionally.
Stir in remaining oil and bring to the boil.
Add the turmeric powder or shredded leaf, palm sugar and salt to taste. Stir until the gravy is thick and oily, and the beef is well coated with it. Remove from heat and serve.

Have Dendeng Daging with
Kerabu (Malay salads)
and afterwardsTepung Gomak (Green Bean Flour-coated Patties)