The Oven has baked its last loaf. This blog is no longer being updated.

My cooking videos appear at youtube.com/janeragavan

I write on food at star2.com

Daring Bakers: Meringue-Filled Coffee Cake

Sunday, March 27, 2011

FLOWER POWER: YEASTED COFFEE CAKE WITH HALVA FILLING  
The March 2011 Daring Baker’s Challenge was hosted by Ria of Ria’s Collection and Jamie of Life’s a Feast. Ria and Jamie challenged The Daring Bakers to bake a yeasted Meringue Coffee Cake.


This month's Daring Bakers challenge could not have made me happier. I make yeasted breads every week. And I love coffee cakes because of their baked-in toppings/fillings. (Well, it seems this challenge was quite a favourite with the other Daring Bakers as well. Check out their dishes at the Daring Kitchen website.)
The squashed flower *sob* didn't stop anyone from ripping it apart rather quickly (right). 
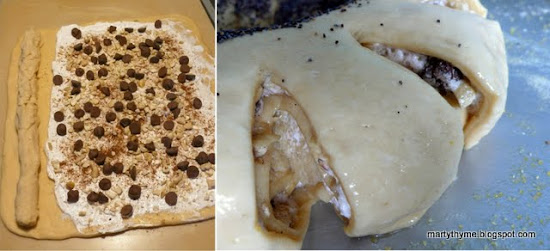
I tried Jamie's version first and the bread dough was perfectly soft. However, I spread it out a little too thin (I simply stretched out the dough into a rectangle using my hands) and so when I had filled it with meringue, nuts and chocolate chips, it was a little delicate and difficult to manoeuvre into a ring and then onto the baking sheet. The result was that squashed flower you see in the picture on the left (above).

Place the semolina halva log on one long end of the dough, and start rolling up the dough from that side so that the semolina will be in the centre of the spiral
I have to say the Indian half of me was intrigued by Ria's version with the saffron and spices. The ingredients got me thinking about Indian sweets so I decided to incorporate one of them, kaseri or semolina halva, into the filling. I think it worked well with the rest of the ingredients.

The halva can, of course, be eaten on its own. Mix in some chopped cashews and raisins. Another version is to cook the mixture until very thick and then press it into a baking tin or shallow bowl until firm (like polenta). It is served cut into shapes, usually diamonds.

To avoid another flattened flower, I let the dough rise in the fridge overnight. The next day, I left the dough out for about 30 minutes (it was still a little cold) before rolling it out with a rolling pin and filling it. It was easier to handle this way.

There are many recipes for semolina halva, of course. This is how I made it for the filling.

With semolina halva filling
SEMOLINA  HALVA
2 tablespoons ghee
½ cup semolina
1½ cup water
3 tablespoons sugar
Pinch of saffron, mixed with 1 tablespoon water
Large pinch of cardamom powder
Pinch of salt
  • Heat ghee in a heavy-bottomed pan over medium heat and fry the semolina until lightly toasted. Add the water and sugar and stir until sugar dissolves. Keep stirring until mixture thickens and semolina starts to leave the sides of the pan. Stir in the remaining ingredients and remove from heat. Allow to cool before using as the coffee cake filling.

    Kitchen kit: Silicone baking moulds

    Monday, March 21, 2011

    SCALLOP-SHAPED MADELEINE 
    Although I like the charm and durability of metal bakeware, silicon moulds have their plus points.

    They often catch the eye with their bright colours ­­– like the lime green ones I got on my last visit to the baking supply shop ­­– but it's the unusual shapes that are probably the biggest attraction. We are getting more choices now in Malaysia, but the thicker, better-quality branded moulds (if you can find them) are rather expensive.

    I've wanted to make madeleines for a while now, not least to dedicate to my god-daughter Madelyn. Not quite the same spelling, but these little cakes are certainly made for a sweetie like Mady. So I was happy to find the madeleine mould at the baking supply store. The lime green colour inspired a cake flavoured with lime and speckled with lovely bright zest.

    There's quite a bit of discussion about madeleines at various blogs: Should the plain side be flat or have a hump? Should the batter contain baking powder or not? Should the eggs be beaten to incorporate a lot of air? Is it all right to simply mix everything together? Is it necessary to leave the batter in the refrigerator overnight? Can the batter be used immediately?

    Well, so far, I've only made one attempt at this cake so that is all I can base my judgement on. I followed a recipe for lemon madeleines from Martha Stewart's Baking Handbook but used lime instead. It does not contain baking powder and the batter is mixed together easily. The cakes had a strong aroma of lime but I would have liked a stronger flavour so for my second batch, I added more lime juice. The recipe is given at the bottom of the post.

    Back to silicone baking moulds. Below are a few that I have used.

    Marble cake in a rose shape
    Jelly in the shape of a rose
    Pyramid-shaped coconut macaroons
    LIME MADELEINES
    Adapted from Martha Stewart's Baking Handbook
    Makes 18

    125g unsalted butter, melted and cooled
    ¾ cup all-purpose flour
    ½ cup cashew nuts, toasted and finely ground
    ½ cup caster sugar
    2 tablespoons finely grated lime zest
    1 tablespoon lime juice
    3 medium eggs
    ½ teaspoon salt
    • Whisk together the flour, ground cashew nuts and sugar; set aside.
    • Add the lime zest and juice to the cooled butter; stir to combine.
    • In a large bowl, combine the eggs with the salt and whisk until frothy. Whisk in flour mixture to combine. With the whisk, fold in the butter mixture. Cover the bowl with plastic wrap and refrigerate until chilled, at least 2 hours or overnight.
    • Preheat the oven to 180°C. Grease two 9-mould madeleine pans*. Transfer batter to a pastry bag fitted with a 12mm (½-inch) plain round tip. Pipe the batter into the prepared pans, filling each mould about three-quarter full. bake, rotating the pans halfway through, until the edges of the cakes are golden brown, 12-14 minutes. Immediately invert the madeleines onto a wire rack to cool. Madeleines should be served the same day they are baked.
    * Silicone moulds just need to be greased; if using metal moulds, dust with flour after greasing and tap out excess. Flouring the tins prevents the cakes from sticking. If you have only one madeleine pan, store the remaining batter in the fridge while you bake the first batch. Wait for the pan to cool slightly (silicone pans don't take very long to cool) when you take it out of the oven and after you remove the cakes, grease again and make the second batch.

    PRINTABLE RECIPE

    Bread bulletin: Kahk

    Monday, March 14, 2011

    IRAQI BREAD BRACELETS 
    I was looking for a recipe for Italian taralli pugliese in one of my bread books when I came upon this recipe for kahk and noticed the similiarities between these two bread snacks. Both are looped into a ring or bracelet shape, contain olive oil and are seasoned with spices ­­– cumin and coriander in kahk and fennel in taralli. The difference is the addition of white wine in taralli, and the rings are first poached like bagels before they are baked.


    The recipe for kahk comes from Linda Collister's Bread: From Ciabatta to Rye. She writes in her introduction to the recipe that kahk are Arab bread bracelets or rings and the one she presents in her book is an Iraqi recipe. I read that there is also a sweet variety, filled with dates and nuts, or plain dusted simply with sugar.

    After reading some recipes for taralli online, I thought why not use Linda Collister's recipe for the kahk, which makes 18 bracelets, and divide that into kahk and taralli? I substituted the cumin and coriander with fennel, and omitted the wine (since I didn't have any). Because I had a little bit of discard from a sourdough leaven I was going to use the next day, I added that to the mix. After shaping into rings, I proceeded to bake half of them for kahk and poach the other half before baking for taralli.  

    This has to work, I thought, or I'll have people 
    from two countries laughing at me.

    Well, as it turned out, I didn't quite pull off either one. My "mock" taralli failed completely. They were pallid and tasted raw despite being cooked twice (poached and baked). I had let the dough rise overnight in the fridge and poached them the next morning without allowing them to come to room temperature. Can that have been the reason for the insipid look and taste, I wonder.

    The kahk are twice-baked, first in a medium hot oven, then at a lower temperature to crisp up. I didn't let the oven cool down significantly before the second baking, so they were hard and a little burnt. But when I managed to crack one with my teeth, it tasted better than it looked. If made well, I can see myself chewing on these crisps all day.

    Which meant a second attempt was in order. This time, the kahk turned out good! They were crisp on the outside but tender on the inside. My jaw didn't hurt and my teeth were still intact. I am submitting this recipe to YeastSpotting (which discussed taralli pugliese some time ago).

    I'm going to get those taralli to work next.
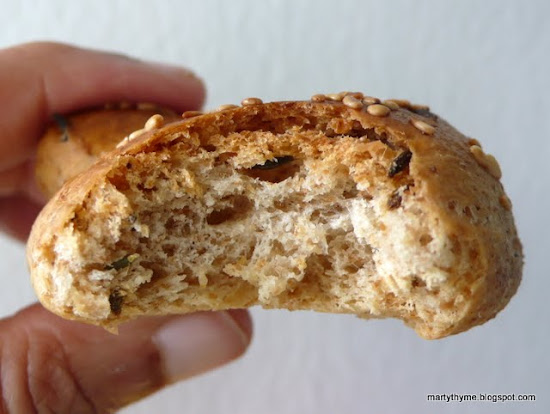
    Perfect for dunking
    KAHK
    From Bread: From Ciabatta to Rye by Linda Collister
    Makes 18 

    300g unbleached strong bread flour
    1 teaspoon sea salt
    2 teaspoons cumin seeds, roasted*
    1 teaspoon coriander seeds, roasted and ground*
    1½ teaspoons (7g) instant dried yeast
    100ml tepid water
    100ml olive oil
    1 egg, beaten, to glaze
    Sesame seeds*, to sprinkle
    • Put the flour, salt, roasted and ground seeds and yeast in a large bowl and mix well. Make a well in the centre.
    • Add the water and olive oil. Gradually draw the flour into the liquids to make a firm, heavy dough. If the dough feels a little sticky, work in a little more flour, 1 tablespoon at a time; if there are dry crumbs in the bowl, work in a little more tepid water, 1 tablespoon at a time.
    • Turn out the dough onto a lightly floured work surface and knead thoroughly for 10 minutes. Return the dough to the bowl, cover and leave to double in size, about 1½ hours.
    • Turn out the risen dough onto a lightly floured work surface and punch down to deflate. Divide into 18 equal pieces about the size of a walnut. Using your hands, roll the pieces into sausages about 12cm long. Overlap the ends to form rings.
    • Arrange slightly apart well-greased baking sheets, then very lightly brush with beaten egg, taking care not to glue the dough to the sheets. Sprinkle with sesame seeds^. Slip the sheets into large plastic bags, slightly inflate, seal, then let rise as before until doubled in size, about 30 minutes.
    • Meanwhile, preheat the oven to 190°C.
    • Uncover the rings and bake for 25 minutes until firm and golden. Remove from the oven, turn down the heat to the lowest setting˜, then, when the oven has cooled sufficiently, bake for a further 20 minutes until crisp and dry. Cool on a wire rack.
    • Eat immediately or store in an airtight tin for up to 1 month. 
    * Instead of cumin and coriander, I used 2½ teaspoons of fennel seeds only, roasted and left whole. Besides sesame seeds, I used onion (nigella) seeds as a garnish.
    ^ To get the seeds to stick better, I pressed a finger into the seeds and then pressed them on each egg-washed ring.
    ˜ Each oven will be different. I actually turn my oven off, wait about 10 minutes, then return the kahk to the oven to crisp and dry from the residual heat.
      PRINTABLE RECIPE
      Morning mix

      Monday, March 7, 2011

      HOMEMADE GRANOLA 
      Last week was crazy. Being away on assignment for a week, then coming back to catch up on work and on top of that falling ill, I really didn't get much done. Luckily, I managed to write my story for the March issue of "Don't Call Me Chef" and make my breakfast dish (story out today in print; here's the link).


      I eat granola for breakfast quite often, either with milk or strained (Greek) yoghurt with a little berry jam. It's nice to make your own because you get to put whatever you like in it and leave out what you don't. I like adding flaxseed to the mix because it's healthy; commercial granola hardly ever has it. I often use almonds, but since I only had peanuts this time, I put those in instead. It's a really flexible recipe and easily scaled up.

      HOMEMADE GRANOLA
      Makes 4 cups

      3 cups rolled oats
      1 cup shredded coconut
      ½ cup pumpkin seeds
      ½ cup sunflower seeds
      ¼ cup flaxseeds
      ½ cup peanuts
      1 tablespoon ground cinnamon
      1 cup honey
      ¾ cup sunflower or canola oil
      1 cup dried fruit (apricots, dates, glacé pineapple), chopped
      • Preheat oven to 180°C. Combine oats, coconut, seeds, almonds and cinnamon in a large bowl. Stir the honey and oil in a small saucepan over low heat for 2 minutes until melted and combined. Add the honey mixture to the dry ingredients and mix to combine.
      • Spread the mixture on a greased baking tray. Bake for 20-25 minutes, stirring occasionally, until golden. Remove from oven and leave to cool ­­– it will be a solid mass.
      • Once cooled completely, break up into clusters and mix in dried fruit. Store in an air-tight jar for up to 4 weeks at room temperature.
      Granola parfait: Layers of granola, yoghurt and fruit 
      Here are links to some of my other posts which feature dishes that make good breakfasts:
      Any Morning Cinnamon Rolls
      Bamboo Charcoal Braid
      Banana Mochaccino
      Cheese on Toast ala Harold Pinter
      Easy Orange Marmalade
      Julia Child's Egg Project: Four ways to cook eggs
      Multi-grain Bread
      Nutty Cinnamon Sticky Buns
      Strained Yoghurt
      Poppy Seed Bread Rolls
      Potstickers with Chicken
      Vegetable Mung Bean Griddle Cakes