 |
| Bottoms up: Made to share... yeah, right! |
I've been telling Veggie Chick that I wanted to make cinnamon buns for some time now, but since I still hadn't got round to it, she said she would make them herself since she has a new-found interest in breadmaking (I think she got fed up with my constant gushing about my love for breadmaking that she wanted to see what all the fuss was about). Well, that sounded like a challenge and that's why we both decided to make the buns, post our recipes and compare notes – and bread – when we meet at work later today.
I decided to go with sticky buns, which are a variation on those regular buttery rolls with the swirls of cinnamon-sugar mixture in the middle (sometimes with dried fruit and nuts as well) with their sticky caramel and nut topping. Instead of making a caramel sauce, however, I simply rubbed butter and sugar together. Because the mixture was in the base of the tin when the buns were baking, it melted anyway. It's not as heavy or gooey as your usual sticky bun caramel sauce, which would drip all over the buns when you flip them over after baking, but it's just as good. (Ooh, I think I hear the dieters getting interested again...)
If you didn't already know, here's a tip on how to cut the dough without squashing it, as would normally happen when you use a knife: Dental floss. Pull off about 30cm of floss, slide it under the roll of dough, cross the ends over above the dough, hold the ends and pull quickly but smoothly. You should have a perfect spiral. Just remember to use unwaxed dental floss!
NUTTY CINNAMON STICKY BUNS
Makes 9 large buns
3 cups all-purpose flour plus extra for dusting
⅓ cup milk powder
1 teaspoon salt1 teaspoon instant yeast1 cup warm water
2 tablespoons honey
1 medium egg, beaten
¼ cup + 1 tablespoon butter (divided), melted
¼ cup packed brown sugar
2 teaspoons ground cinnamon
Topping
½ cup brown sugar
2 tablespoons cold butter, chopped
¾ cup chopped hazelnuts, pecans or walnuts
- Sift flour, milk powder and salt together in a large bowl. Mix in yeast. Add honey to water and stir to mix. Pour into flour mixture; blend together with a wooden spoon (if using a food processor, whiz together until just blended). Mix in ¼ cup melted butter and add the beaten egg a little at a time until the dough starts to leave the side of the pan or food processor bowl. You may not need to use all the egg.
- Knead dough on a lightly floured surface for 10 minutes until smooth, elastic and no longer sticky. Shape into ball; place in large greased bowl. Turn to grease top. Cover; let rise in warm place 30 to 40 minutes or until doubled in size.
- Meanwhile, make the topping: Rub the butter and sugar together so that they form coarse crumbs. Mix in the nuts and spread the mixture evenly in the bottom of a 25cm square baking pan; set aside.
- Punch dough down; turn out onto a lightly floured surface. Pat or roll dough into a 30x25cm rectangle. Brush dough with remaining 1 tablespoon melted butter. Mix brown sugar and cinnamon together and sprinkle over the butter. Roll dough from long side into a log; pinch edge to seal. Cut into 9 equal slices.
- Arrange in the prepared pan on top of the nut mixture; cover and let rise 25 minutes.*
- Preheat oven to 180°C. Bake buns 30-35 minutes or until golden. Cool slightly; invert onto a plate.
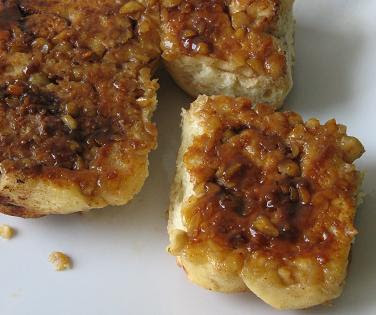
The picture on the right shows what will become the underside of the buns – like an upside-down cake, the bottom is the pretty side. The tray had just come out of the oven and the smell of caramelised sugar and cinnamon was too much; I couldn't wait and scoffed that piece in the corner!
PRINTABLE RECIPE


No comments:
Post a Comment
Your views are welcome and appreciated. Have a nice day!