The Oven has baked its last loaf. This blog is no longer being updated.

My cooking videos appear at youtube.com/janeragavan

I write on food at star2.com

In lotus pose

Saturday, January 30, 2010

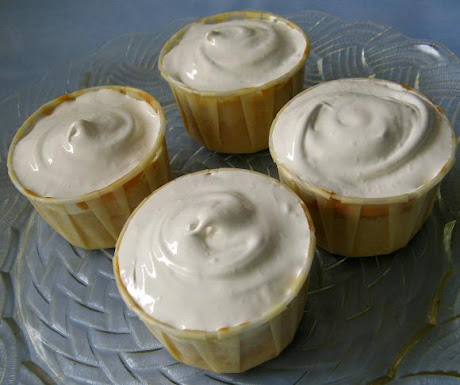
Having been left with a quite a bit of lotus seed paste from a project for the Don't Call Me Chef column (see tab above; a post on this will appear on Monday to coincide with the publication of the newspaper article), I thought I might use it in another dessert. Many Chinese desserts use the paste as a filling, but I decided go with "Western-style" cupcakes. (I know, I know, the picture above could be for any cupcake, but I assure you there's lotus paste in the centre; scroll down for a picture of the cross-section.)

I used a basic Victoria Sponge recipe because it never fails. It's quick to make, and because this is such a small amount of batter, I simply beat it by hand. In fact, with this recipe, it's the frosting that requires attention. I decided on a boiled frosting, which is light and not too sweet. It is made from egg whites, so be sure to use organic, free-range eggs. The eggs are not fully cooked even though hot sugar syrup is mixed into the beaten whites, so if you or the people you're making this cake for are among those advised not to take raw eggs (the very young, the elderly, expecting mothers, etc), you may want to go with another type of frosting instead.

Just so you know, the lotus paste is green because it is flavoured with the juice from pandan or screwpine leaves. I wouldn't want you to think it had gone off or anything. You may also be able to find the white variety, or use red bean paste. Thank goodness I went to the bakery supply shop early because stocks have run low since Chinese New Year is only two weeks away.


Vanilla Cupcakes with Lotus Seed Paste Filling
Makes 8 medium cupcakes. The batter is also sufficient for a 17cm layer cake.
125g butter, softened
125g caster sugar
2 medium eggs, left at room temperature for 30 minutes
125g all-purpose flour
½ tsp baking powder
Pinch of salt
½ tsp vanilla extract
1-2 tsp milk
¾ cup ready-made lotus seed paste

Preheat oven at 175°C. Line 8 medium cupcake moulds with paper cups. Sift flour, baking powder and salt together. Set aside. Roll lotus paste into 8 balls (about 1 heaped teaspoon each; I use a melon-baller).

In a medium bowl, beat butter and sugar until light and creamy (by hand or electric mixer). Add eggs one at a time and beat to incorporate. Stir in flour mixture and vanilla extract. Add enough milk so that batter is not too stiff.

Fill each paper cup to about half full. Place a ball of lotus seed paste in the centre and push down lightly; cover with more batter until paper cups are two-thirds full. Bake for 16-20 minutes until firm to the touch and lightly browned on top. Remove cupcakes from the pan and immediately place on a wire rack to cool (left in the tin for too long, the paper will come away from the cake). When cool, frost with Boiled Vanilla Frosting.

Boiled Vanilla Frosting
Makes enough frosting for 12 medium cupcakes or to fill and top a 17cm layer cake. Refrigerate in an air-tight container and use within 3 days. This frosting dries out quickly so make just before assembling the cakes. Don't even attempt this without an electric hand beater or stand mixer.
¾ cup white caster sugar
¼ cup water
2 medium egg whites (separate eggs when cold, then leave the whites at room temperature for 30 minutes)
¼ teaspoon cream of tartar
1 teaspoon vanilla extract

In a saucepan, stir together the sugar and water. Cook over low heat until the sugar is dissolved. Turn heat up to moderate and bring syrup to the boil. Allow to boil rapidly without stirring for about 10 minutes (the sugar syrup will still be clear) until syrup reaches the soft-ball stage or registers 115°C on a candy thermometer.

In a medium mixing bowl, whip the egg whites and cream of tartar to soft peaks; add the vanilla and whip briefly to combine. Add the hot sugar mixture in a thin stream (down the side of the bowl so it does not spatter) while whipping constantly until the bowl is no longer warm and the frosting is thick, glossy and holds its shape, 7-10 minutes. Frost and decorate cupcakes as desired.
The extraordinary downstairs

Monday, January 25, 2010

Drink your vegetables: Luscious green pea soup
Essential Beeton reminds me of one of my favourite films, Gosford Park. They both show the dichotomy between the upper class and the serving class ­­– in a household, that's the upstairs and below stairs. They're both about English society, but while Beeton wrote about managing the household in the mid-19th century – to cater for the increasingly frenetic lifestyle of an expanding middle class and instruct them in the ways of their new and unfamiliar social scale – the film is set in 1932 in a countryside manor.

The book is full of "recipes and tips from the original domestic goddess", as its subtitle states, and presents extracts from Mrs Beeton's original Book of Household Management. In the film, while a lot of activity takes place in the kitchen, food isn't mentioned much ­­– marmalade (here is an easy recipe) and strawberry jam, and Mrs Wilson (played brilliantly by Helen Mirren ­­– is that ever in doubt?), the housekeeper at Gosford Park, talks about dishes without meat for a vegetarian filmmaker. While there's quite a bit of eating, we don't really see much food either, although the Bloody Marys the shooting party was served in one scene was obvious enough!

What the two mediums have in common is a portrayal of the job of servants in the household. "It is the custom of 'society' to abuse its servants", is how Mrs Beeton opens her chapter on domestic servants before going on to describe the duties attached to each division of service. However, for a book with recipes, it seems odd that the responsibilities of the cook and her kitchen staff ­­– and we see how important their jobs are in the film ­­– are not discussed. Perhaps because this book came out in 2004, and the tasks of a cook have basically remained unchanged, the publishers saw no need to include it.

Mrs Beeton's recipes are not difficult to follow and don't use a lot of ingredients, although we may have to estimate some of the quantities (for example, how big was a lump of sugar in 1860?) Also, they can be time-consuming and in quantities that feed large numbers.

Her Pea Soup (Green) was "sufficient for 10 persons" (she used 3 pints or 1.7kg of peas and 2 quarts or 1.9 litres of common stock) and it took 2½ hours (!) to make. The vegetables in the soup were boiled down to a pulp, which explains why Victorian food had a reputation for being bland and looking like baby food. Rub the soup through a sieve, she instructed (hurrah for today's electric kitchen aids). The average cost of making the pea soup was 1 shilling 9 pence per quart (if my conversion is correct, that's about 21 pence now or MYR1.15!) and it was seasonable from June to the end of August (frozen peas are a godsend!). The recipe that follows is scaled down, simplified and modernised; nothing could be done to keep the price below that in Victorian times though.

Towards the end of Gosford Park, Mrs Wilson says, "I'm the perfect servant; I have no life." No kidding. Still, we were all rooting for the downstairs.

PEA SOUP (GREEN)
Adapted from a recipe by Mrs Beeton
Serves 4
1 tablespoon butter
2 rashers streaky bacon, diced
2 medium onions, finely chopped
1 tablespoon all-purpose flour
500g frozen green peas, divided
4-5 leaves from a large head of lettuce, shredded
1 cup spinach leaves
600ml vegetable or chicken stock*
Toasted pumpkin seeds to garnish (optional)

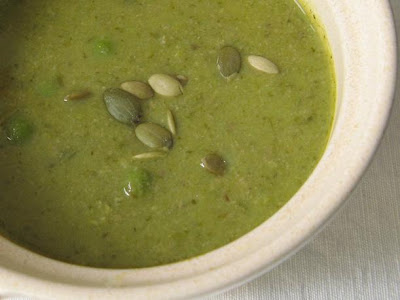
Melt the butter in a large saucepan and add the bacon; fry until crisp. Remove bacon pieces and set aside. (I must admit that I didn't have any bacon the day I made this and instead used an Italian sausage ­­– the little chunks in the picture ­­– which I fried together with the onions.)

To the remaining fat, add onions and fry until softened. Stir in the flour, then add ⅔ of the peas and all the lettuce, together with the stock. Bring to the boil and simmer for 15 minutes. Add the spinach and simmer on low heat for 5 minutes.

Take pot off the heat and using a hand blender, process the soup until smooth. Alternatively, blend soup in a food processor or blender, then pour back into the pot. Return pot to the heat and add the rest of the peas and fried bacon. Bring to the boil again and serve. Season with salt and pepper to taste and garnish with pumpkin seeds.

* It's fine to use a stock cube but remember, it is already salty so you may not need to season with any extra salt.

PRINTABLE RECIPE

Love it and leaf it

Friday, January 22, 2010

In the process of cleaning out my fridge, I found a variety of things to toss together into a salad along with some lovely fresh basil leaves from Blessed Glutz, the only person I know who has successfully propagated this herb in her garden. My own attempt at growing basil in a pot on my apartment balcony failed and still has me crying over a container of spilled soil, so I'm really happy for her and hope her plant thrives. Considering that the origins of basil can be traced back to tropical Asia, I am an embarrassment to my roots.

CHICKEN SALAD WITH CHILLI CORIANDER DRESSING
Serves 2
2 tablespoons coriander pesto (recipe follows)
2 tablespoons yoghurt (preferably strained)
1-1½ tablespoon sweet chilli sauce (made or bought)
2 cooked chicken breasts or thighs, torn into bite-sized pieces*
1 cup fresh basil leaves, washed and dried
2 cups torn salad leaves, washed and dried
½ cup cashew nuts, toasted
  • Stir coriander pesto, yoghurt and chilli sauce together. Combine chicken, basil and salad leaves (romained is used in this dish) in a large bowl; toss with the dressing and sprinkle with cashew nuts before serving.
* Croutons make a nice crunchy addition to this salad, especially if you don't have enough leftover chicken. Cut stale country-style bread (not the common sliced bread, please!) into 2cm cubes and fry briefly in a little oil until toasted. For non-meat eaters, use only bread cubes as in a panzanella. They soak up the dressing very well.

Coriander Pesto
Makes 1 cup
This is just one version of pesto. Use a different cheese, nut or oil as you desire.
2 cups fresh coriander with stems, washed and dried
2-3 cloves garlic, peeled
½ cup peanuts, toasted
¼ cup Cheddar cheese
½ cup sunflower or corn oil, approximate
Salt and freshly ground pepper
  • Place all the ingredients except the oil in a food processor. Turn on the machine and trickle in the oil until mixture is a smooth, thick emulsion with a creamy green colour (you may not need to add all the oil). Use immediately or store in the refrigerator ­­– place pesto in a clean bottle and pour a thin layer of oil on the top to preserve it. Use within a week.
PRINTABLE RECIPE

Bread bulletin: Finding the hole-y grail

Tuesday, January 19, 2010

NO-KNEAD BREAD
Many home cooks are intimidated by the kneading and shaping of bread, but getting my hands right in the mix has been what I liked best about breadmaking (that's the masochist in me). But while my everyday breads have been edible, they were just adequate. I've never been able to get a crusty bread or the crumb with the large holes, and I wanted bread that I had tasted in France. I knew that would be difficult to replicate, but a close facsimile would be nice.

Some years ago, Mark Bittman wrote in The New York Times about a technique used by baker Jim Lahey to make a crusty bread which didn't need kneading but took about 20 hours to produce. I saved that recipe but never tried it.

But recently I saw chefs Laura Calder and Michael Smith make the bread in their respective cookery shows on TV and I finally decided to give it a try. Waiting for the dough to rise is a long process, as time does all the work, and so is this post, so fair warning.

The French, and other bakers as well, like to keep the way they make their bread a secret, even if the recipe isn't – after all, it's simply water, flour, yeast and salt. Thanks to Mark Bittman, who made the process accessible through his New York Times article and video of Jim Lahey showing him the technique (he's also come out with a book), hundreds of bakers have tried it and blogged about it. I've read through many of their posts and it's apparent that what works for one person may not work for another. It depends on a number of factors – the quality and type of flour, the weather, the pot that the bread is baked in, etc.

The recipe calls for a heavy-duty pot that can withstand the high temperature of the oven and a Dutch oven is the obvious choice. These casserole dishes are, however, terribly expensive here in Malaysia and weren't exactly available until recently. Pyrex is a good substitute, according to Lahey, but I can't bring myself to own one despite their contemporary designs. And then Michael Smith showed that one could use a stainless steel saucepan as well and since I had that, I was on my way.

(In Calder's recipe, by the way, the pot size is stated as 8 quarts/2 litres, but if you make the conversion, those measurements don't actually correspond.)

I had a number of flops (although the unsuccessful bread didn't go to waste) initially but finally everything aligned and I found the hole-y grail. Whatever you call it – No-Knead Bread, Pane Integrale, Miracle Boule – this is a fantastic recipe and produces the kind of bread that keeps people off the no-carb diet. I used Lahey's original recipe but what works for me is a combination of the methods and use of utensils/equipment from all the bakers I've cited above and provided links to.

Because of its high water content, this bread will not stay crusty for long, but you can give it a second toasting in the oven. The first time I made this, I was impatient and did not give the loaf time to rest before cutting into it and the inside was a bit gummy, although the requisite holes and airyness was there. The smell of the dough is fantastic after the first rising, and gets better after the second. And the crackling sound as I cut into the crust just inspires me to keep on making this bread.

I like this recipe because it makes just one loaf of bread. In fact, I scale it down by half to make a smaller loaf since I am the only one at home who eats bread.

Inspired, I went to look for Lahey's book. It wasn't at the bookstore but Nancy Baggett's Kneadlessly Simple was and since it's received good reviews, I got that instead. Can't wait to try out her Easy Cinnamon Sticky Buns.

With the no-knead technique, there's not much to do except wait, which takes some of the fun out of breadmaking for me. But I'm not complaining because taste always takes precedence, don't you agree?

NO-KNEAD BREAD 
Adapted from Jim Lahey's original recipe. Makes 1 large round loaf

3 cups (400g) white bread flour*, plus extra for dusting
¼ teaspoon dry active yeast
1½ teaspoons salt
1¼ cups (310ml) tepid water (use boiled water, not straight from the tap)
The wet dough (left) will rise as it rests and bubbles will form on the surface
  • Mix the dry ingredients together thoroughly. Add the water and stir until a wet, goopy dough forms. Cover the bowl with cling film and leave to rest on the kitchen counter (it's warm enough in Malaysia) for 12 to 18 hours. It will double in size and the surface will be covered with bubbles.
Place the dough on a well-floured tea towel
  • Lay a cotton tea towel on a large tray and cover thoroughly with flour. Using a dough scrapper or lightly floured hands, bring the dough together. Quickly form it into a ball with your hands and place on the tea towel, seam side down. Rest again for 2 hours until doubled in size.

Keep the lid on to produce a crust with crunch
  • Half an hour before the dough is ready, preheat your oven to 250°C (this is the maximum for most home ovens). Place a 3-5 litre heavy-duty pot in the oven with the lid on. When the dough has fully risen, slide your hand under the towel and quickly invert the delicate dough into the hot pot (use thick oven gloves to handle the pot!). Shake the pot a bit to settle the dough, then place the lid on and start baking. Bake for 30 minutes with the lid on, then remove and bake for 15 minutes more until the top is golden. Remove from oven and let the bread rest for at least 15 minutes (very important!) before cutting/tearing into it. Serve with homemade butter.

Crusty and brown
* According to Lahey, you can replace ¾ cup of the white bread flour with wholewheat. Just increase the yeast to ½ teaspoon. In the interest of full disclosure, I must admit that I haven't been successful with anything other than an all-white bread (I've also tried it with rye flour). I hope you fare better and please let me know what you are doing right. Thanks.

Incendiary devices

Sunday, January 17, 2010

Fresh and bottled
My apartment is filled with smoke. My eyes are watering like crazy. I am frying some noodles for lunch and everything is going smoothly until I throw some chopped bird's eye chillies into the wok at the end. These, as we all know, can be little firebombs (although at times, they go phut from the start) so I put in only two chillies. As it turns out, they are the RDS-220 hydrogen bomb (that I know this scares me a little) – the Tsar Bomba or Ivan as the Russians called the world's most powerful nuclear weapon – of chillies. The mushroom cloud over my wok spreads quickly and in all directions, staying long after I finish my plate of noodles and keeping me in tears and with a runny nose.

Hot chillies are said to cause hallucinations and I wouldn't have minded a chilli-induced trip with a coyote with the voice of Johnny Cash offering me spiritual guidance as Homer experienced in an episode of The Simpsons (after Chef Wiggum feeds him "the merciless peppers of Quetzlzacatenango grown deep in the jungle primeval by the inmates of a Guatemalan insane asylum"). All I got was the sweats.

At meal times, the women in my family hold a raw bird's eye chilli by the stalk in the left hand and take bites from it as we scoop up rice with the right hand. In fact, there's an unspoken rivalry between us as to who can take the most bites from the hottest chillies. With these fellows though, I don't know if any of my sisters or cousins could take a second bite even for bragging rights. It certainly shut my mouth up and my insides down.

Since I couldn't eat them raw, I decided to pickle them. What follows is a recipe for a hot sambal or sauce tempered with sweet red pepper. It's always nice when peppers are roasting (to get the skin off) because they give off a wonderful aroma. These chillies were another matter. Even during and after boiling them in water to soften, there were still irritating fumes. They got up my nose, which got me sniffling again, but that was my own fault for putting my face directly above the cooking pot.

If you want less heat, remove the seeds from the bird's eye chillies but it's a fiddly job given their size. As you can see from the picture, I didn't bother. It may come back to bite me in the you-know-where.

Can you stand the heat?
CHILLI AND ROASTED RED PEPPER SAUCE 
Makes 250ml

180g red pepper
100g red bird's eye chillies
½ cup white vinegar
1-1½ cups white sugar, approximate
½ cup soft brown sugar
  • Cut the pepper in half and remove the seeds and membrane. Place on a baking tray and place under a hot grill, cut side down, until skin blackens and blisters. Remove and place in a bowl; cover with a tea towel until leave to cool, then peel off the skin.
  • Meanwhile, chop up the bird's eye chillies and place in a pan with 2 tablespoons water. Simmer for 6-7 minutes until soft.
  • Place chillies and pepper in a food processor with the half the vinegar and finely chop. Transfer to a large non-reactive pan and combine with the remaining vinegar. Bring to the boil, then reduce the heat and simmer for 5 minutes. Add all the brown sugar and two-thirds of the white sugar. Stir until the sugar is completely dissolved and taste. If the sauce is too hot, add some more white sugar. Boil for 10-15 minutes until sauce is thick and glossy, then remove from the heat and carefully pour into a clean jam jar. Put on the lid immediately and turn the jar over (remember to use oven gloves!) and then upright again (this helps seal the jar). Keep in the refrigerator for up to 2 months.
Uses:
  • As a dipping sauce
  • In stir-fries
  • In marinades
  • To eat with plain boiled rice. (Yum! The bland rice actually helps to balance out the heat from the chillies.)
PRINTABLE RECIPE

Any night fish fry

Friday, January 15, 2010

Fantastic
When we were young, my siblings and I would fish in the nearby paddy fields and ditches. We caught mostly sepat or gourami, a small flat fish with a spot in the middle of its body that looks like an extra eye. These were fish that could be eaten whole ­­– head, tail, fins and bones (similar to the whitebait of Western menus) ­­– and were usually dusted with a little curry powder and deep-fried.

Another freshwater fish commonly found in the rice fields was haruan. It's called snakehead in English (scientific name: Channa stiatus), which gives you an idea of what this creature looks like. Well, what it lacks in beauty, it makes up for in taste. Haruan is said to have medicinal value ­­– among its many claims are that it cleanses the blood and helps wounds heal, it's good for those suffering from asthma and boosts energy. But if taste is what you're after, you won't be disappointed. This is a tender fish with white, sweet flesh which doesn't need much jazzing up other than being simply fried (Chinese restaurants, however, have all kinds of delicious ways to prepare it.)

So, one day, we catch a small haruan, about 10cm long, and decide to put it in an old oil drum filled with water so that we could regularly admire our catch over the next few days. But being little children with short attention spans, we forgot about the fish.

Some time later, our neighbour dips his hand into the oil drum (I can't remember why) and gets a "terrible bite" (that I remember because he told the story in such melodramatic fashion!). Then we remember the fish and when we dump out the water, out slithers this angry-looking thing as big as my 10-year-old forearm (and I was a chubby youngster)!

With a lot of shrieking children in the way, trying to catch that fellow as it wriggled about on the ground seemed hopeless but someone finally managed to get hold of it and there was some blood, I remember ­­– haruan have spiky fins – but then, my ma fried it up real good and everyone was happy.

The fish must have been in the drum for about three weeks and it's amazing how it managed to survive all that time and grow three times its original size. Maybe I'm just seeing it again through the eyes of a child when everything seems bigger than it really is, or maybe it had really mutated, feeding on the remnants of that oil drum. Well, nothing happened to those who ate it.

Fish fried well is delicious. Here's a recipe that comes with a sauce. Louis Jordan may have had his fish fry only on a Saturday night; this I could eat any night of the week.

FRIED FISH IN TAMARIND SAUCE 
Serves 2 with rice

200g white fish (a meaty and firm-fleshed kind is ideal)
Salt and pepper
Cornflour for dusting
1 shallot
2 cloves garlic
1 tablespoon tamarind paste mixed with 2 tablespoons water
2 tablespoon palm sugar
2 tablespoons fish sauce 
2-3 bird's eye chilli, chopped
Chopped spring onion, to garnish
Vegetable or sunflower oil, for frying
  • Score fish with diagonal criss-cross lines and sprinkle with a little salt and pepper. Dust with cornflour and shake off excess. Pound shallot and garlic with a pinch of salt in a mortar and pestle. Set aside.
  • In a skillet, heat about 2cm of oil over medium heat. Fry fish until golden, 5-6 minutes on each side. Drain from oil and keep warm while you make the sauce.
  • Pour off all but 1 teaspoon of oil from the pan. Over medium heat, fry the shallot-garlic paste, stirring constantly, until aromatic, about 2 minutes. Add tamarind paste, sugar and fish sauce, and continue stirring until mixture bubbles and thickens. Stir in chopped chilli. Pour sauce over fish. Sprinkle with chopped spring onion before serving.
PRINTABLE RECIPE

Bread a flop? It's toast...

Wednesday, January 13, 2010


I'm writing on breadmaking in a future post and have been baking earnestly with varying results. Some loaves have been wonderful and others have not been quite so successful. It's disappointing when something doesn't work but in this instance, I've managed to cook away the failure.

As you can see from the picture on the right, this loaf was a bit too dense and slightly gummy ­­– I put it down to the baking pan being too small as well as my adding too much water to the dough. I also think the portion of wholewheat flour that I had in it was past its prime and so was a little "sluggish".

When bread gets stale, you make French toast. There's no waste and it's a nice way to use up what's left of the loaf. Well, it works just as well with homemade bread that didn't quite rise to the occasion. Somehow, the closed crumb works to the toast's advantage. It's not limp and there are crunchy bits in the thick crust.

I wouldn't suggest you deliberately sabotage your bread dough and ruin it just so you can make French toast, but if this happens to you, at least there's something to do with the bread other than feed it to the birds.

P.S
After publishing this post, I took another look at the main picture and noticed that the two pieces of French toast look like a broken heart that's been put back together. This is just me being philosophical, but that seems to be a metaphor for this dish ­­– harmony after heartbreak over an unsuccessful union! Awww... (yes, I know, that can be an expression of endearment or a groan!)

French Toast with Cinnamon Sugar 
Makes 4-5 slices
2 medium eggs
¼ cup milk
¼ teaspoon vanilla extract
Pinch of salt
Bread, sliced 1cm thick
Butter
¾ cup brown sugar*
¾ teaspoon cinnamon*

Combine brown sugar and cinnamon on a large platter. Beat eggs, milk, vanilla and salt to combine. Heat a little butter in a large skillet over medium heat. Dunk bread slices into the egg mixture until well soaked, let excess drip off, then fry in the skillet till brown, about 2 minutes on each side. Do this in batches and repeat until all the egg is used up. Immediately dredge hot toast straight out of the frying pan with the cinnamon sugar (the sugar will melt slightly and caramelise). Serve warm.

* Unless you like a thick coating of cinnamon sugar on your toast, this amount may be more than you need.

Sorbet a new passion

Saturday, January 9, 2010

Woo-hoo! I went against the advice of a respectable cooking magazine and my recipe turned out fine. I don't have an ice-cream maker but wanted to make a sorbet and consulted Donna Hay Magazine, Issue 7, Summer 2003. One of the tips was:
"If you don't have an ice-cream maker, you can use the still-freezing method to freeze your ice-cream in the freezer (this method is not suitable for the sorbets)." [my emphasis]
But I went ahead anyway (instructions for the still-freezing method in the recipe below) and managed to produce a passion fruit sorbet with a lovely smooth texture! No matter, I still think DH magazine is wonderful even if I often have to cut down on the amount of sugar asked for in sweet recipes.

I used passion fruit in the sorbet. Now, I've been made to believe that passion fruit is harvested when it falls off the vine when its skin is smooth and is best eaten when its skin starts to wrinkle (you can get some information on the fruit here and here), which means you have to keep them for a while after you buy them. I have to admit that I've cut them open before they got wrinkled and I haven't been disappointed. This time, though, I waited until they were wrinkly and they were very sweet. See, wrinkles aren't so bad. Like Samuel Beckett's face. (Sorry, I'm digressing but talking about wrinkles makes me think of the author's picture on the edition of Waiting for Godot I'm reading now – those lines, so much character in that face.)

And then I found this site which claims to debunk myths about the wrinkled skin. I don't know what to believe, but I'm glad the fruit I had was excellent.

Good quality ice-cream is delicious but sorbets are lighter and I think more refreshing for the hot and humid climate of Malaysia. After I made the one with passion fruit, I was stoked and wanted to try another flavour. The Husband had made a cup of white coffee that morning but forgot to drink it because he was already late ­­– that's Mr Notime for you ­ – so I decided to use that. This coffee had milk in it so technically, it's not a sorbet. It's more like a gelato or iced milk (not cream), a kulfi even, though I wouldn't be so bold as to claim that it was an authentic Italian or Indian frozen dessert.

The amount of sugar seems to be key in the texture of sorbets ­­– too much and the ice crystals will be large and hard, too little and the mix doesn't freeze well. The experts advise adding alcohol ­­– vodka is preferred because it doesn't mask the flavour of the fruit ­­– since it doesn't freeze and so large ice crystals don't form. I've already added Kahlúa to the kulfi. Looks like I'll be stocking my liquor cabinet some more.

PASSION FRUIT SORBET
Makes 2 cups
1 cup water
¾ cup caster sugar
Pulp and seeds from 4 ripe passion fruit (about ½ cup)
¼ cup Piña Colada mix (alternatively, use 2-3 tablespoons of pineapple or citrus fruit cordial)
2 tablespoons lime juice
  • Put water and sugar in a saucepan and cook over low heat until sugar dissolves. Turn up heat and let syrup boil for a minute. Pour syrup into a metal mixing bowl and set aside to cool. Stir in the rest of the ingredients, cover bowl with cling film and place in the refrigerator for 2 hours.
  • When chilled, place bowl in the freezer for an hour or until the mixture is set around the edges but soft in the middle. Beat until smooth with a hand whisk or fork to break up the ice crystals and return to the freezer. Check again after an hour and beat the ice crystals till smooth. Return to the freezer and repeat the process a final time, then pour mixture into a plastic container and freeze completely.
KAHLÚA COFFEE KULFI
Makes 2½ cups

Use milk coffee that you would normally make to your taste or use this recipe.
Milk coffee (combined)
2 teaspoons instant coffee
1 teaspoon sugar
150ml freshly boiled water
50ml fresh milk

Kulfi ingredients
200ml milk coffee (recipe above)
200ml evaporated milk
¼ cup caster sugar
2 tablespoons Kahlúa (or another coffee liqueur)
  • Put coffee, milk and sugar in a saucepan over low heat and cook until sugar is dissolved.Turn up the heat to medium and simmer for a minute. Pour mixture into a metal mixing bowl and set aside to cool; stir in Kahlúa, cover bowl with cling film and place in the refrigerator for 2 hours.
  • When chilled, place bowl in the freezer until the mixture is set around the edges but soft in the middle, about 2 hours (it takes longer to set than the sorbet). Unlike the sorbet, use a fork and just stir the mixture gently until smooth (if you use a whisk, too many air bubbles will form), then return to the freezer. (Actually, at this stage if you don't want to continue, you could just have the coffee as a slushie!) Repeat this process two more times, then pour mixture into a plastic container and freeze completely.
PRINTABLE RECIPE

Keeping in shape (and we're not talking exercise)

Thursday, January 7, 2010

The subtlety of onions

Tuesday, January 5, 2010

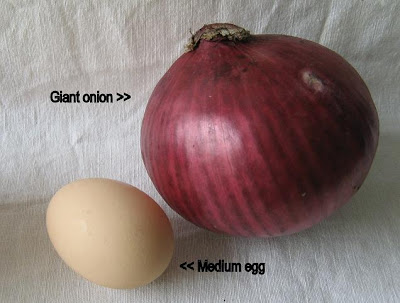
My mother gave me two of the biggest red onions I'd ever seen in my life. They each weighed just short of 400g and I could only hold one in my hand at a time. I only needed to use half of one for a pasta sauce and I cried the whole time I was chopping it up.

You could never call a red onion subtle, but it can be subdued with heat. And once onions are tempered, they show a whole different side. An onion jam is the perfect dish to make and can be eaten in many ways ­­– spread on toast, tossed through pasta, baked in a tart...

ONION JAM
Makes 1½ cup
1 teaspoon butter
1 tablespoon vegetable/sunflower oil
4 cups red onions (about 400g), sliced thinly
½ cup apple cider vinegar
2 tablespoons balsamic vinegar
¼ cup dark brown sugar
Sea salt and freshly ground black pepper
  • Melt butter and oil in a sauté pan over medium heat. Add the onion slices and cook, stirring occasionally until they soften and begin to brown, about 10 minutes. Add the rest of the ingredients, reduce heat to low and simmer until the mixture becomes thick and all the liquid is gone, about 25 minutes. Adjust seasonings to taste.
PRINTABLE RECIPE
* * *
Yotam Ottolenghi's recipe for aubergine kuku in The Guardian inspired me to try a similar dish since I needed to use up some aubergine I had fried up. I also had some dried barberries which I'd got a while ago for an Iranian rice dish I was cooking and writing about ("1,001 bites", Don't Call Me Chef, Oct 2009) ­­– I've kept the berries in the fridge so they're still good. If you can't find barberries, Ottolenghi says to add lime juice to the mix. I've adapted the Iranian kuku to include cubes of fried potato and onion jam.


It's basically a load of vegetables held together with a little egg. I used four medium eggs but I think even three would have been sufficient. I wish I could be more precise with the quantity of aubergine and potatoes ­­– how big is "medium" or "large", right? ­­– but if you have about 2 cups of each after they are fried, that would be about right.

VEGETABLE FRITTATAServes 4-5
2 medium aubergine, cut into 2cm cubes and pan-fried/baked until golden
2 large potatoes, cut into 1cm cubes and pan-fried until golden
3 tablespoons onion jam (recipe above)
4 medium free-range eggs
1 tbsp plain flour
½ tsp baking powder
2 tablespoons dried barberries, rinsed and dried
1 tablespoon chopped fresh coriander
Large pinch of saffron strands, mixed with 1 tbsp of hot water
Salt and black pepper
  • Beat eggs, flour and baking powder together. Stir in the rest of the ingredients and season to taste. Pour mixture into a greased 21cm tart dish and bake in a preheated 190°C oven for 30-35 minutes until golden brown and cooked through ­­– test the centre with a skewer to see if the egg has set. Serve warm or at room temperature.
PRINTABLE RECIPE

This tofu is smokin'

Monday, January 4, 2010

For the January 2010 issue of Don't Call Me Chef, our challenge was to make a dish using a cooking technique, ingredient or appliance we had never used before.

I had decided on cooking with smoke, but after doing the research, I wondered if I was perhaps taking on too much, especially being an apartment dweller. All the articles I had read pointed out quite clearly that there would be a lot of smoke, and if you can't do it outside, you need an industrial-strength extractor fan, or you should dismantle your smoke alarm before attempting this. 

I went ahead anyway and happily discovered that it wasn't as bad as those writers made it out to be. There was a little smoke in the beginning when the fire was on high to start the ball rolling ­­– it looked like like wisps from a mosquito coil ­­– but most of it was well-contained in my wok smoker. (During the process, a car siren went off, however, and I was jumpy for a moment!) If I had known all of this sooner, I wouldn't have waited so long to try this technique.

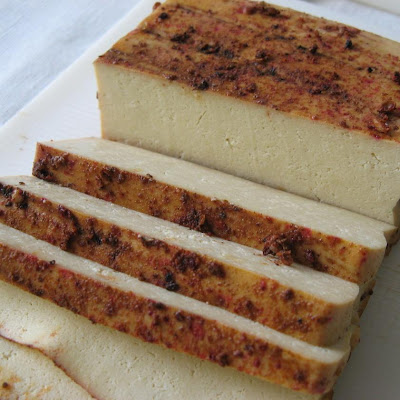
Smoking gives flavour ­­– and what flavour! ­­– to food and cooks it as well, but with the quantity of smoking mixture used here, the smoke will only last about 25 minutes. For foods that take longer to cook, such as chicken, duck or ribs, you can start off with a larger amount of tea, but the meats will probably still need to be cooked completely under the grill, in a frying pan, or in the oven. Even the salmon above can be seared briefly in hot oil to caramelise the skin after smoking, and the smoked tofu below can be used in stir-fries and even as a substitute for meats.

I was warned that I might ruin my wok in the smoking process, but since I used a double layer of foil to line the wok first, it survived. I like my cast iron wok and would have been very sad if I couldn't use it for anything but smoking after my first attempt at it.
A block of flavour
My recipe for the column was for tea-smoked salmon but I smoked a block of tofu with the salmon and that is the recipe that follows. This cooking method infuses a lot of flavour and for everyone who has complained about the blandness of tofu, this is the recipe for you. It develops a meaty texture, but it doesn't taste of any meat I've eaten. It's certainly not the tofu I'm used to.

The water in tofu needs to be removed before it is smoked. Freezing tofu will help remove more water than simply pressing it. This also makes it chewy, and it absorbs flavours better. Tthe freezing-thawing-water removal process takes about 36 hours, so plan ahead when smoking tofu. 

TEA-SMOKED SPICED TOFU 
400g firm tofu (try to get the kind in large blocks) 

Smoking mixture (combined) 
2 tablespoons oolong tea (Jasmine is an alternative)
2 tablespoons brown sugar
2 tablespoons raw rice
2 star anise 

Wok smoker
Heavy-duty wok with lid
Aluminium foil
Round metal rack or trivet 

Spice rub (combined) 
You don't need to marinate the tofu before smoking, but this rub adds colour and flavour. Or use any dry rub you like.
1 teaspoon Szechuan peppercorns, toasted and crushed
½ teaspoon paprika 
½ teaspoon garlic powder
¼ teaspoon brown sugar 

Preparing the tofu for smoking 
  • First, wrap the tofu in cling wrap and place into a freezer bag, squeezing out as much air as possible. Place in the freezer overnight. The next day, remove from the freezer and place frozen tofu in the refrigerator to defrost completely, 12-24 hours.
  • Once thawed, remove cling film and place tofu between two tea towels. Gently set a small plate on top and a weight (canned food) in the plate, and let sit for 30 minutes or so until all the liquid has seeped out. It is now ready for smoking.
  • Press the spice rub on all sides of the block of tofu and let sit for 10 minutes. Get your smoker ready.
From left: The smoking mix; the marinated salmon and tofu; wrap the foil over the lip of the wok cover.
Preparing the smoker and cooking 
  • Line the inside of the wok with a double layer of foil so it comes at least 8cm up the sides of the wok. Place smoking mixture in base of wok. Grease baking rack and set on top of the mixture; place tofu on rack. Put on the lid and crimp the excess foil around it tightly.
  • Turn the heat to high. When smoke appears, turn heat down to low and smoke for 20 minutes, then turn off heat and leave undisturbed for 5 minutes. Open the lid outdoors if possible as there will be some residual smoke.
  • Remove tofu and let cool before slicing. Use as desired.
PRINTABLE RECIPE