 |
| Ye merry gentlemen. |

JOY!
Saturday, December 25, 2010
Friday, December 24, 2010
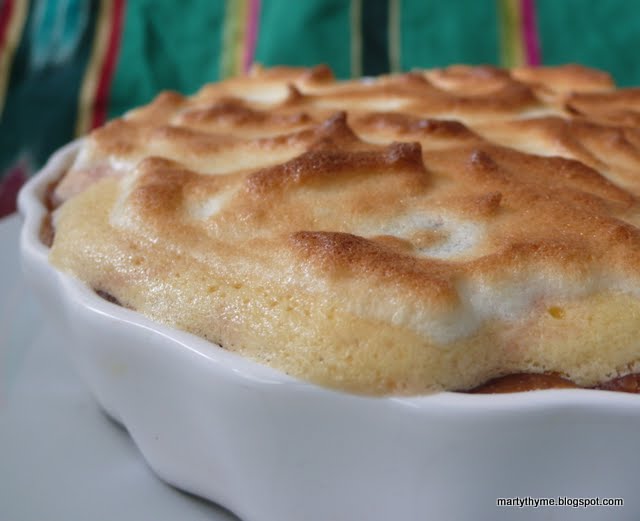 |
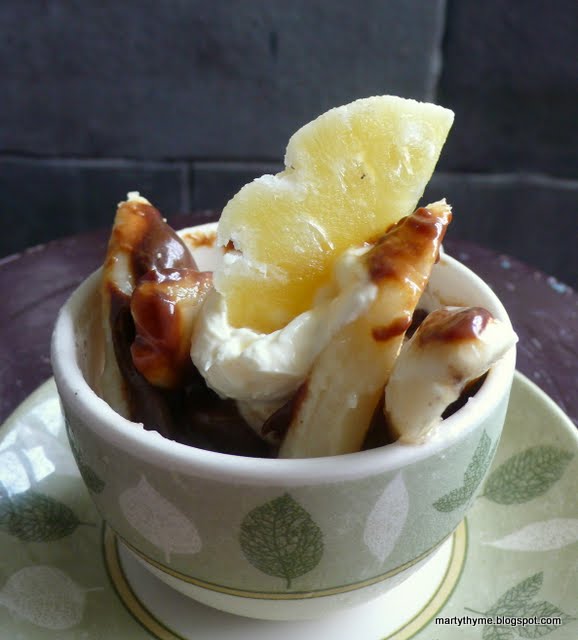
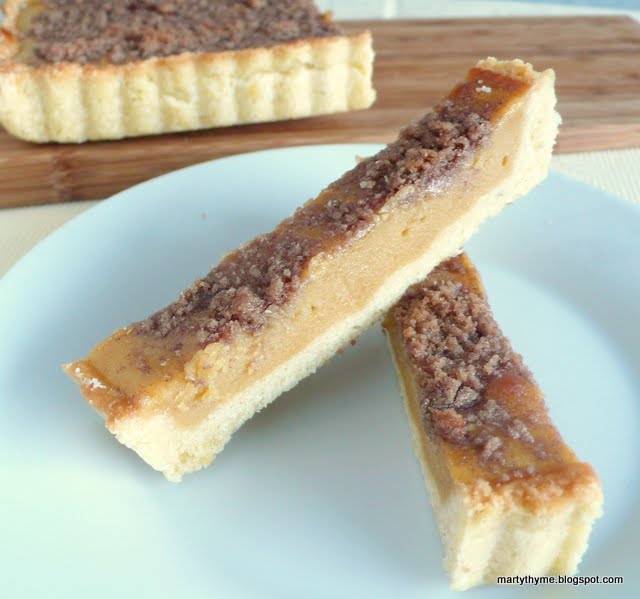
| SURPRISE PIE. |
3 tablespoons condensed milk
1 lemon
1 425g tin pitted dark sweet cherries in heavy syrup
This is a list of leftovers and items I had in the fridge and kitchen cupboard. The cookie dough was left over from the Daring Bakers sugar cookie challenge in September (it was kept in the freezer); the condensed milk was the last bit from yesterday after making the macaroon cookies; the lemon was skinless after I used the rind together with corn chips to coat some fish fillets (the recipe will be in a future post); and the tin of cherries I had bought a few months ago thinking I would make something but it ended up in the back of the cupboard until I discovered it a couple of days ago.
With nothing but the desire to use all of these items up before the end of the year, I turned them into a pie big enough for two or three servings. Here's what I did:
- Spread cookie dough in base and up the sides of a 15cm fluted pie dish. Prick base and bake for 5 minutes in an oven preheated at 175°C. Cool.
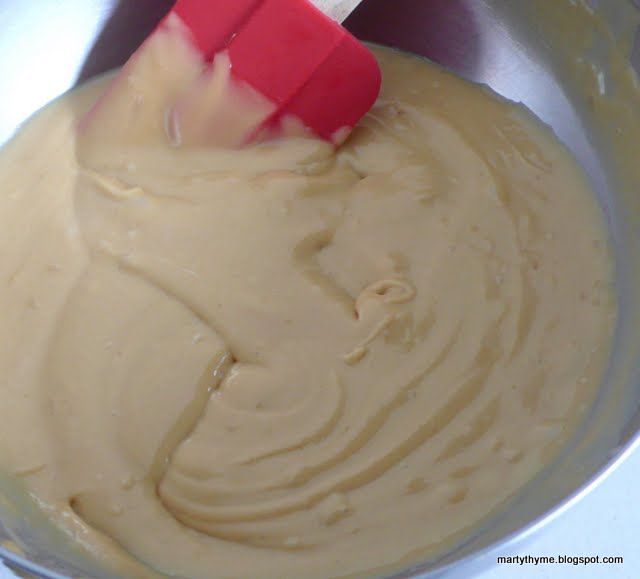
- Separate egg. Beat yolk with condensed milk and juice of half the lemon until frothy.
- In a separate bowl, beat egg white with juice of other half of the lemon and 1 tablespoon sugar until soft peaks form.
- Fold ⅔ of the egg whites into egg yolk mixture. Pour into pastry case until three-quarters full (there will be some left over).
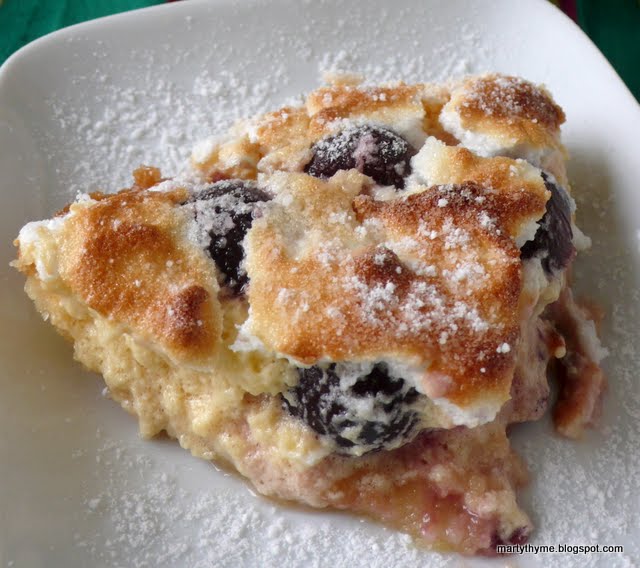
- Open tin of cherries. Arrange as many cherries as possible (I managed 21) on the egg mixture.
- Spread remaining meringue (egg white) on top of cherries and make ripples and swirls. Bake in a 175°C oven for 20 minutes or until top is golden.
 |
| Dust with icing sugar and serve |
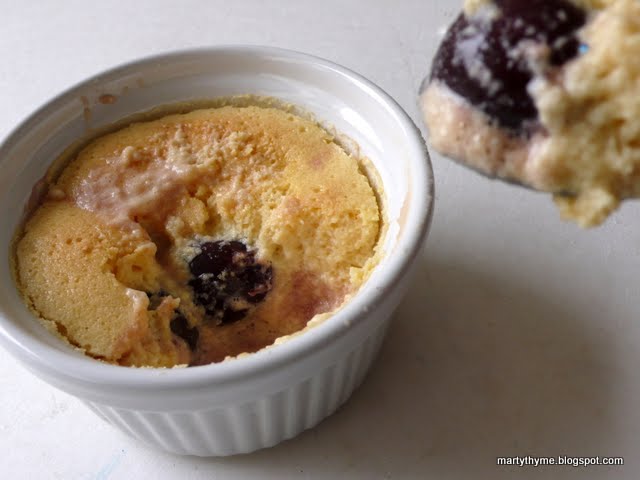
What to do with the leftover egg mixture: Place a few cherries in the base of a ramekin; spread the egg mixture over the top and bake along with the pie. Remove from oven when top of custard is firm and light golden, 10-12 minutes.
So that's what I did with leftovers and items that have been sitting around for a while. I gave some to Veggie Chick and Mz M to try and they seemed to like it so I guess I didn't too badly. Cheers, here's to more surprises next year!
 |
| Dig in for the cherries |
Thursday, December 23, 2010
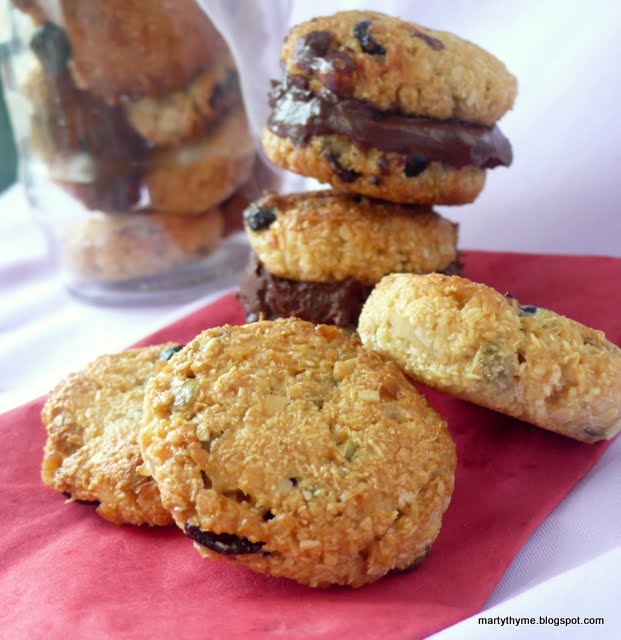 |
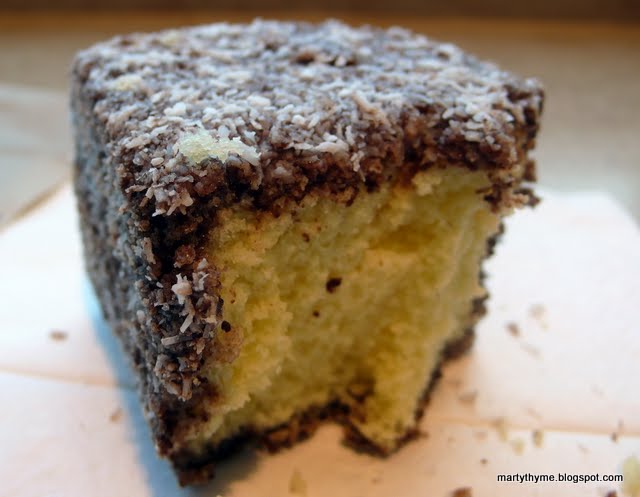
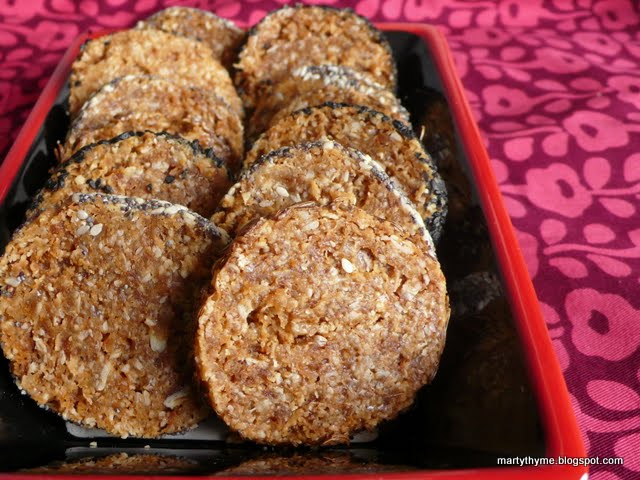
| CRANBERRY-PUMPKIN SEED MACAROONS. |

At least the picture is still in Blogger/Picasa (right).
That was the last time I made macaroons actually, and since I had a tin of condensed milk my sister sent me from the US, this was a good time as any to make some. I saw this recipe for Outrageous Macaroons on cooking,com, in which cranberries and pistachios provide the traditional red and green colour of Christmas. These would be perfect on the snack table at the family Christmas gathering – although with six children under the age of 12 present, I might be the bad aunty that day for getting them more hyper than usual.
But after scrutinising the recipe, I decided not to follow it, and instead used the one I had for Macaroon Pyramids with a few changes. For the red, I kept the cranberries but opted for green pumpkin seeds because the price of pistachios over here has gone up tremendously. Pumpkin seeds don't have the same nuttiness or buttery creaminess of pistachios, but they do have an appeal all their own.
The Outrageous recipe garnishes the cookies with melted chocolate and more nuts and fruit. I had some chocolate ganache leftover from the Banana Split I made last week and sandwiched a couple of cookies together instead. That's entirely optional, of course. These cookies don't need extra adornment.
The Outrageous recipe garnishes the cookies with melted chocolate and more nuts and fruit. I had some chocolate ganache leftover from the Banana Split I made last week and sandwiched a couple of cookies together instead. That's entirely optional, of course. These cookies don't need extra adornment.
CRANBERRY-PUMPKIN SEED MACAROONS
Makes 3 dozen cookies
⅓ cup plain flour
Pinch of salt
2 cups dessicated or shredded coconut (or a combination of both)
1 cup ground almonds
Makes 3 dozen cookies
⅓ cup plain flour
Pinch of salt
2 cups dessicated or shredded coconut (or a combination of both)
1 cup ground almonds
½ cup dried cranberries
½ cup green pumpkin seeds
1 cup sweetened condensed milk (if using sweetened creamer instead, cut down a little)
1½ teaspoons vanilla extract
1 cup sweetened condensed milk (if using sweetened creamer instead, cut down a little)
1½ teaspoons vanilla extract
- Sift flour and salt together in a bowl and stir in coconut and ground almonds. Mix in the other ingredients to form a soft dough. Chill in the refrigerator for 15 minutes.
- In the meantime, preheat oven to 175°C. If using baking sheets, line with ungreased baking/parchment paper. Pinch off pieces of dough, about 1 rounded tablespoon each, and shape into balls. Place on the tray, spacing them about 3cm apart, and press down with a bottom of a glass until 4cm wide and 1cm thick. Bake 15-20 minutes until coconut is toasted.
- Remove from oven and leave for 2 minutes before placing each macaroon on a wire rack to cool.
Wednesday, December 22, 2010
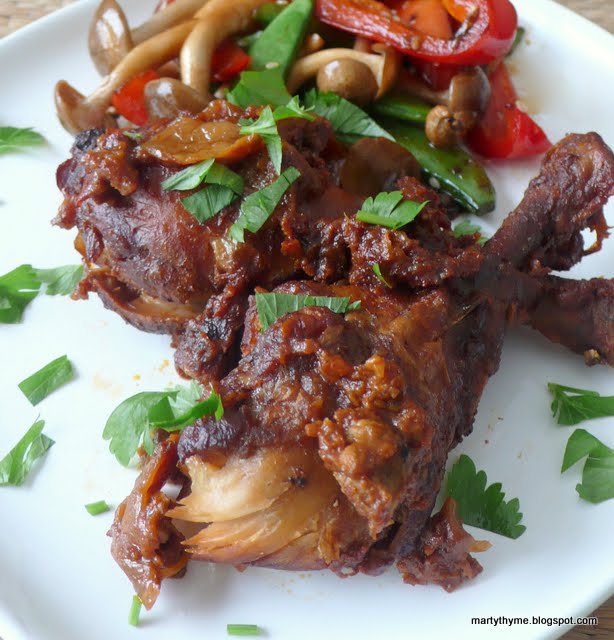 |
| SLOW-COOKED CHICKEN IN RED SAUCE. |
That's moot anyway since I didn't get the recipe for the mole sauce below in any secret meeting; I simply adapted one from a book. The chocolate in it has always fascinated me, and I thought it would be a good time to try it with the can of chipotle in adobo sauce my sister had brought from America when she was here on her last visit.
I have to admit, after I made the sauce, I wasn't impressed. It had an insipid colour – not a fiery red as I assumed it would be. It tasted fine, but fine doesn't wow me. I added more of the hot chilli and adobo sauce but it still seemed bland. But I put it into a container and refrigerated it after it cooled.
The next day, it looked like it had thickened but was still as unimpressive as the day before. I went ahead and prepared the chicken thighs I was slow-cooking and then added some of the sauce to the crockpot with the chicken and an onion cut into wedges. I switched on the cooker, and got ready for bed (I don't know why I started cooking this so late at night).
The next morning, through the bedroom door came an aroma that got me straight out of bed. Out in the kitchen/living room, it was more intense. In the crockpot, the sauce had become a glaze around the chicken thighs. Bits of it were dark and caramelised, and sticking to the inside of the pot. The top layer was still bubbling. The meat of the chicken fell off the bone as I picked a thigh up with tongs.
I spooned out some sauce and tasted it. The creaminess of the nuts came through and had intensified, and so had the heat from the chilli. There was a certain sweetness to it although as you can see from the recipe, there is no sugar in it, so I can't explain that.
This sauce completely changed from the time it was made to the time it came out of the crockpot. Fantastic.
 |
| Doesn't look like much, does it? |
(Adapted from 500 Mexican Dishes)
Makes about 475ml
1 large thick slice of stale bread, cubed
150ml milk
170g blanched almonds
2 tablespoons pumpkin seeds, toasted
2-2½ tablespoons chipotle in adobo sauce
1 teaspoon cinnamon powder
30g dark chocolate
1 rib celery, finely diced
1 medium onion, finely diced
100ml chicken stock
1 400g tin tomatoes, with juice
Salt to tasteCooking oil
- Place bread cubes in a small bowl and add the milk. Leave aside to soak until bread is soft.
- Blend bread and milk with almonds, pumpkin seeds, chipotle, cinnamon and chocolate using a food processor or hand blender until puréed but grainy.
- Heat a little oil in a large deep skillet and sweat celery and onions. Add puréed ingredients, stock and tinned tomatoes, and simmer, stirring, over medium heat, until chocolate melts and the flavours have blended, about 5 minutes. Season with salt. If not hot enough, add more of the adobo sauce.
- Take sauce off heat and blend in a food processor or using a hand blender until smooth. Return to heat and cook, stirring, until it starts to bubble again, about 5 minutes.
The chicken can also be cooked in the oven. Preheat oven to 170°C. After browning chicken in an oven-proof skillet or pan with a lid, stir in red sauce and water, cover and place in the oven and cook chicken until tender, 3-4 hours.
If you can't get chipotle in adobo sauce, any kind of hot chilli could work although I haven't tried that. I would grind/pound the chilli and fry it in a little oil before using.
PRINTABLE RECIPE
Tuesday, December 21, 2010
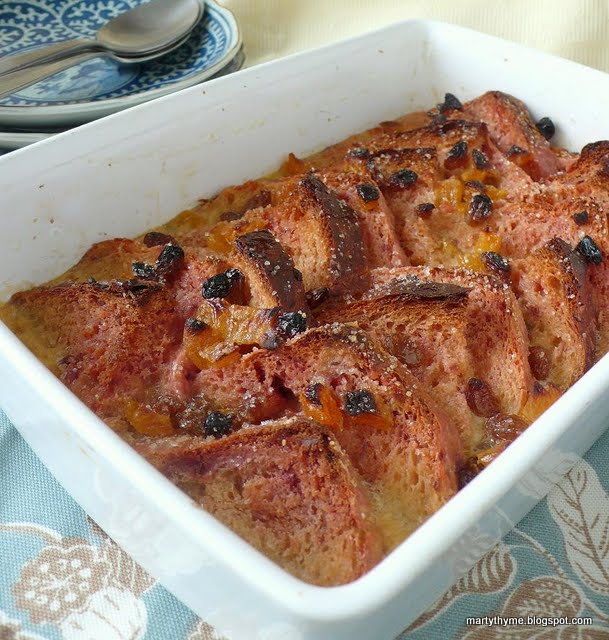 |
| TICKLED PINK BREAD & BUTTER PUDDING. |
There's also bread and butter pudding, a traditional British favourite but also found elsewhere in other variations.You could also flavour the pudding with chocolate, or make it savoury with ham and cheese. Here's a recipe for a Caribbean-inspired bread pudding with lime curd and cranberries. (These three recipes come from the BBC Food site and it has a dozen others.) Someone may want to come up with a kaya (coconut egg jam) and coconut milk version in Malaysia.
White bread is normally used and an eggy bread, like brioche or challah, or a fruit bread makes a more luscious pudding. Stale croissants are good too. Whatever it is, the bread needs to be of good quality; your ordinary sliced bread tends to go claggy when it soaks up the milk.
Some recipes call for the custard ingredients to be partly cooked first; others simply mix them together. Some use a lot of custard so that the bread slices are completely submerged; others have the points sticking out. Some people like the crust of the bread off, others keep it on.
I mixed the milk, cream and eggs together with the fruit and flavourings, the crust stays on and the custard only comes halfway up the sides of the bread slices so that there is a crisper top. I decided to use the beetroot bread I made this past week for my pudding. It makes a rosy dessert, doesn't it?
This one is going to YeastSpotting.
TOMORROW: Olé mole!
 |
| Beetroot loaf |
Serves 4-5
60g mixed raisins and diced apricots
2 tablespoons rum
30g butter, plus extra for greasing, softened
4 medium-thick slices beetroot bread or good-quality white bread
2 eggs
60g caster sugar
350ml whole milk
60ml cream
¼ teaspoon vanilla extract
¼ teaspoon ground cinnamon
1 tablespoon demerara sugar
- Grease a 1-litre shallow ovenproof dish. Soak the raisins and apricots in the rum for 30 minutes. Butter the slices of bread and cut each piece into 4 triangles. Arrange the slices in the greased dish.
- Beat the eggs, sugar, milk, cream, vanilla and cinnamon. Add the dried fruit and any liquid, and mix well.
- Pour the custard over the bread. Make sure the fruit is spread evenly. Cover and refrigerate for 1 hour.
- Preheat the oven to 180°C. Sprinkle the pudding with the nutmeg and demerara sugar. Bake for 35-40 minutes, or until the custard is set and the top is crunchy and golden.
Monday, December 20, 2010
 |
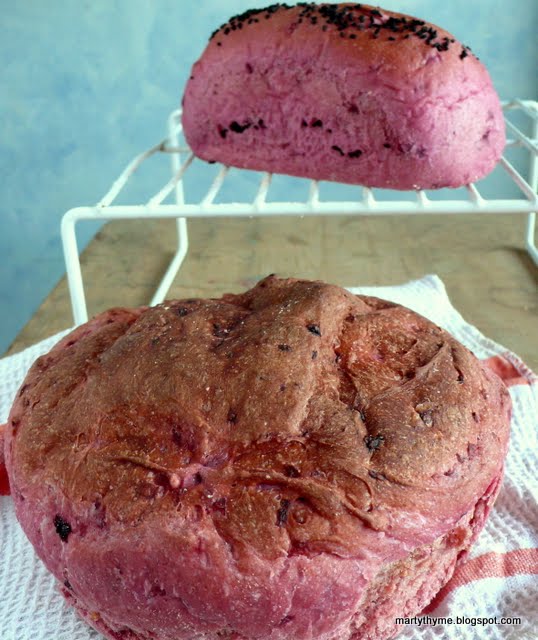
| USING BEETS IN BREAD. |
But then I started eating it fresh, mostly in Indian dishes, and became even more fond of it. This, however, is the first time I had ever tried preparing and cooking it myself.
As you can see from the picture above, the ones that I got were already "mature" beetroot. After I roasted them, I started using gloves when I was removing the skin because that is what many recipes advise to keep your hands from turning red. But that just didn't feel right – how can you not touch your food when preparing it? There needs to be a connection.
 |
| Too red? |
I had to know, however, if I could use beetroot in a bread and searched for recipes online. There are many but most are for quick breads, and then I came upon this recipe at Sunday Hotpants (isn't that just a great name?! Go check out the blog; it has some great stories and recipes). I just could not take my eyes off the picture of the pink dough – it's so enticing! This meant that a beetroot yeasted bread was possible, and I got on with the task.
I used a simple bread recipe that I was familiar with, but have to admit that this was probably not the best recipe to use. I made a little loaf in a half-pound pan and that turned out fine, and a boule, which I decided bake using the Dutch oven method (from Jim Lahey's No Knead Bread recipe). Instead of preheating the pot, I used Michael Ruhlman's suggestion in Ratio
TOMORROW: Beetroot bread makes a rosy dish
 |
| Not shocking, is it? |
Makes 1 standard boule
(+ a little one)
3-4 cups strong white bread flour
3 tablespoons full-cream milk powder
3 teaspoons salt
4 tablespoons butter
2 tablespoons honey
1 medium beetroot
1½ teaspoons active dried yeast
250ml warm water, approximate
Seeds (optional)
- Cook the beetroot (either steam or roast). When cool, peel and coarsely grate. Mix 3 cups of flour, milk powder and salt together in a large bowl. Rub in the butter and honey until combined. Stir in the beetroot. Sprinkle the yeast onto the mixture and stir to incorporate. Stir in the water until the mixture comes together.
- On a lightly floured surface, knead the dough, adding more flour a little at a time if necessary, until a smooth and elastic dough is formed and it passes the windowpane test, 10-15 minutes. Return to the mixing bowl, cover with a tea towel and leave to proof until doubled in size, about 1 hour. To test for proofness, poke the dough with a finger and the dent should remain.
- Deflate the dough and remove from the mixing bowl. Shape as desired and place on a baking tray/loaf pan that has been lightly greased and sprinkled with flour/cornmeal. Paint the top of the dough with water and slice an X into the top or make long diagonal scores. Sprinkle with flour or seeds. Cover and set aside to rise until doubled in size.
- 30 minutes before baking, preheat the oven to maximum (most domestic ovens go up to 250°C). Place risen dough in oven and bake for 10 minutes, then turn oven down to 190°C and continue baking until done, 40-50 minutes.
 |
| The process |
 |
| Tickled pink with the colour |
Monday, December 13, 2010
 |
| BANANA SPLIT. |
My review of his book appeared today in print and after toiling away with my usual breads for the review, I thought I would post on a simple dish here: an ice cream. Although Ruhlman makes the ice cream for his Banana Split using a crème anglaise recipe, I have decided to use store-bought. With the many varieties available, there will be one to suit every taste. If you do want to make your own ice cream though, I suggest this recipe. It is one of the creamiest and most delicious I have ever tasted – and it doesn't require an ice cream maker!
 The butterscotch sauce, though, requires some care; first of all, because you're melting sugar and that always comes with some risks (especially if you're as accident-prone as I am) and also since timing is important. Leave the caramelising sugar just a few seconds too long on the heat and it burns and is ruined. When made right, it is a wonderful sauce and I am already planning to drizzle it on some pancakes tomorrow morning.
A classic banana split comes with three scoops of ice cream – vanilla, chocolate and strawberry – in a long dish, with three types of toppings as well as nuts, whipped cream and a maraschino cherry. Ruhlman makes his own version with the butterscotch and chocolate sauces, and I have opted for coconut ice cream (Bounty, actually) and a piece of glacé pineapple for garnish. Very tropical. All it needs is a little paper umbrella.
OLD-FASHIONED BUTTERSCOTCH SAUCE
From Michael Ruhlman's Ratio
Makes about 1½ cups
125g unsalted butter
250g dark brown sugar
250ml cream
1 teaspoon vanilla extract
2 teaspoons apple cider vinegar
½ teaspoon salt, or to taste
- In a heavy-bottomed saucepan or an enamelled cast iron pot, combine the butter and sugar over medium heat and cook until sugar has melted completely and the mixture has taken on a thick frothy appearance (lava-like), 5-10 minutes. Turn off the heat. Whisk in the cream until it is thoroughly incorporated. Let it cool for 10 minutes, then add the remaining ingredients. Taste and adjust the seasoning.
Serves 4-8
2 cups ice cream of preferred flavour(s)
4 ripe bananas
1 recipe butterscotch, warm (recipe above)
1 recipe ganache, warm (recipe follows)
125ml cream, whipped to stiff peaks with 2 tablespoons sugar
4-8 maraschino cherries
- Scoop portions of ice cream into 4 bowls (or 6 or 8). Split the bananas down the middle (and halve them if you wish) and arrange half to 1 banana per bowl. Pour about 55g each of the butterscotch and chocolate sauce over the bananas and ice cream. Top with a dollop of whipped cream and a cherry (or a piece of glacé pineapple, as I've used here),
Makes about 2 cups
250ml cream
250g delicious bittersweet or semisweet chocolate, coarsely chopped
- Bring the cream just to a simmer, pour it over the chocolate, wait 5 minutes for the chocolate to soften, then whisk the cream and chocolate until they're completely combined. Serve immediately or chill until you're ready to serve.
Monday, December 6, 2010
 |
| Sweet potato-onion pizza |
I never really had the chance to take packed meals to school when I was growing up. In primary school, I lived in the school compound so I used to go home for a snack during recess. Then I attended a fully residential school in my secondary years, so again, I had all meals at the dining hall.
Nowadays, I tote a packed lunch to work almost every day, but I'm not a three- or four-tier tiffin person. It takes too much effort to cook rice and side dishes to go with it. And that kind of meal would just slow me down in the afternoons, anyway. Most days, it's one-dish meals – a hearty serving of salad with a few pieces of leftover meat or a few strands of pasta; very often, it's soup; and stuffed bread rolls are a favourite too.
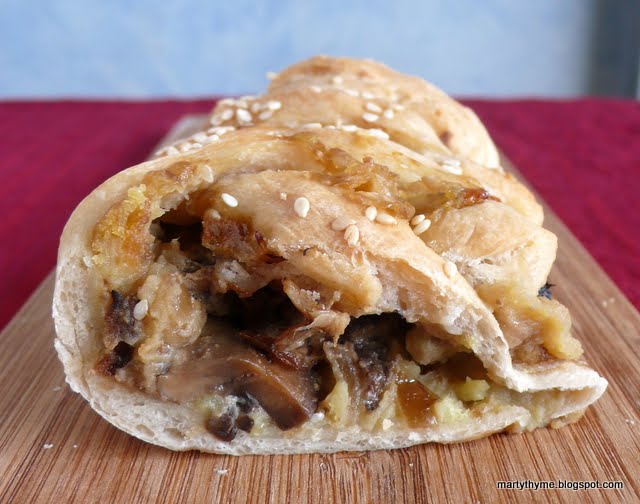
I have two bread dishes here and they both start with sweet potato pâté – I know, fancy name for mash potatoes, but what the hey? Chefs give fancy names to common dishes all the time and hike the price up 150%; at least we're not fooling anyone. I did say in my last post that I would be making something with sweet potato and here are two.
The pizza is inspired by a recipe from an old Australian Women's Weekly Potato Cookbook, and the mushroom braid is just something I thought up because I had some nice portobello mushrooms and a little bag of dried porcini. (I should have taken pictures of the braiding process but only remembered after the fact.) Pack either of these breads, along with a leafy salad and maybe some pieces of fruit, and you're good to go.
I am submitting this to YeastSpotting.
* December's Don't Call Me Chef (out in print today;
SWEET POTATO PÂTÉ
180g sweet potatoes (any colour), peeled
1 tablespoon olive oil
1 small onion, chopped
1 small clove garlic, crushed
125ml chicken or vegetable stock
- Cut potatoes into 1cm cubes. Heat oil in a pan, add potatoes, onion and garlic; cook, stirring, until onion is soft. Add stock, simmer, covered, over low heat, 15-20 minutes, or until potatoes are very soft. Blend or process potato mixture until smooth; cool.
SWEET POTATO-ONION PIZZA
Serves 2-3
1 quantity sweet potato pâté
1 small onion, sliced thinly
1 small onion, sliced thinly
50g grated Parmesan cheese
Pizza dough
150g all-purpose flour
¼ teaspoon salt
½ teaspoon white sugar
1 teaspoon dried yeast
90ml warm water
- Combine all the dry ingredients for the pizza dough in a large bowl. Add water and mix to a firm dough. Turn into a lightly floured surface and knead for 10 minutes or until smooth and elastic. Set aside to proof until doubled in size.
- Grease a medium pizza pan or two small ones. Preheat oven to 200°C. Knock down dough and roll out to fit prepared pan(s).
- To make pizza, spread sweet potato pâté onto dough. Sprinkle evenly with the onion slices and then with Parmesan. Bake until edges are brown and onion is golden.
 |
| Lunch is up |
Makes 2 rolls
1 quantity pizza dough (from recipe above)
1 quantity sweet potato pâté
1 tablespoon olive oil
1 shallot, chopped
1 clove garlic, minced
100g mixed mushrooms, sliced
Salt and black pepper to taste
50g grated Parmesan cheese
- In a large skillet over medium, heat the oil. Add the shallots and garlic. Sauté until the onions are translucent. Add the mushrooms, salt and pepper, and keep on cooking until the mushrooms are soft and any liquid has evaporated. Set aside to cool.
- Preheat the oven to 200°C. Divide the pizza dough into two. Roll out each one to a rough 15cm square. Make cuts into the sides of the square about 3cm long and at a diagonal.
- Divide the sweet potato into two portions and spread in the centre of the dough between the cuts. Place half the mushrooms on the potato layer. Sprinkle with the Parmesan.
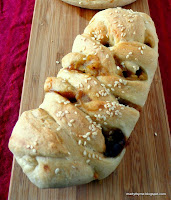 Alternating between the left and right, fold the cuts over each other so they overlap in the centre. Press the ends into the sides. Brush with water and sprinkle with seeds. Place rolls on a greased baking sheet and leave to rise, about 10 minutes.
- Place in the oven and bake for 12-15 minutes until tops are golden.

Monday, November 29, 2010
 |
| Sweet potato |
The sweet potato above has, as you can see, purple skin. Would it be incorrect to think that the flesh might also be purple? Well, as it turned out, it was a mistake to think so. Because you skin the potato and find it's not purple.
When I made kuih keria for the October Daring Bakers challenge, I used local sweet potato. The skin was brown, but the flesh was orange and I got the much desired orange-coloured doughnuts.
The ones above are touted as Japanese sweet potatoes, but after reading up on the variety, it made me think that the ones I had bought might have been mislabelled.
But then, colour no longer remains a concern when you cook the vegetable and end up with a dish – like the one below – that reminds you of the wonder of nature, and all is good in the world again.
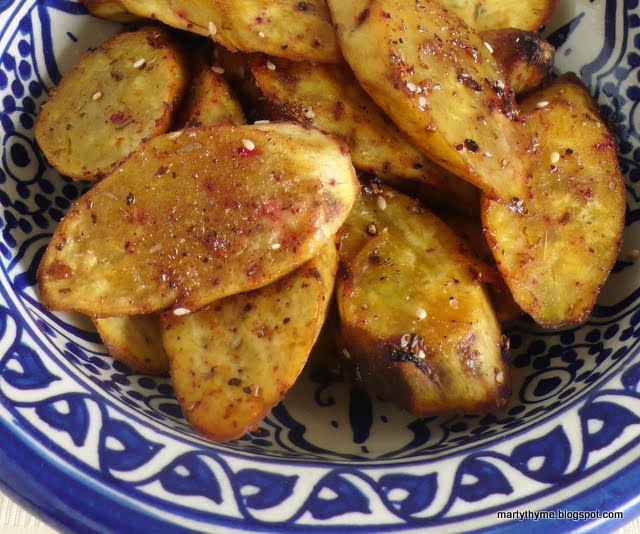 |
| Baked sweet potato with za'atar and chilli |
ZA'ATAR
2 tablespoons sumac1 tablespoon dried thyme
1 tablespoon toasted sesame seeds
1 teaspoon paprika
- Mix all the ingredients together and store in an air-tight jar in the refrigerator. Use within 2 weeks.
* In the next issue of The Thymes, which coincides with the publication of Don't Call Me Chef in The Star on Dec 6 – the theme is the tiffin lunch – I'll be posting on a dish made with sweet potato that can be toted to the office/school.
Saturday, November 27, 2010
 |
| LOTUS SEED PASTE CROSTATA. |
I have been looking for this tin for a long time now, but it wasn't until I was in Sydney recently that I found it.
I like it because it makes cutting whatever is made in it easier and more uniform compared to a round tin – I'm quite hopeless at dividing cakes up equally.
And so on with the challenge.
The 2010 November Daring Bakers’ challenge was hosted by Simona of briciole. She chose to challenge Daring Bakers’ to make pasta frolla for a crostata. She used her own experience as a source, as well as information from Pellegrino Artusi’s Science in the Kitchen and The Art of Eating Well.
I used version 2 of the pasta frolla, and added almond meal to the mix. The pastry was just enough for the 38cm by 13cm tin. (The original recipe and other versions can be found here.)
The filling is a lotus seed paste "custard". Lotus seed paste is the stuff used in mooncakes; I got it from a baking supply shop. Initially, I thought I would just spread a layer of it at the bottom of the crust and top that with pastry cream and fruit, but I decided to live up to the "daring" name and experiment. I mixed up the custard, tasting as I went along, but to be honest, I didn't know if this filling would work. As it turned out, the result was a pleasant surprise. Chalk up one for the Daring Bakers!
 |
| Bar bella! |
LOTUS SEED PASTE CROSTATA
The recipe for each component follows1 quantity pasta frolla
1 quantity lotus seed paste custard
Crumble topping
- Roll out the pasta frolla to fit a lightly greased 38 x 13cm tart pan. Chill for 30 minutes. Preheat oven at 190°C.
- Bake crust until just beginning to brown, 10-12 minutes. Remove from oven and set aside.
- Spoon the custard into the pie shell. Sprinkle on the crumble topping. Bake at 190°C for 20-25 minutes or until the edges of the custard are firm (the centre will still be a little wobbly but will firm up as the tart cools) and the crust has browned. Place on a wire rack to cool. Serve chilled or at room temperature.
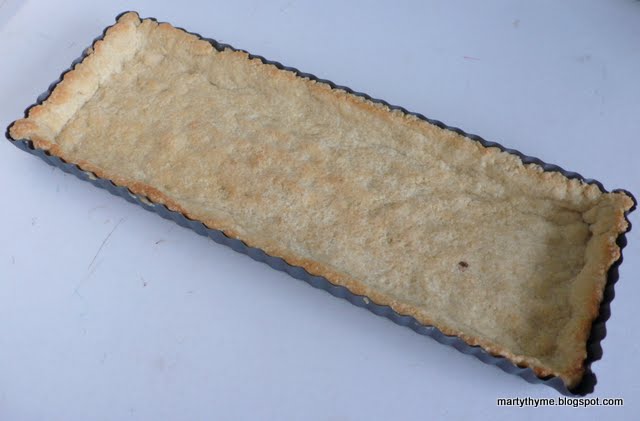 |
| Parbaked tart shell |
Pasta Frolla
(from Simona/Daring Bakers)
For a 38 x 13cm tart pan
⅓ cup caster (superfine) sugar
¾ cup unbleached all-purpose flour
½ cup cake flour
¼ cup almond meal
Pinch of salt
6 tablespoons cold unsalted butter, cut into small pieces
1 egg, lightly beaten
¼ teaspoon vanilla extract
- Whisk together sugar, flours and salt in a bowl.
- Rub or cut the butter into the sugar and flour mixture until it has the consistency of coarse crumbs.
- Make a well in the centre of the flour and butter mixture and pour the beaten egg and vanilla extract into it.
- Use a fork to incorporate the liquid into mixture and then use your fingertips.
- Knead lightly just until the dough comes together into a ball.
- Shape the dough into a flat disk and wrap in plastic wrap. Place the dough in the refrigerator and chill for at least two hours, or refrigerate overnight.
2 eggs
1¼ cup lotus seed paste (store-bought)
⅓ cup whipping cream
Pinch of salt
Crumble topping
- In a large bowl, whisk the eggs. Whisk in the lotus seed paste until smooth. Add cream and salt and stir to combine.
Crumble Topping
3 tablespoons brown sugar
Large pinch of cinnamon
3 tablespoons crushed nuts
3 tablespoons cold butter
- Mix the dry ingredients together. Rub in the butter to form a crumbly mixture.
Monday, November 22, 2010

Monday, November 15, 2010
 |
| Marmite oatmeal cheese biscuits |
I have to admit, I wasn’t fond of Marmite (and its beefy cousin, Bovril) as a child, but I think it had a lot to do with the rice porridge it was added to. I wasn’t averse to the yeast extract on its own, but I always associated it with congee (this site provides lengthy background information) because Marmite was stirred into the rice porridge for taste (and nutrition) and I didn’t – and still don’t – like rice porridge (I associate it with being ill – I’m not the only one; although Fuchsia Dunlop likes it). But later, I discovered Marmite was good with other things, like toast, and developed a liking for it (and the Australian version, Vegemite).
Two tablespoons of Marmite might seem a lot in this recipe, but if you’re going to go that way, then go all the way, right? The Marmite doesn’t really overwhelm – it just adds a pleasant yeasty saltiness to the taste. In fact, I think I may add more the next time I make these biscuits.
I got the idea for these snacks from Dan Lepard’s recipe for Red Leicester Seed Biscuits. There’s no Marmite in Mr Lepard’s biscuits, but in his introduction, he compares caraway seeds to Marmite – how they’re both an acquired taste – which made me think of using the two ingredients in one item. How’s that for inspiration?
As for the seeds, I use three other types apart from the caraway: onion seeds and a combination of blue poppy and white sesame seeds.
 |
| Brushed with egg white and rolled in seeds |
MARMITE OATMEAL CHEESE BISCUITS
Makes about 20
1 cup rolled oats
½ cup all-purpose flour, sifted
Large pinch of salt
A few grindings of black pepper
¼ teaspoon cayenne pepper
2 cups finely grated cheese (sharp Cheddar, Red Leicester, Emmenthal)
2 tablespoons Marmite
125g (½ cup) unsalted butter, room temperature, cut into pieces
Lightly beaten egg white
Seeds (caraway, sesame, poppy or onion seeds)
- Place rolled oats in a food processor and process until fine, 20 seconds. Add flour, salt, black pepper, cayenne pepper, cheese, Marmite and butter to the food processor bowl and pulse until ingredients are combined and come together; do no over-process.
- Divide dough into 2 or 3 portions. Place each portion onto grease-proof paper and roll tightly into a 4cm-diameter log; twist the ends of the paper firmly. Freeze for 30 minutes.
- Remove from freezer and unwrap. Stand the logs upright and brush with egg white. Roll in the seeds so the sides are well coated (see picture above). Re-wrap the logs and freeze until ready to bake.
- Turn on oven to 180°C. Unwrap the logs and slice into ¾cm-thick rounds. Place on an ungreased baking tray and bake until golden, about 20 minutes. Transfer to a wire rack to cool; store in an airtight container for up to 5 days.
Monday, November 8, 2010
 |
| Spinach roti |
I’ve had to be very careful with my food intake in the past couple of weeks because I need to be fit and healthy. Tomorrow I leave for Sydney to take a course and sit for an exam and I cannot fall ill. To refuse the delicious, but artery-clogging dishes served would have been an insult – and too much of a hassle to explain why I could eat only a little of it.
After that day, I just felt very heavy and sluggish and so all I had allowed myself to eat were fruits (nice!) and cereal (not so great). But last night, I had had enough.
So out came the flour and whatever I could find in the fridge. It seemed that I had everything for an Indian flat bread. Delicious and an opportunity to continue with the Deepavali theme.
I make chappati all the time. It uses few ingredients, is easy to make, and cooks quickly. I usually make it plain or with the simple addition of some fennel or cumin seeds, to eat with curry or chutney. This time, I didn't have anything to go with the bread and I wasn't keen on turning the spinach I had into a side dish, so I decided to just throw the vegetable into the mix. Hence, spinach roti.
The rolling method I detail below isn't necessary but it does help create a flaky, puffy roti. This method is used for Chinese spring onion pancakes, as well as Indian paratha, so I decided to give it a try.
The yoghurt makes the bread soft. If you add a little bit more of it as well as some instant yeast to the dough mix (plus some sugar), you could easily turn this roti into naan.
Spinach leaves from 1 bunch, cleaned (water still clinging to the leaves)
1 cup atta (or wholemeal) flour
1 cup bread flour
½ teaspoon salt
Large pinch of fennel, cumin, or onion seeds
Pinch of chilli powder
5-6 curry leaves, shredded
5-6 curry leaves, shredded
1 tablespoon ghee (clarified butter) or vegetable oil
2 tablespoons yoghurt
¾-1 cup hot water
Oil or ghee for brushing and frying
- Place spinach leaves in a large pan over medium heat. Cover and steam until lightly wilted. Remove from pan, squeeze out excess water and chop finely.
- Mix all the dry ingredients together in a large bowl. Mix in chopped spinach, ghee and yoghurt. Add water gradually until mixture forms a soft, sticky dough. Knead for 5 minutes, then cover bowl and set aside for 30 minutes.
- Divide dough into 5 or 6 pieces. On a lightly floured surface, roll out into a thin circle. Brush the top with a little oil/ghee and roll up like a Swiss roll. Twist the length of dough into a loose spiral, flatten and roll out again into a 2mm-thick circle.
 |
1&2: Roll out, spread with ghee and roll up like a Swiss roll; 3: Twist into a spiral; 4: Press to help the roti puff up
|
- Heat a griddle over high heat, put in a little oil/ghee and rub the base lightly with a scrunched up paper towel so that the whole surface is greased. Place the roti into the hot griddle and press with a spatula or clean kitchen cloth. When air pockets start to form, flip the roti; there should be brown spots all over the surface.* Cook the other side.
- Remove and keep warm while you cook the rest of the roti.
- Fold into halves or triangles and serve with a curry or chutney.
* The heat should be kept on medium high so that the roti cooks quickly and puffs up. But if you're getting black spots instead of brown, then you know it's too hot!
Monday, November 1, 2010
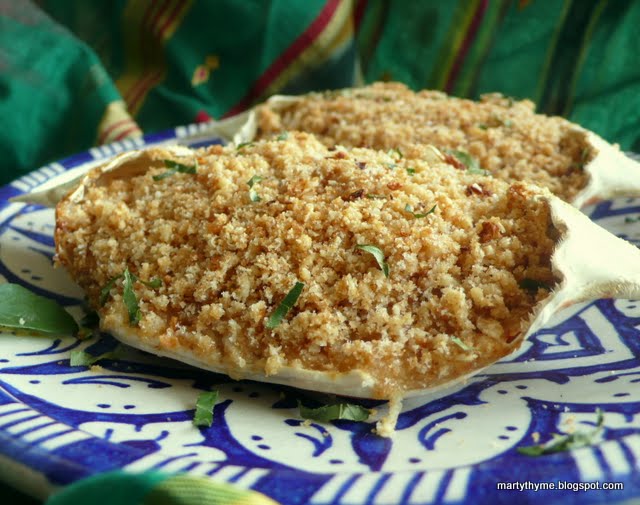
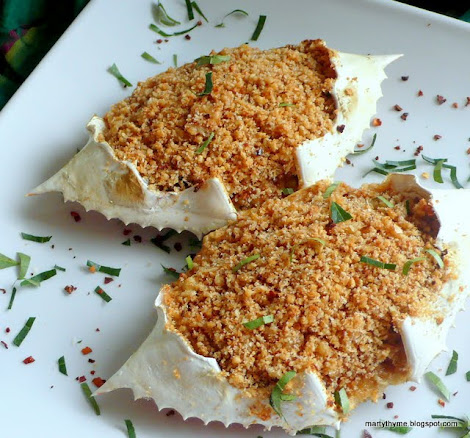
 |
| Baked crabs |
What I didn't do was buy live crabs, which is the best way to start out. But it was a day before I had to hand in the article for Don't Call Me Chef, and I hadn't even started on the Prawn Varai I was featuring, as well as the baked crabs for this post that links to the newspaper column (here's the link; the theme is Deepavali dishes) so I just popped into the nearest hypermarket one morning and got the crustaceans from there.
But as it turned out, the crabs I got must have just arrived even if they weren't alive anymore, because they still smelled fresh.
This is the first time I have cleaned crabs. I am not squeamish and have no problem with guts – I just never learned how to do it. So I googled "how to clean crabs" and found several sites and some bonus information about boy and girl crabs, and I just got down to the task. Not as difficult as I had imagined, I must say.
You can boil or steam the crabs to extract the meat, but I think steaming prevents the flesh from getting too wet. It only takes seven minutes – once the shells go pink, they're done. Be careful when removing the flesh as the pincers of blue crabs have spikes on them. I have a gash in my left thumb from being pierced by one of those spikes. I don't know why I can't do anything in the kitchen without getting hurt.
 |
| Pinch me, I must be dreaming |
The Mr Silu of the recipe title is Mr S. Siluvairasa, the proprietor of the Yarl Beach Inn in Jaffna, Sri Lanka, when I was there in August 2003 (I speak of him in my contribution to the column). He was a wonderful cook and opened his guest house not only to boarders, but dinner guests as well and when I stayed there, he always had a large number of diners coming by. These baked crabs were one of his specialties.
The crabs he used were meaty but not as large as the one I have here. They were about the size of a bar of soap and normally, each diner would be served two of these. I remember Mr Silu saying that he used to fry the stuffed crabs before he got an oven, and that is how many people still prepared it then.
The crabs he used were meaty but not as large as the one I have here. They were about the size of a bar of soap and normally, each diner would be served two of these. I remember Mr Silu saying that he used to fry the stuffed crabs before he got an oven, and that is how many people still prepared it then.
MR SILU'S BAKED CRABS
Serves 2-3
½ tsp mustard powder
4 shallots, finely chopped
2 green chillies, finely chopped
½ tsp curry powder
Salt and pepper to taste
2 cloves garlic, finely chopped
2cm ginger, finely chopped
1 sprig curry leaves, leaves removed and finely sliced
1 beaten egg
4 tablespoons finely grated cheese (use any hard cheese)
3 tablespoons breadcrumbs
- Clean the crabs. Remove the carapace carefully and set aside.
- Remove the pincers and cut the crabs in half. Steam the crabs for 10 minutes or until the shells turn pink.Cool, then remove the flesh from the shells. Mix the flesh with mustard powder, shallots, chillies, curry powder, and salt and pepper to taste; set aside.
- Fry garlic, ginger and curry leaves for 1-2 minutes. Add crab flesh; stir-fry until lightly golden. Remove from pan and cool. Preheat oven to 180°C.
- Mix the egg with the crab. Stuff mixture into shells. Mix cheese and breadcrumbs together; sprinkle over the filling. Bake the stuffed crabs until topping is golden, 12-15 minutes. If the topping browns too quickly, cover the pan with foil to ensure that the filling is heated through. Serve immediately.
Wednesday, October 27, 2010
 |
| Kuih keria |
And so it was with some trepidation that I read the October Daring Bakers' challenge. In fact, I actually started to laugh... a sign of anxiety, I think. Well, here's the brief:
The October 2010 Daring Bakers challenge was hosted by Lori of Butter Me Up. Lori chose to challenge DBers to make doughnuts. She used several sources for her recipes including Alton Brown, Nancy Silverton, Kate Neumann and Epicurious.
 Like I said, I love doughnuts. I've even written a cover story (left) for my newspaper in praise of these confections. I so wanted to take part in this challenge properly and try out all the recipes Lori had lined up. The day after I read about it, I went out and bought some sweet potato because I knew I had to make the Malaysian kuih keria, or sweet potato doughnuts.
But good intentions or not, sometimes you are just overwhelmed with things that crop up. Lots to do in life – I'm preparing for a course I am taking – and at work – the boss is hounding me for a story I have been sitting on for over a month – and so all I could manage was the sweet potato doughnut.
 |
| I'll take a bite of that |
The doughnuts are usually coated with a thick sugar syrup which hardens in clumps, but here I have simply dredged them with icing sugar.
Monday, October 25, 2010
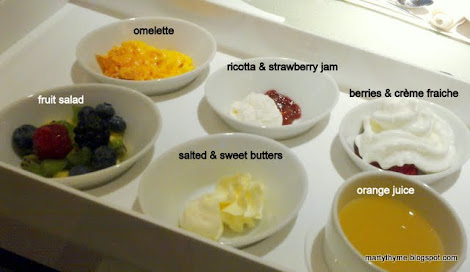 |
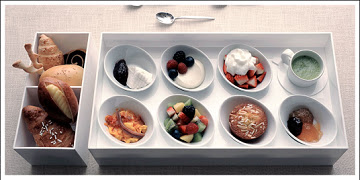
| Mos Kit |
This is a six-serving "Mos Kit". It is the breakfast served at Maison Moschino in Milan, Italy, which I was fortunate enough to be a guest of for three nights last week. (I was there on a working trip; I could never afford to stay anywhere so posh on my own ringgit!)
The picture was taken at the Clandestino Milano restaurant at 7am and with the camera on my mobile phone, so it is not as clear as I would have liked it to be. But it's obvious that this kind of breakfast makes a very good start to the day: lots of fresh fruit, eggs, orange juice and – what's not shown in the picture – a selection of seeded and wholewheat breads. Breakfast also comes in four- and eight-serving Mos Kits.
The meal is presented in a white glossy plastic box with a lid which looks like a shoebox. When the server brings it to the table, he/she will place it in front of you and open the lid to reveal the delightful spread. The bread comes in a smaller, separate box. The first morning I had the breakfast, I was very impressed. The following two days, I wasn't surprised any more, but still enjoyed the meal tremendously.
Maison Moschino is a pretty hotel with an interesting history. Its official website has some information but few images, but if you're interested, click on this hotel industry site for pictures. Here's a better picture of the Mos Kit breakfast from the site.
The rooms are done up in various concepts and there are fashion-related items all around the place. This is what the restaurant looks like (again, taken with my phone):
More about what I ate in Italy, and my visit to a Parmigiano Reggiano producer, in a future post. Ciao!
The picture was taken at the Clandestino Milano restaurant at 7am and with the camera on my mobile phone, so it is not as clear as I would have liked it to be. But it's obvious that this kind of breakfast makes a very good start to the day: lots of fresh fruit, eggs, orange juice and – what's not shown in the picture – a selection of seeded and wholewheat breads. Breakfast also comes in four- and eight-serving Mos Kits.
The meal is presented in a white glossy plastic box with a lid which looks like a shoebox. When the server brings it to the table, he/she will place it in front of you and open the lid to reveal the delightful spread. The bread comes in a smaller, separate box. The first morning I had the breakfast, I was very impressed. The following two days, I wasn't surprised any more, but still enjoyed the meal tremendously.
Maison Moschino is a pretty hotel with an interesting history. Its official website has some information but few images, but if you're interested, click on this hotel industry site for pictures. Here's a better picture of the Mos Kit breakfast from the site.
 |
| Eight-serving Mos Kit |
The rooms are done up in various concepts and there are fashion-related items all around the place. This is what the restaurant looks like (again, taken with my phone):
 |
| Clandestino Milano restaurant at Maison Moschino |
Monday, October 18, 2010
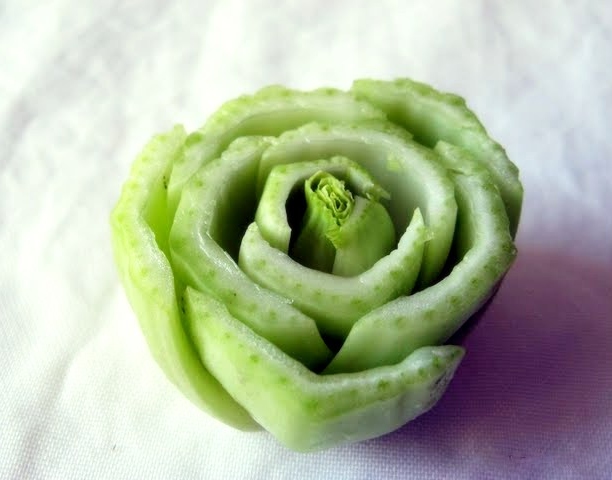 |
| Bak choy rose |
A year ago today, I started this blog... reluctantly.
My colleagues Hungry Caterpillar, Veggie Chick and I had been producing our Don't Call Me Chef cookery column in print for close to a year when HC thought that the next step should be writing individual blogs as an extension to the monthly newspaper feature.
As I said, I was reluctant. I wondered what I could say in it or if anyone would even be interested in what I ate or cooked. I didn't want to be someone who made her private cookery/eating journal public; if I was going to say something, I hoped it would be informative and meaningful to someone other than myself. Coming up with the focus of the blog took some time. But finally I decided, since I prepared my own lunch almost every day, and ate in the office canteen by myself with a book – usually food-related – perhaps I could write about that. And that was how I introduced myself in my first post.
But even as I got used to blogging, I didn't know where I was really headed. And looking over the older stuff now, there seems to be so many random posts without any substance as well as some real dingers. That was posting just for the sake of it – what I had told myself initially to stay clear of.
Through the year, the design of this blog has changed and so has the focus – from putting thoughts down in readable form however disorganised they are, to making an effort to document something worth remembering for the future.
And now I've come to realise what this space means to me.
The process of documenting food through photography is fun, from the styling (and sometimes, there is hardly any!) to the time when I click and then download the pictures to the computer to see my handiwork. There's often a lot of groaning at how bad the pictures are, but most of the time, there's that one shot that I am satisfied with and which drives me to do better next time.
As a blogger, I'm glad I signed up as a Daring Baker. Although I am often tardy and do the challenges at the last minute, it has been a wonderful experience. Even for a geeky loner like me, it's been nice to be part of a community just as fond of baking as I am.
As with many food bloggers, this is my cooking journal and recipe keeper. I still go to the archives for help with cooking and when that piece of paper I wrote a recipe down on goes missing.
What I like most about writing this blog is that it pushes me to "study" food. Sometimes I cook and eat to fill my belly (and for pleasure!), and sometimes, it's more than that. Food – a fascinating subject. It's about life.
* The title of this post is a play on the title of a favourite poem of mine when I was little. I don't know where I'll be in six years, and what will happen to The Thymes, but right now, I am happy to write it.
Now We Are Six
By A. A. Milne
When I was One,
I had just begun.
When I was Two,
I was nearly new.
When I was Three
I was hardly me.
When I was Four,
I was not much more.
When I was Five,
I was just alive.
But now I am Six,
I'm as clever as clever,
So I think I'll be six now for ever and ever.
Subscribe to:
Posts (Atom)