The Oven has baked its last loaf. This blog is no longer being updated.

My cooking videos appear at youtube.com/janeragavan

I write on food at star2.com

Cannonball eggs

Friday, September 30, 2011

CRAB-CRUSTED 'SCOTCH' EGG 
After reading this article on Scotch Eggs by Tim Hayward in The Guardian, I had to make boiled eggs encrusted with some sort of meat and deep-fried to look like a cannonball. His suggestion for a crab crust reminded me that I had a packet of crab meat in the freezer.
    I don't know what crab this meat came from, or even if it was really crab meat  there were only the words on the packet to rely on. This "crab meat" tasted fishy – both literally and metaphorically. Once it had thawed, I added a variety of seasonings to it. Only then it began to be palatable.
    Then it got better. But before I say how, a quick rundown of what went into it. There's no real recipe, I simply tasted as I went along.
    First, cook eggs for four minutes, then plunge them into cold water to stop the cooking before peeling the shells carefully. They should be soft-boiled but mine are obviously overcooked because the yolks are not runny. To get the yolks in the centre, I swirled the eggs in the water when they were in the pot before cooking.
    To the crab meat for the "scotching", I added cayenne pepper, onion powder, lime juice and chopped fresh mint to taste. Everything was bound together with breadcrumbs, mayonnaise and beaten egg. In fact, without the raw egg, this would have made an excellent sandwich filling.
    The crab meat is then wrapped around the boiled egg. I was a little generous with the coating around the egg in the picture above, but the second egg had a thinner crust. To bread it, I first dusted the balls in flour, then dipped them in beaten egg and finally rolled them in a mixture of fine breadcrumbs and (and this is what made the eggs – oh God of Language, forgive me this terrible pun – eggs-ellent. I shall atone!) grated Parmesan. Then deep-fry, drain on paper towels and serve with any kind of sauce. I made some mint pesto. Best eaten cold. I liked the eggs better the next day straight from the fridge.

Daring Bakers: Croissants

Tuesday, September 27, 2011

FRIED CROISSANTS, ANYONE?  
The pastries in the picture above may look edible but they are not. The are hard, yet undercooked; and there was butter in it when the croissants went into the oven, but they actually fried in their own fat.
    Here's what happened: Halfway through baking, I noticed an oily pool in the base of the pan – the butter in the dough had actually melted out and in effect, the croissants were frying! I had to remove the pan, drain off the melted butter and put the pan back in the oven for the croissants to finish baking. The inside didn't puff up and the whole batch was hard.
   This was my second attempt. I had made a batch of croissants a few days earlier from half the dough (pictured below) and those didn't turn out too bad taste-wise although the shaping leaves much to be desired.
First batch – not a total disaster – of croissants and pain au chocolat.
    Enough said about my failure. The Daring Kitchen site has a slide show of much better-looking, and undoubtedly better-tasting, croissants made by the other Daring Bakers. Here's what we had to do:
The Daring Bakers go retro this month! Thanks to one of our very talented non-blogging members, Sarah, the Daring Bakers were challenged to make Croissants using a recipe from the Queen of French Cooking, none other than Julia Child!
    The recipe comes from Mastering the Art of French Cooking, Volume Two, by Julia Child and Simone Beck.
   I liked Sarah's recipe for the yeast dough because it was for a quantity of dough that was easy to manage by hand (no need for heavy machinery for mixing and kneading). I referred to Ciril Hitz's book Baking Artisan Pastries & Bread and his accompanying DVD for the laminated dough technique, including how to make a butter block (he shows some of the techniques in his own video on YouTube). This link to a YouTube video of a baker guy making all sorts of pastries gives ideas on the uses for the laminated dough. His grin at the end of the video when he shows off what he spent the day making is priceless.
    I want to make all those pastries too. One day...

That's why they call it passion

Sunday, September 18, 2011

TART WITH A HEART FULL OF PASSION 
When I was growing up, my next door neighbour, who also happened to be my great-uncle Ben, had a large metal and wire structure in his front yard  on which he grew climbing plants. We children simply used it as a climbing frame and like monkeys, we would be all over said structure at one of our games until one of the adults would eventually yell at us to get off.
    One of the vines that twisted and twirled over the trellis was passion fruit. I never understood what they had to do with passion: They were so sour, the only strong feeling they could arouse was repulsion. I avoided passion fruit for years because of that memory.
Who said wrinkles were bad?

   Years later, passion fruit sold at the market caught my eye again. People with their own plants would wait until the purplish skin (another variety is yellow) shrivels a little or falls off the plant, but suppliers of course, will get them to the market while the skin is still smooth. I take them home, leave them on the kitchen counter and wait until they start to look like my cellulite-ridden hips. The inside will be full of tangy pulp. Not the passion fruit I remember from my childhood.
    I still don't know how the fruit got its name, but since I got reacquainted with passion fruit, I have looked for as many recipes as I can in which to use it. 
    Like this tart, for instance. It has a few components, but comes together quite easily. For a different flavour, I would change the type of biscuit or spices I use for the tart shell or substitute the fruit. In fact, the pastry cream is a good, basic go-to custard filling.
    I brought the tart over to a family gathering on the Malaysia Day (Sept 16) holiday and it went down a treat, especially with Nephew No.1 who sheepishly asked for a second slice (good boy!). I couldn't convince Nephew No.2 (my dear godson a.k.a The One Who Doesn't Eat) despite telling him the little black things on top of the tart were tadpoles.
Quite easy to put together: Cook, bake, pour, chill
PASSION FRUIT CREAM TART
Serves 8-10

1 baked tart shell (still in baking tin)
1 quantity pastry cream
100g passion fruit pulp (from 2-3 fruits)


Garnish (optional)
Whipped cream and passion fruit pulp
Snow sugar (decorating icing sugar)
  • Fold pulp into pastry cream. Spoon into tart shell and smooth the top. Cover and refrigerate until set and firm.
  • To serve, remove sides of pan and place tart on a serving dish. Pipe whipped cream around top edge or dust the top with snow sugar, and garnish with passion fruit pulp.
Tart Shell
250g digestive biscuits, finely crushed
½ teaspoon ginger
¼ teaspoon cinnamon
¼ teaspoon allspice
150g unsalted butter, melted
  • Combine the biscuit crumbs and spices in a bowl. Add the melted butter and combine well. Press crumbs into the base and 2.5cm up the sides of a 23cm springform pan (the crust will be thin). Refrigerate for 20 minutes.
  • Meanwhile, preheat oven to 160°C. Bake crust for 10 minutes. It will be soft but will become firm as it cools. 
Pastry Cream
250ml full-fat milk
½ teaspoon pure vanilla extract
teaspoon salt
2 tablespoons cornstarch
55g sugar
1 medium egg + 1 medium egg yolk
1 teaspoon vegetarian gelatin
½ tablespoon water
200 ml heavy cream
  • Pour the milk, vanilla, and salt into a heavy sauce pan. Place over medium-high heat and scald, bringing it to a near boiling point. Stir occasionally.
  • Meanwhile, place the cornstarch and sugar in a mixing bowl; whisk to combine. Add the eggs to the bowl and whisk until smooth.
  • When the milk is ready, gently and slowly pour it into the bowl with the eggs, whisking constantly. Pour the mixture back into the warm pot and continue to cook over a medium heat until the custard is thick, just about to boil and coats the back of a spoon. Remove from heat and pass through a fine mesh sieve into a large mixing bowl. Allow to cool for 10 minutes stirring occasionally.
  • Cover the cream with plastic wrap, pressing the plastic wrap onto the top of the cream to prevent a skin from forming. Chill in the refrigerator for up to five days.
  • In a small dish, sprinkle the gelatin over the water and let stand for a few minutes to soften. Put 5.5cm of water into a small sauce pan and bring to a simmer over a medium heat.
  • Place about a quarter of the chilled pastry cream into a small stainless steel bowl that will sit across the sauce pan with the simmering water, without touching the water.
  • Heat the cream until it is warm (body temperature) and you can hold your finger in it for 10 seconds without feeling discomfort. Add the gelatin and whisk until smooth. Remove from the water bath, and whisk the remaining cold pastry cream in to incorporate.
  • Whip the cream until it holds medium stiff peaks. Gently fold the whipped cream into the pastry cream with a rubber spatula. Use immediately.
PRINTABLE RECIPE

Explosive buns

Wednesday, September 14, 2011

BREAD THAT WON'T BOMB: CHEESE AND ONION GRENADES 
The taste buds and nose are being bombarded. First, a hit of cheese, then a shot of heat-seeking mustard and finally, an olfactory strike from the onions.
    I've wanted to try Dan Lepard's Cheese Torpedoes since the recipe appeared in Guardian, and finally I have. Five or six torpedoes, as his original produces, are a little too much for my needs, so I halved the recipe. Actually, the fact that I only had half the amount of cheese decided it for me. I made smaller rolls instead of larger batons because they're easier to eat. The onion I used was a little pungent and added to the explosion. I suppose onion powder could be used instead (¼-½ teaspoon maybe, depending on taste).
    On the explosive device theme, I went for a smaller weapon and shaped the grenades by making a shallow criss-cross pattern on the top of the rolls. But I didn't score them so well and so the pattern wasn't distinct. Let's just say they had already exploded and so the shells look a little beat up.
    They may look like bombs, but taste-wise, they didn't bomb. The cheese is cut into cubes of significant size so when they melt while the rolls are baking, they leave little holes in the crumb. And then they start oozing out and there's all this crisp baked cheese sticking on the outside. They're like cheese wafers. I took some pictures with my camera but then couldn't upload them because the SD card was corrupted. These photos were taken with my camera phone a few days later, and by that time, I only had two of the rolls left, and none of the cheesy bits to show off.
Whether small or large, these cheesy rolls are great
CHEESE AND ONION GRENADES
Using the recipe for Dan Lepard's Cheddar Torpedoes
Makes 5 grenades

225g strong white flour
½ teaspoon salt
½ tablespoon powdered mustard
150g Cheddar, cut into 1cm cubes
½ medium onion, finely chopped
150g warm water
1 teaspoon fast-action yeast
1 medium egg, beaten (divided)
Oil, for kneading
Fresh ground black pepper
  • Put the flour, salt and mustard in a large bowl, add the cheese and onion, and toss together.
  • Weigh the beaten egg and set aside half of it (for the egg wash to finish). In a jug, whisk the water, yeast and the other half of the egg until smooth. Pour this into the flour mixture and mix everything together to a soft dough. Cover the bowl with a tea towel and set aside for 10 minutes.
  • Lightly oil a worktop and knead the dough for just 10 seconds. Cover; repeat this 10-second knead two more times at 10-second intervals. Return the dough to the bowl, cover and leave for an hour.
  • Divide the dough into 5 equal pieces, shape into fat sausages with tapered ends and place on a tray lined with baking/parchment paper. Cover and leave until risen between half and double.
  • Meanwhile, preheat the oven to 220°C. Once the sausages have risen, using a shape knife, score the top in a criss-cross pattern. Brush with beaten egg, grind black pepper over them and bake for 20-25 minutes, or until evenly golden all over.

Stretching the doughnut

Thursday, September 8, 2011

CAKE DOUGHNUTS AS 'BREAD' PUDDING WITH PASSION FRUIT 
I never knew how bad stale doughnuts tasted until I ate two-day-old ones recently. I mean, how could I know since doughnuts never stay around long enough to become leftovers, right?
    Well, I made some buttermilk cake doughnuts and doughnut holes last Saturday for a newspaper article (it'll be out on Sept 26), ate one – all right, three! and a couple of doughnut holes – and didn't have anyone to offer the rest to until the following Monday at work. But by that time, they were already stale and after I popped a whole doughnut hole into my mouth, I knew they were not fit to be shared as they were. I couldn't bear to dump them, and wondered what I could do with them.
    There are many suggestions online for truffles (make doughnuts into crumbs, combine with a liquid, form into balls and dunk in melted chocolate). There are recipes for bread pudding as well, but most use yeast-raised doughnuts.
     But I thought that might actually be a good idea even if my doughnuts were the cake type. The yeast doughnuts, like in normal bread pudding, would be allowed to soak in the egg and milk mixture to soak up some of the liquid before baking. I didn't do that with these doughnuts though, and baked them immediately after the custard had been pour into the baking dish in which I had arranged the broken doughnuts.
    I mixed in some rather sour passion fruit pulp on a whim and I'm glad I did because the combination of tangy and sweet together with the vanilla flavoured doughnuts made this dessert quite special. Though not particularly elegant, I think it would make a nice closing to a fancy meal, perhaps with some pouring cream or a dollop of Greek yoghurt. I am rather proud of it and would happily share this dish.
    Oh, who am I kidding? This is all a ploy to eat more doughnuts than I should.
Paired with passion fruit for tang
CAKE DOUGHNUT & PASSION FRUIT PUDDING
Serves 2

2-3 stale (day-old) cake doughnuts, preferably plain
1 egg
60ml milk
2 tablespoons caster sugar
1 teaspoon cornflour
Pulp of one small passion fruit
Coarse golden sugar for sprinkling (optional)
  • Preheat oven to 200°C. Grease a 15cm shallow ramekin or two 125ml ramekins. Break up the doughnuts into two or three pieces and arrange in the ramekins.
  • Beat the egg, milk, caster sugar and cornflour together. Stir in the passion fruit pulp. Pour mixture over the doughnuts. Sprinkle with the coarse sugar, if using. Bake for 15-20 minutes until the edges are golden and the centre is still a little wobbly. Set on a wire rack to cool; the custard will firm up a little more. Serve warm or at room temperature. Do not refrigerate as the doughnuts will become hard.
PRINTABLE RECIPE

Mustard for zing

Monday, September 5, 2011

MUSTARD AND CREAM CHEESE BREAD STICKS 
For a dish with heat, chillies are the common choice. But other ingredients have zing too. There's also the heat from mustard, which is different to that from chillies. Mustard has its place in certain dishes, and is sometimes even preferable.

    For the Don't Call Me Chef column, which comes out in print today, we wrote on spices and I chose mustard to feature. I made prawns with mustard which is inspired by Bengali cuisine.
    What else could I make with mustard? Well, the bread sticks came to mind when I was looking through the fridge and found some cream cheese that was already starting to grow mould. I believe that unless the mould has penetrated the cheese and if there's only a little bit on the outside, there's no need to throw it out. I just scrape off the mould and have never fallen ill from consuming the cheese.
    Both mustard powder and crushed mustard seeds are used. I use yellow mustard seeds because I didn't want the bread sticks to be too hot.

MUSTARD AND CREAM CHEESE BREAD STICKS
Makes 30-40 sticks depending on length

155g plain flour
Pinch of salt
½ teaspoon powdered mustard
Dash of paprika
60g butter
Cold water (about 80ml), to mix
60g cream cheese, softened
Freshly ground black pepper
½ teaspoon yellow mustard seeds, cracked
  • Preheat oven to 200°C and grease a baking tray or line with baking parchment.
  • This step may be done in a food processor. Put flour, salt, mustard and paprika in a bowl and mix well. Rub in butter so that mixture resembles fine breadcrumbs, then add water, a little at a time, to form a stiff dough. Knead lightly and form a disk. Roll out on a floured surface to a rectangle 5mm thick.
  • Spread cream cheese even over half the dough. Fold over the other half to completely cover cheese. Sprinkle with black pepper and cracked mustard seeds. Roll out again until 5mm thick and the cheese just begins to show through. With a floured knife or pizza wheel, trim edges, the cut dough into sticks 5mm wide and as long as you like. (I got 32 sticks between 23cm and 30cm long.)
  • Transfer to prepared tray and bake until lightly browned, about 10 minutes.
PRINTABLE RECIPE

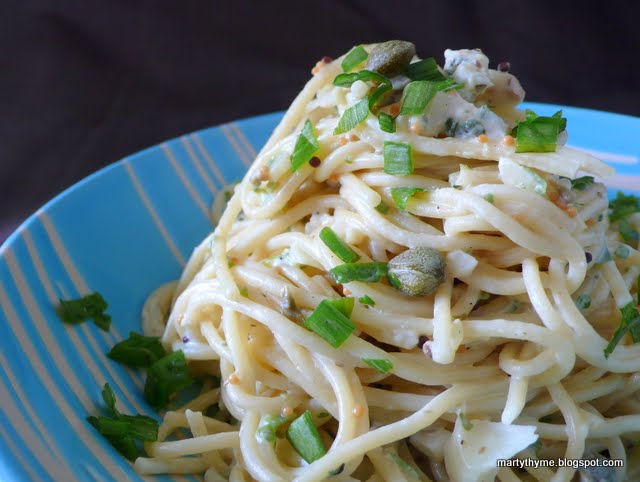
Pasta with mustard caper cheese sauce
I had a little cream cheese left over and when it was time for lunch, I thought I would put it into a sauce with mustard and capers. The sauce can be served on the side with grilled meat, chicken and even fish, but I tossed it through some vermicelli. For this dish I used both black and yellow mustard seeds, as well as powdered mustard.

MUSTARD CAPER CHEESE SAUCE
Serves 1

Cooked long pasta for one (save some of the cooking water)
Chopped green onion leaves for garnish

Sauce
1 tablespoon butter
2 cloves garlic, sliced
1 teaspoon mustard seeds (any colour or a combination)
1½ tablespoons cream cheese
5 caper berries, lightly smashed
½ teaspoon powdered mustard
Salt and pepper to taste
  • Melt the butter in a small pan over medium heat and fry the garlic until aromatic. Add the mustard seeds and toss them around to toast. Stir in the cream cheese and a few tablespoons of the pasta cooking water to get a thick sauce. Add the caper berries and powdered mustard; if the sauce is too  thick, add more pasta cooking water. Season to taste with salt and pepper.
  • When the sauce is the desired consistency, add the cooked pasta to the pan and toss through to coat well. Dish out and sprinkle with chopped green onion leaves.

PRINTABLE RECIPE

On this site are a couple more recipes with mustard in them: Cheese and mustard scones and Mr Silu's Baked Crabs

Top banana

Friday, September 2, 2011

FORGET-ME-NOT BANANA-PECAN BISCOTTI 
I bought a small bunch of bananas for something, but for the life of me, I cannot remember what it was I had planned to do with it. I know I wanted to use the fruit while they were still fresh (was it in a layer cake filling?) but now they have turned brown.
    On to Plan B then, although I only decided what it would be just now.
    While I was searching online for recipes, I thought I would look up a Banana Dacquiri. I don't actually know what it is but I like to deconstruct cocktails and make them into baked goods. I did find a recipe, but what interested me was a video on the same site. A man was blending a Frozen Banana Bread Cocktail which comprised a pear, banana, scotch, cinnamon and lots of ice. I thought I would try something similar using what I had on hand: a banana, a wedge of apple, cinnamon and a splash each of orange juice and rum. It was not bad although I think I might have been a little heavy handed with the rum.
    Fortunately, it didn't stop me from trying out this recipe for Banana-Pecan Biscotti from myrecipes, which got good reviews. The original recipe gives measurements in cups, and below are the weight quantities along with my own interpretation. (And yes, for my own picture of the biscotti, I did copy the way the picture is styled on the site. It was pretty and I am not averse to flattery by imitation.)
    The logs, when they come out of the oven after the first round of baking, have such a good aroma of banana and spices, I just wanted to have it all there and then. In fact, when I sliced the logs to make the biscotti, I kept the little pieces at the end for myself, and was not disappointed. I could not wait until they cooked completely especially since the aroma from the oven was again very appealing. It took every ounce of willpower not to pop a hot morsel into my mouth when I turned the slices over at the halfway point.
    I know what I'll be doing with the last overripe banana I've saved in the freezer. This is one time it paid to be forgetful.

BANANA-PECAN BISCOTTI
Makes 2 dozen

230g all-purpose flour
90g sugar
1 teaspoon baking powder
½ teaspoon mixed spice
¼ teaspoon salt
70g mashed very ripe banana (about 1 banana)
1 tablespoon vegetable oil
1 teaspoon vanilla extract
1 medium egg
50g toasted pecans, chopped
  • Preheat oven to 180°C.
  • Combine the flour, sugar, baking powder, mixed spice and salt in a mixing bowl. Combine banana, oil, vanilla, and egg in a medium bowl; stir into flour mixture with pecans (dough will be sticky).
  • Shape dough into 2 (20cm-long) rolls with floured hands. Place rolls on a parchment-lined baking sheet; flatten to 1cm thickness.
  • Bake at 180°C until surface is firm and pale brown, 20-23 minutes. Remove rolls from baking sheet; cool 10 minutes on a wire rack. 
  • Meanwhile, turn down the oven to 120°C. Cut each roll diagonally into 12 (1cm) slices. Place slices, cut sides down, on baking sheet; bake 12-15 minutes. Turn cookies over; bake an additional 10-12 minutes until nicely golden (cookies may be slightly soft in centre but will harden as they cool). Remove from baking sheet; cool completely on wire racks.
Postscript: Sept 4, 2011
I made the biscotti again, this time, substituting 30g of the flour with the same amount of dessicated coconut, and using chopped walnuts instead of pecans.
    PRINTABLE RECIPE