The Oven has baked its last loaf. This blog is no longer being updated.

My cooking videos appear at youtube.com/janeragavan

I write on food at star2.com

Daring Bakers: Baked Alaska

Tuesday, August 31, 2010

Our first home
Today is Malaysia's National Day. The country is 53 this year. I've had nothing to do with any of the events that are taking place, so I cannot use that as an excuse for posting late on this month's Daring Bakers challenge. I've simply been trying to play catch-up with things in life, though by the looks of the picture, it might seem as if I just have too much time on my hands! 

The August 2010 Daring Bakers’ challenge was hosted by Elissa of 17 and Baking. For the first time, The Daring Bakers partnered with Sugar High Fridays for a co-event and Elissa was the gracious hostess of both. Using the theme of beurre noisette, or browned butter, Elissa chose to challenge Daring Bakers to make a pound cake to be used in either a Baked Alaska or in Ice Cream Petit Fours. The sources for Elissa’s challenge were Gourmet magazine and David Lebovitz’s The Perfect Scoop.

You will find the recipe in pdf form here. And please visit the Daring Bakers website for all the creative work done by the other Daring Bakers who took part.

I decided to make the Baked Alaska. Why? Because as soon as I read "Baked Alaska", I thought of this pair of papier mâche penguins I had made to illustrate crafts on wedding gifts some time ago, so snow, ice... IGLOOS! The penguins would fit perfectly into the tableau.

You can tell I like to play with my food.

Crack, whip, ice, and finally the burnt butter
The vanilla ice cream is from the last Daring Bakers challenge. A month has passed and there's still so much left over so I was quite glad this month's challenge involved ice cream again.

I used the oven to brown the meringue but as you can see, it didn't toast all over. The igloo sat on a cake board but it was a little fiddly doing the browning in the oven since I couldn't manoeuvre the base very well.

Julia egg project: Omelette

Thursday, August 26, 2010

Rolled omelette
It's said that the perfect omelette is the mark of a great kitchen and a fine chef. Legend has it that famous French chef Escoffier challenged would-be cooks to prepare a perfect omelette. Those who succeeded earned a place in his kitchen.

The omelette was the last item on my Julia egg project. The previous ones ­­– on scrambling, poaching, and shirring and baking ­­– were easy compared to making omelettes. I had to do it three times before I got it right.

But it certainly was the most enjoyable method of cooking eggs. Not least because you really have to get tough with the eggs!

You have to move fast when making an omelette ­­– 30 seconds is all it takes from start to finish. This video from Julia Child's cooking programme, The French Chef, shows just how fast.

Julia Child advises that you not only read and memorise the recipe first, but she also suggests practising with a pan and half a cupful of dried beans to learn the proper technique of moving the eggs while they cook ­­–  you need to "flip them (the beans) over themselves in a group". The picture below shows what happens when you're not prepared:

Good taste, but lacking in looks
I left the third attempt for a day later after initially spilling the beans all over the balcony but I finally managed to do a good flip and ended up making a decent enough omelette. I couldn't go another round anyway. That was my last egg...


Stuffed with marinated bell peppers
ROLLED OMELETTE
L'Omelette Roulée

For 1 omelette, 1-2 servings
Time: Less than 30 seconds of cooking

2 or 3 eggs
Big pinch of salt
Pinch of pepper
A mixing bowl
A fork
  • Beat the eggs and seasonings in the mixing bowl for 20-30 seconds until the whites and yolks are just blended. 
15g butter
An omelette pan 19cm in diameter at the bottom
A fork
  • Place the butter in the pan and place over very high heat. As the butter melts, tilt the pan in all directions to film the sides. When you see that the foam has almost subsided in the pan and the butter is on the point of colouring (indicating it is hot enough), pour in the eggs. It is of utmost importance in this method that the butter be of the correct temperature.
  • Let the eggs settle in the pan for 2 or 3 seconds to form a film of coagulated egg in the bottom of the pan.
  • Grasp the handle of the pan with both hands, thumbs on top, and immediately begin jerking the pan vigorously and roughly towards you at an even 20-degree angle over the heat, one jerk per second. It is the sharp pull of the pan towards you which throws the eggs against the far lip of the pan, then back over its bottom surface. You must have the courage to be rough or the eggs will not loosen themselves from the bottom of the pan. After several jerks, the eggs will begin to thicken. (A filling would go in at this point.)
  • Then increase the angle of the pan slightly, which will force the egg mass to roll over on itself with each jerk at the far lip of the pan.
  • As soon as the omelette has shaped up, hold it in the angle of the pan to brown the bottom a pale golden colour, but only for a second or two, for the eggs must not overcook. The centre of the omelette should remain soft and creamy. If the omelette is not formed neatly, push it with the back of your fork.
  • Turn the omelette on to the plate, rub the top with a bit of butter, and serve as soon as possible.
Garnishings and fillings for omelettes
HERBS: Beat into the eggs at the beginning 1 tablespoon of chopped fresh herbs. Sprinkle more of the same over the finished omelette.
CHEESE: After the eggs have set for 2 or 3 seconds in the pan, sprinkle 1 or 2 tablespoons of grated Swiss or Parmesan cheese and finish the omelette. If you wish, sprinkle more cheese over the completed omelette, dot with butter, and place quickly under a very hot grill to melt and brown the cheese.
SPINACH: Beat 2 or 3 tablespoons of cooked purée of spinach into the eggs at the beginning, then proceed with the omelette as usual.

Julia egg project: Shirred & baked

Wednesday, August 25, 2010

Shirred eggs and chips
The scrambled and poached eggs portion of the Julia egg project were a cinch compared to using the oven to cook eggs. I didn't do very well with these dishes at all.

Both the shirred (Oeufs sur le Plat) and baked (Oeufs en Cocotte) eggs came out a little overcooked and were firm when they were supposed to remain a little wobbly. I don't like runny eggs, but these would have never passed muster with the great Julia Child.

First the shirred egg. A shirred egg is one that is broken into a small, flat, buttered dish and cooked quickly under the grill. The white is softly set and tender, and the yolk is liquid, but covered by a shimmering, translucent film. In the recipe, the egg is broken into a heatproof dish ­­– a shallow ramekin is recommended ­­– which is then placed on the stove so the bottom cooks before the dish gets bunked in the oven to finish cooking.

I was a little scared to use my ramekin on the gas stove, even if it was just for 30 seconds. I didn't know if it could really stand the heat of an open flame. But as the saying goes, you can't make an omelette without breaking a few eggs (different egg dish, but you get the idea). So I put the ramekin on the flame and patiently kept it there fo 30 seconds.

Well, it survived... but then I made the mistake of keeping it too long under the grill...

With the baked egg, I just didn't take it out of the oven soon enough and the top burnt. And I put too much butter in the dish so there's an oil slick on top of the eggs.

TOMORROW: The defining egg dish... The Omelette

Eggs from the grease pit
EGGS BAKED IN RAMEKINS
Oeufs en Cocotte

For each serving
  • Preheat oven to 190°C.
1 tsp butter
1 ramekin 6-7.5cm in diameter and about 3.5cm high
2 tablespoons cream
A pan containing 2cm of simmering water
1 or 2 eggs
Salt and pepper
  • Butter the ramekin, saving a dot for later. Add 1 tablespoon of cream and set the ramekin in the simmering water over moderate heat. When the cream is hot, break into it 1 or 2 eggs. pour the remaining spoonful of cream over the egg and top with a dot of butter.
  • Place in the middle level of the moderate oven and bake for 7-8 minutes. The eggs are done when they are just set but still tremble slightly in the ramekins. They will set a little more when the ramekins are removed, so they should not be overcooked. Season and serve.
Variations
  • Add a teaspoon of chopped herbs with the cream.
  • Put a spoonful or two of any of these cooked ingredients in the bottom of the ramekins along with the cream: chopped mushrooms or asparagus; diced lobster or shrimp
Uh-oh, the unbroken yolk got burnt
SHIRRED EGGS
Oeufs sur le Plat ­­– Oeufs Miroir

For each serving
  • Preheat grill to very hot.
A shallow, fireproof dish about 10cm in diameter
1 teaspoon butter
1 or 2 eggs
  • Place the dish over moderate heat and add the butter. As soon as it has melted, break the egg(s) into the dish and cook for about 30 seconds until a thin layer of white has set in the bottom of the dish. Remove from heat, tilt dish and baste the egg with the butter. Set aside.
Salt and pepper
  • A minute or so before serving, place the dish an inch below the hot grill. Slide it in and out every few seconds and baste the egg with the butter. In about a minute the white will be set, and the yolk filmed and glistening. Remove, season and serve immediately.
There are several suggestions given in the book to dress up the eggs, for example, with black butter sauce and browned with cheese, but I won't provide the recipes here. The eggs can also be surrounded with sautéed mushrooms, tomato sauce, sausages, "or whatever else strikes your fancy".

Julia egg project: Poached

Tuesday, August 24, 2010

Humpty Dumpty's cooked cousin has a broken heart
I had never poached an egg before this. I'm not a fan of runny yolks so there was never a need to cook eggs this way or have them half-boiled. But I had to do it in the interest of my Julia Child project where I test the egg recipes in Mastering the Art of French Cooking (I started with scrambled eggs yesterday and will continue with more over the next few days).

I can't say that I have taken a liking to runny yolks, but if anyone wanted their eggs poached, I could do that now.

This is what Julia Child says about the technique:
"The most important requirement for poaching is that the eggs be very fresh; the yolk stands high, the white clings to it in a cohesive mass and only a small amount of watery liquid falls away from the main body of the white. A stale egg with a relaxed and watery white is unpoachable because the white trails off in wisps in the water leaving the yolk exposed."
Here's her advice for eggs that are not that fresh:
"... simmer them in their shells for 8-10 seconds before poaching. This will often firm up the white just enough to make it hold its shape around the yolk when the egg is broken into the water."
I have read and seen TV chefs swirling the simmering water in their pans before putting the eggs in. That apparently helps keep the egg nice and round. This isn't Julia Child's method. I tried the swirling technique for one egg and the white floated all over the pan. Maybe the free-range eggs I used weren't as fresh as I thought (although look at that lovely yellow yolk!). But when I left the water alone for the other egg, it was easier to keep the white and yolk together. Mrs Child really did know what she was talking about. And to think, she didn't even know how to boil an egg when she got married.

The poached eggs are pictured here with blanched asparagus and drizzled with a simple white sauce (not from the book).

TOMORROW: Shirred and baked


Before the break-up
POACHED EGGS
Oeufs Pochés
To transfer the egg from the shell to the water, you may either break it directly into the water or break it into a saucer, tilt the saucer directly over the water and slip the egg in.
Cooking time: 4 minutes per egg

A saucepan or deep frying pan (I use a wok)
Vinegar (which helps the eggs hold their shape)
  • Pour 5cm of water into the pan and add 1 tablespoon of vinegar for every 500ml of water. Bring to a simmering point.
4 very fresh eggs
A wooden spoon or spatula
A slotted spoon
  • Break an egg and slip in into the water. Immediately and gently push the white over the yolk with a wooden spoon for 2-3 seconds. Maintain the water at barely simmering point and proceed with the other eggs in the same manner.
A bowl of cold water
  • After 4 minutes, remove the first egg with the slotted spoon and test with your finger. The white should be set, the yolk still soft to the touch. Place the egg in the cold water; this washes off the vinegar and stops the cooking. Remove the rest of the eggs as they are done, and poach others in the same water if you are doing more.
WHITE SAUCE
1 clove garlic, finely minced
1 teaspoon butter
1 cup water
1 teaspoon concentrated chicken stock (or ½ vegetable stock cube)
½ teaspoon cornflour mixed with 1 tablespoon water
Pepper
  • In a saucepan over medium heat, melt butter. Add garlic and stir for 30 seconds. Add water and concentrated stock. Bring to a boil. Turn down heat and stir in cornflour solution to thicken sauce; season. Drizzle over eggs and asparagus.

Julia egg project: Scrambled

Monday, August 23, 2010

Fluff piece: Scrambled eggs with herbs.
Soufflés wait for no one... and neither do eggs cooked any other way.

My review of Mastering the Art of French Cooking (Vol. 1) by Julia Child, Louisette Bertholle and Simone Beck for The Star is out today (the link to the published page will be up soon is now up; click here) and as an extension to the two recipes that were published, I tried all the recipes in the egg chapter since it wasn't very long. Child et al concentrated on poaching, shirring, baking, scrambling and omelette making. I will post about them over the next few days.

I decided to start with the method that I considered the easiest: Scrambling. I've reproduced the recipe as it appears in the book but I only used 2 eggs since I had many more recipes to test. I remember making scrambled eggs in Domestic Science class and milk being added to the beaten eggs before they went into the saucepan and I have been making scrambled eggs like that since my school days. They always seemed to come out a bit mushy. I would often overcook them because I didn't like them watery, which would result in some kind of rubberised custard. After reading the Julia Child's instructions, I now know not to add any liquid to the eggs.

I must have done something right for a change because with this recipe, the eggs came out nice and fluffy. I think it also had something to do with the free-range eggs I used. So that's one egg recipe down and a few more to go.

I posted about the Orange and Almond Spongecake from the book some time ago. Click on the picture on the right for the recipe.

TOMORROW: Poached eggs


SCRAMBLED EGGS
Oeufs Brouillée
Scrambled eggs in French (sic) are creamy soft curds that just hold their shape from fork to mouth. Their preparation is entirely a matter of stirring the eggs over gentle heat until they slowly thicken as a mass into a custard. No liquid or liquid-producing ingredients such as tomatoes should be beaten into them before cooking as this is liable to turn them watery.
For 4 or 5 servings

A fork or a wire whisk
8 eggs, or 7 eggs and 2 yolks
A mixing bowl
¼ teaspoon salt
Pinch of pepper
  • Beat the eggs with the seasonings for 20-30 seconds too blend yolks and whites.
30g softened butter
A heavy-bottomed enamelled, ovenglass, eathernware or stainless steel saucepan or frying pan, 18-20cm in diameter; depth of eggs in pan should be 2-3cm
A rubber spatula, wooden spoon or wire whisk
  • Smear the bottom and sides of the pan with the butter. pour in the eggs and set over moderately low heat. Stir slowly and continually, reaching all over the bottom of the pan. nothing will seem to happen for 2-3 minutes as the eggs gradually heat. Suddenly, they will begin to thicken into a custard. Stir rapidly, moving pan on and off heat, until the eggs have almost thickened to the consistency you wish. Then remove from heat, as they will continue to thicken slightly.
20-30g softened butter or cream
A warm buttered dish
Parsley sprigs
  • Just as soon as they are of the right consistency, stir in the enrichment butter or cream, which will stop the cooking. Season to taste, turn out on to the dish, decorate with parsley and serve.
With herbs: Beat a tablespoon of chopped fresh herbs into the eggs at the start. Sprinkle more herbs over the eggs just before serving.
With cheese: Stir 4-6 spoonfuls of grated Swiss cheese into the eggs along with the enrichment butter at the end.

Soup rocks!

Thursday, August 19, 2010

The following picture only slightly relates to food since the two painted pebbles on the left are of a chilli and a cupcake. This was a craft project I did several years ago for a Malaysian home and interiors magazine article.
Pet rocks
I was reminded of these pebbles when I was reading about "rock soup". The name of the dish comes from the fable about a returning soldier and how he managed to get all the villagers to contribute their few bits of ingredients to make a big pot of soup that fed everyone. Nice story: here's one version.

The dish may have got its name from that fable and is a soup where you just put in anything ­­– there's no real recipe. I saw some pictures of it and they looked so delicious, I couldn't wait to make a pot for myself – and believe me, when it comes to soups, I can finish a whole pot on my own!

Is it a soup, is it a stew, is it a chilli? You decide.
My stone soup is basically cobbled together from leftovers. 

First, there's a little bit of meatloaf I had made for sandwiches. In it was minced beef, rolled oats, carrots and onions held together with eggs. There was also heat to it since there was some cayenne pepper in it.

There had to be some protein and fibre in the soup so the night before, I soaked some adzuki beans. No homemade broth, so it was just water and a beef stock cube. I had a single potato left in the vegetable basket so that was cubed and thrown into the pot.

Finally, as the soup came to the boil, I added dried rigatoni directly to the pot. The starch from the pasta helped to thicken it.

There was enough for two, but I didn't share.

Rose, rose, I love you

Sunday, August 15, 2010

ORANGE BLOSSOM 
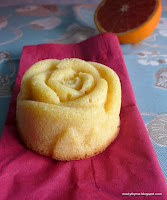
Being a sucker for pretty cake pans, I got a six-cup Silicone rose cake mould the last time I was at the baking supply shop. This one seems a bit flimsy for the oven, unlike another Silicone mould I have which is firm and doesn't need to be supported by a baking sheet. But what the hey, let's give it a try. 

Do this even with Silicone bakeware
As you can see from the picture, there was nothing wrong with the pan.

This cake uses the principle of a 1-2-3-4 cake: 1 cup butter, 2 cups flour, 3 cups sugar and 4 eggs – basically, the same weight of all the main ingredients. (This LA Times article explains it; with recipes.) The recipe lends itself well to variations and here flour is substituted with almond meal (ground almonds), one less egg is used and orange juice is added.

The original recipe lists the quantities in pounds, ounces and pints. I've done metric conversions and rounded up the numbers because 57g or 94ml seems random. This recipe is quite forgiving and as long as all the figures are consistent, it should be all right. (I include Julia Child's original numbers in brackets, just in case.)

Oh, and don't be foolish (like someone ;-p) and think that a Silicone mould doesn't heat up in the oven. Try grabbing it with a bare hand and you may not have fingerprints left!


GÂTEAU À L'ORANGE ET AUX AMANDES
(Orange and Almond Spongecake)
Adapted from Mastering the Art of French Cooking by Julia Child et al. Mrs Child made this cake in a round tin 9 inches (22cm) in diameter and 1½ inches (4cm) high. I used six silicone ½-cup cake moulds in the shape of roses and two small ramekins.
Serves 8

120g (¼ pound) butter, melted
120g (4 oz) granulated sugar (or caster sugar)
3 egg yolks
Grated rind of 1 orange
100ml (⅛ pt) strained orange juice
¼ tsp almond extract (only if you like the taste; can be left out or substituted with vanilla extract)
120g (4 oz) ground almonds
60g (2 oz) sifted cake flour (or plain flour)
  • Butter and flour eight ½-cup ­­cake moulds. Preheat oven to 180°C.
  • Gradually beat the sugar with the egg yolks and continue beating until the mixture is thick, pale yellow and forms a ribbon. Add the grated orange rind, orange juice and almond extract. Beat for a moment or two until mixture is light and foamy. Then beat in the almonds and finally the flour.
3 egg whites
Pinch of salt
1 tablespoon caster sugar
  • Beat the egg whites and salt together in a separate bowl until soft peaks are formed; sprinkle on the sugar and beat until stiff peaks are formed.
* * *
  • Using a rubber spatula, fold the cool melted butter into the cake mixture, omitting milky white residue at bottom of butter pan. Stir ¼ of the egg whites into the mixture; delicately fold in the rest.
  • Immediately turn into prepared moulds and run the mixture up to the rim all around. Bake in the middle of the preheated oven for 22-25 minutes for the mini cakes (of you use a large cake tin, give the cake 30-35 minutes). The cakes are done when they have puffed, browned lightly, tops are springy when pressed and a needle (skewer or toothpick) plunged into the centre comes out clean.
  • Remove to a cake rack and allow to stand 10 minutes, until cakes begin to shrink from sides of moulds. Remove and cool completely on the rack.
  • Serve dusted with icing sugar.
PRINTABLE RECIPE

Seedy and cereal-ised

Thursday, August 12, 2010

Rye grains (left) and buckwheat
The buckwheat grains may have turned my head but the rye didn't get a second glance. How wrong I was to dismiss something for the way it looks.

No, they certainly didn't look like much, but look at what they did for this bread. They turned it into a hearty and healthy loaf ­­– one hunky toasted slice with a spread of Marmite made me a good breakfast.

Cracklin'
I was mistaken that buckwheat was a grain cereal. Actually it's a fruit seed and is ideal for those allergic to the gluten in wheat. (A bit more on buckwheat here.)

Rye, as we're probably aware, is a type of grass. Bread made from rye flour is dense and delicious, but I'm not always successful with it. By adding just the grain to bread dough, I still get the health benefits and of course, there's the nice texture and chewiness from the grains.

I think it's important to toast the rye and buckwheat before cooking as that gives them a better flavour. A topping of seeds and rolled oats gives the bread a lovely crunch as well. I shaped this loaf in a Pullman loaf pan (right) and that's why the top is flat.

In the Malaysian climate, this bread will be good only for a day if kept outside the fridge even in an air-tight container.

I am submitting this to YeastSpotting.

MULTI-GRAIN BREAD
Makes 1 loaf

¼ cup (50g) buckwheat
¼ cup (50g) rye grain
2¼ cup (335g) bread flour
½ cup (80g) wholemeal flour
¼ cup (40g) milk powder
2 teaspoons salt
2 tablespoons honey
30g butter, melted
3 teaspoons (10g) instant dry yeast
About 1 cup (250ml) warm water

Topping
1 egg yolk
1 teaspoon milk
1 teaspoons sesame seed
½ teaspoon blue poppy seeds
1 tablespoon sunflower seeds
1 tablespoon rolled oats
  • Toast buckwheat and rye grain separately in a dry pan over medium heat. Place both grains in a saucepan and pour in 1½ cups of water. Bring to the boil and simmer until grains are soft, 10-15 minutes. Drain and cool.
  • Sift flours, milk powder and salt into the bowl of an electric mixer attached with a dough hook.* Mix in honey and melted butter. Add yeast and cooked grains. Turn on mixer on low and gradually add warm water to form a soft, wet dough. Cover the bowl and allow dough to rest for 10 minutes. 
  • After resting time, knead on medium for 7-10 minutes until dough is smooth and elastic. The dough will still be a little sticky; use greased hands to remove it from the bowl and form into a round ball. Grease the bowl and return the dough to the bowl. Cover and stand in a warm place until dough has doubled in size.
* Alternatively, this process can be done by hand, mixing the dry and wet ingredients with a wooden spoon, then kneading on a lightly floured surface.
  • Punch down dough and knead until smooth. Form into a ball and rest for 5 minutes. Shape dough into a rectangle with the shorter side nearest to you. Fold the top third into the middle and then the bottom third over that like a letter. Pinch seams together and place dough, seam side down, into a greased 11cm by 20cm loaf pan. (Or, form the dough into your preferred shape and place on a greased baking tray.) Cover and stand in a warm place until risen. Preheat oven at 200°C 30 minutes before baking time.
  • Brush dough with combined egg yolk and milk; sprinkle evenly with combined seeds and oats for topping.** Bake about 45 minutes.
** Use any seed or grain you like.

PRINTABLE RECIPE

Live Ade

Thursday, August 5, 2010

Double, double toil and trouble;
Fire burn and cauldron bubble.
This ginger beer is from Nigel Slater's Classic Ginger Beer recipe which appeared in The Observer. I didn't think you could make fizzy drinks from scratch at home, and was pleasantly surprised to see the bubbles. It happened a couple of days after it was brewed and the source of the effervescence is yeast, an ingredient I never thought would be used in making ginger beer.

What I didn't reckon on was the alcoholic content in this homemade brew!

But of course! I make bread, I should have realised that yeast reacts with sugar and creates carbon dioxide and alcohol. No wonder I felt woozy after gulping down a whole glass, expecting it to be just like any other refreshing fruitade.

It's not potently alcoholic, but for someone who hardly imbibes, it went straight to my head.

In Toast, Nigel Slater talks about waiting for the man who sells pop and that his second favourite drink is cream soda. I can't remember if he mentions ginger beer in his memoir, but if cream soda is like drinking a sponge cake, as he says, this ginger beer is like drinking Asia ­­– ginger, lemongrass, cloves...

This recipe does not involve toil and trouble or burning fires under cauldrons: Place lemons, fresh ginger, cloves, cream of tartar and sugar in a large bowl; pour in boiling water. Wait till the mixture cools down enough to add the dried yeast. Leave overnight before straining and bottling. Allow to mature for two or three days.

Mr Slater suggests the option of adding lemongrass, which I did. That gave it an extra level of tang. He didn't say to squeeze the lemons before straining, but I did that too. The result was a lemony flavour together with the ginger and lemongrass. I won't do that next time ­­– the taste of ginger should dominate.

One addition that I think is necessary is salt. Pour yourself a glass of ginger beer and add a pinch of salt to it ­­– it's subtle but I think you will be able to appreciate the difference in taste. There are people who like to add a pinch of salt to their Coke, swearing that this makes the drink fizzier. I just think salt, even a small amount, makes anything taste good. My mother doesn't call me Salty Mama for nothing.

Something's fishy going on

Tuesday, August 3, 2010

Clockwise from top left: The whole can; the open can - looks like leather;
Can we eat this?
Fried dace in a can is one of those things, like raw streaky bacon, that may not look very appetising but is a good example of not judging a book by its cover.

Yaki onigiri with fried dace
I made yaki onigiri (grilled crusty sushi patties) with fried dace for the August Don't Call Me Chef (unfortunately, something's wrong with the pdf file, so here's the link to a temporary docx file) challenge using canned food. I had earlier made some fried rice with French beans with half of the dace and ate it all in one meal!
Fried rice with tinned dace and French beans
This month, my co-producers Veggie Chick, Hungry Caterpillar and I decided to ask some bloggers about their favourite canned food. I invited my sister The Kitchen Boss who likes to use canned tuna and has a delicious looking recipe for Simple Skinny Tuna Salad, and Jeannie, whom I have only communicated with through our respective blogs before – she did a fantastic job with her Sardine Calzone.

Me, I have had quite a bit of writing to do that I wasn't up to trying other dishes containing canned food. Sorry...