
 |
| GUIDE TO HOMEMADE RAVIOLI. |

 The theme for January's Don't Call Me Chef column (it is out in print today; link to the pdf
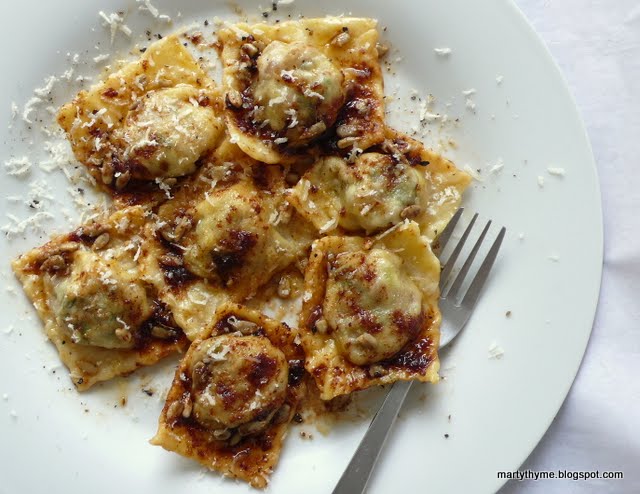
 A ravioli mould makes perfectly shaped pasta (the one pictured right makes 3.5cm by 3.5cm pasta) but handmade ravioli like the ones in the picture at the top of the post* look rustic and good enough to eat. Instead of cutting into squares, you can also use a round fluted cookie cutter. It's what you put in it and on it that matters, and the choices are endless.
I first learned how to make pasta – from the dough recipe to rolling and shaping by hand and with a machine – from the Dorling Kindersley 101 Essential Tips series on Pasta. It's no Italian mamma, but the tips are pretty good. Buon Appetito!
FRESH EGG PASTA DOUGH
Makes 500g
300g durum/semolina flour
Salt
3 medium free-range eggs
1 tbsp oil
- Combine flour with a pinch of salt and mound on a work surface. Make a well in the centre and add eggs and oil. Using a fork, draw in the flour gradually, working it into the liquids (Pix 1).

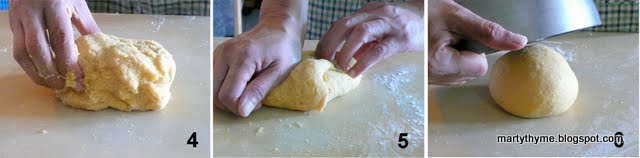
- When the mixture looks like crumbly wet sand (Pix 2), use the fingertips of one hand to pull the mixture together to form a dough (Pix 3); if sticky, add flour a little at a time. Gather the mixture into a rough ball (Pix 4).
- Lightly flour the work surface and knead dough until elastic and smooth, 7-10 minutes (Pix 5).
- Form dough into a ball and cover with a bowl (Pix 6). Allow to rest for 1 hour at room temperature before rolling out.
Italian pasta cooks use a traditional rolling pin that has no handles and is 80cm long. The extra length is useful since the dough covers a large area when rolled out. You can get them at specialist bake shops. My homemade rolling pin is sawn off from a thick wooden curtain rod.
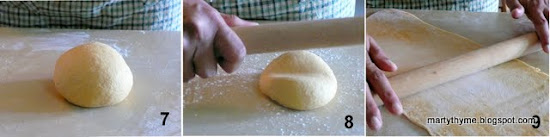


- Before beginning to roll, knead dough briefly on a floured surface. Form the dough into a ball (Pix 7).
- Sprinkle surface with flour. Place ball of dough on work surface and flatten it slightly with rolling pin (Pix 8). Begin rolling out dough, turning and moving it all the time to prevent sticking.
- Continue rolling, pressing dough away from you, not pushing down, and always rolling in just one direction. Sprinkle work surface and rolling pin generously with flour as you work (Pix 9).
- Keeping even pressure on rolling pin, carry on rolling until dough is almost transparent. If rolling pin is not long enough, divide dough into three and roll each piece separately. Keep other pieces wrapped in plastic.
- When the pasta dough has been rolled out as thinly as possible (for ravioli, the pasta should be no more than 1.5mm thick), leave to dry on a floured surface until it acquires a leathery look, 5-10 minutes, before cutting or filling as desired.

- Cut the pasta into 2 equal rectangles. Place small mounds (about 1 tsp) of filling on dough, spaced 4cm apart (Pix 10). Brush around filling with beaten egg or water (Pix 11).
- Lay second rectangle on. Press gently around each mound of filling to seal the layers and ensure there are no air pockets around the fillings (Pix 12).
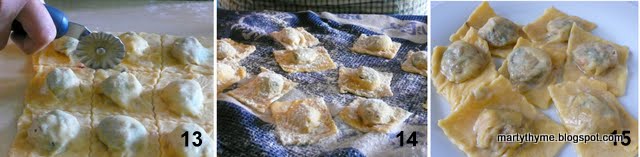
- With fluted pastry cutter or large chef's knife, cut between the mounds to separate rectangle into equal sized squares (Pix 13). Place on floured tea towel to dry for 1-2 hours (Pix 14). Cook fresh pasta immediately or store in the refrigerator and cook within one day.
- To cook, add ravioli in batches to a pot of boiling salted water. When they float, they are done (Pix 15). Divide the pasta among four plates and pour the sauce over the ravioli (main pix, top*).
Wow very nice but lots of work lol! Enjoyed reading your article in the Star. Nice work!
ReplyDeleteSpinach and cheese ravioli and butternut squash ravioli with sage butter are two of my favourite meals. Great article!
ReplyDeleteThanks Jeannie! Lot of work, but truly enjoyable.
ReplyDeleteThanks JWeitz. I wish butternut squash wasn't so expensive here. I would definitely use it often if I could afford it all the time.